


Web scraping has become essential for data analysts and developers who need to collect data from dynamic websites. However, traditional scraping methods can’t deal with sites that rely heavily on JavaScript to render content. This is where Selenium comes in handy.
In this comprehensive guide, I’ll walk you through the process of using Selenium for web scraping step by step.
By the end, you’ll be able to scrape dynamic sites efficiently and understand how to leverage ScraperAPI’s proxy mode and rendering features to streamline your scraping tasks.
In this guide, you will learn how to:
- Set up and install Selenium for web scraping
- Perform tasks such as taking screenshots, scrolling, and clicking on elements
- Use Selenium in conjunction with BeautifulSoup for more efficient data extraction
- Handle dynamic content loading and infinite scrolling
- Identify and navigate around honeypots and other scraping obstacles
- Implement proxies to avoid IP bans and improve scraping performance
- Render JavaScript-heavy sites without relying solely on Selenium
Now, let’s dive into Selenium web scraping and unlock the full potential of automated data collection!
What is Selenium?
Selenium is a powerful browser automation tool that goes beyond its original purpose of testing web applications. It has become an essential tool for web scraping, especially when dealing with dynamic websites.
Unlike traditional scraping methods that only fetch static HTML, Selenium interacts with web pages in real time, mimicking the actions of a real user. This ability to automate tasks like scrolling, clicking, and filling out forms makes Selenium ideal for scraping data from modern websites. Whether you’re working with pages that use infinite scrolling, dynamic content loading, or complex interactive elements, Selenium bridges the gap between static web scraping tools and the dynamic demands of JavaScript-driven sites.
Is Selenium good for web scraping?
Challenges like JavaScript-rendered content, infinite scrolling, and interactive elements can make web scraping tricky; this is where Selenium shines. Simulating real user behavior in a browser allows you to extract data from websites that traditional scraping tools can’t handle effectively.
This flexibility has its trade-offs; Selenium’s full-page rendering and interactive capabilities can make it slower and more resource-intensive compared to lightweight alternatives like BeautifulSoup or Scrapy. Combining Selenium with tools like ScraperAPI for larger projects can help manage proxies, bypass IP bans, and optimize performance.
Ultimately, Selenium is a powerful choice when the data you need is hidden behind dynamic elements or requires advanced interaction, making it an indispensable tool for navigating the complexities of modern web scraping.
Project Requirements
Before starting with Selenium web scraping, ensure you have the following:
- Python installed on your machine (version 3.10 or newer)
pip(Python package installer)- A web driver for your chosen browser (e.g., ChromeDriver for Google Chrome)
Installation
First, you need to install Selenium. You can do this using pip:
pip install selenium
Next, download the web driver for your browser. For example, download ChromeDriver for Google Chrome and ensure it’s accessible from your system’s PATH.
Importing Selenium
Begin by importing the necessary modules:
1. webdriver: This is the main module of Selenium that provides all the WebDriver implementations. It allows you to initiate a browser instance and control its behavior programmatically.
from selenium import webdriver
2. By: The By class is used to specify the mechanism to locate elements within a webpage. It provides various methods like ID, name, class name, CSS selector, XPath, etc., which are crucial for finding elements on a webpage.
from selenium.webdriver.common.by import By
3. Keys: The Keys class provides special keys that can be sent to elements, such as Enter, Arrow keys, Escape, etc. It is useful for simulating keyboard interactions in automated tests or web scraping.
from selenium.webdriver.common.keys import Keys
4. WebDriverWait: This class is part of Selenium’s support UI module (selenium.webdriver.support.ui) and allows you to wait for a certain condition to occur before proceeding further in the code. It helps in handling dynamic web elements that may take time to load.
from selenium.webdriver.support.ui import WebDriverWait
5. expected_conditions as EC: The expected_conditions module within Selenium provides a set of predefined conditions that WebDriverWait can use. These conditions include checking for an element’s presence, visibility, clickable state, etc.
from selenium.webdriver.support import expected_conditions as EC
These imports are essential for setting up a Selenium automation script. They provide access to necessary classes and methods to interact with web elements, wait for conditions, and simulate user actions on web pages effectively.
Setting Up the Web Driver
Initialize the web driver for your browser and configure options if needed:
chrome_options = webdriver.ChromeOptions()
# Add any desired options here, for example, headless mode:
# chrome_options.add_argument("--headless")

driver = webdriver.Chrome(options=chrome_options)
This setup allows you to customize the Chrome browser’s behavior through chrome_options.
For example, you can run the browser in headless mode by uncommenting the --headless option. This means everything happens in the background, and you don’t see the browser window pop up.
Now, let’s get into scraping!
TL;DR: Selenium Scraping Basics
Here’s a quick cheat sheet to get you started with Selenium web scraping. Here, you’ll find essential steps and code snippets for common tasks, making it easy to jump straight into scraping.
Visiting a Site
To open a website, use the get() function:
driver.get("https://www.google.com")
Taking a Screenshot
To take a screenshot of the current page, use the save_screenshot() function:
driver.save_screenshot('screenshot.png')
Scrolling the Page
To scroll down the page, use the execute_script() function to scroll down to entire height of the page:
driver.execute_script("window.scrollTo(0, document.body.scrollHeight);")
Clicking an Element
To click on an element (e.g., a button), use the find_element() function to locate the element, then call the click() function on the element:
button = driver.find_element(By.ID, "button_id")
button.click()
Waiting for an Element
To wait for an element to become visible:
element = WebDriverWait(driver, 10).until(
  EC.visibility_of_element_located((By.ID, "element_id"))
  )
Handling Infinite Scrolling
To handle infinite scrolling, you can repeatedly scroll to the bottom of the page until no new content loads:
last_height = driver.execute_script("return document.body.scrollHeight")
while True:
    driver.execute_script("window.scrollTo(0, document.body.scrollHeight);")
    time.sleep(2)  # Wait for new content to load
    new_height = driver.execute_script("return document.body.scrollHeight")
    if new_height == last_height:
        break
    last_height = new_height
Combining Selenium with BeautifulSoup
For more efficient data extraction, you can use BeautifulSoup alongside Selenium:
from bs4 import BeautifulSoup

html = driver.page_source
soup = BeautifulSoup(html, 'html.parser')

# Now you can use BeautifulSoup to parse the HTML content like normal
By following these steps, you can handle the most common web scraping tasks using Selenium.
If you want to dive deeper into web scraping with selenium, keep reading!
How to Use Selenium for Web Scraping
Step 1: Configuring ChromeOptions
To customize how Selenium interacts with the Chrome browser, start by configuring ChromeOptions:
chrome_options = webdriver.ChromeOptions()
This sets up chrome_options using webdriver.ChromeOptions(), allowing us to tailor Chrome’s behavior when controlled by Selenium.
Optional: Customizing ChromeOptions
You can further customize ChromeOptions. For instance, add the line below to enable headless mode:
chrome_options.add_argument("--headless")
Enabling headless mode (--headless) runs Chrome without a visible user interface, which is perfect for automated tasks where you don’t need to see the browser.
Step 2: Initializing WebDriver with ChromeOptions
Next, initialize the Chrome WebDriver with the configured ChromeOptions:
driver = webdriver.Chrome(options=chrome_options)
This line prepares Selenium to control Chrome based on the specified options, setting the stage for automated interactions with web pages.
Step 3: Navigating to a Website
To direct the WebDriver to the desired URL, use the get() function. This command tells Selenium to open and load the webpage, allowing you to start interacting with the site.
driver.get("https://google.com/")
After you’re done with your interactions, use the quit() method to close the browser and end the WebDriver session.
driver.quit()
In summary, get() loads the specified webpage, while quit() closes the browser and terminates the session, ensuring a clean exit from your scraping tasks.
Step 4: Taking a Screenshot
To screenshot the current page, use the save_screenshot() function. This can be useful for debugging or saving the state of a page.
driver.save_screenshot('screenshot.png')
This takes a screenshot of the page and saves it in an image called screenshot.png.
Step 5: Scrolling the Page
Scrolling is essential for interacting with dynamic websites that load additional content as you scroll. Selenium provides the execute_script() function to run JavaScript code within the browser context, enabling you to control the page’s scrolling behavior.
Scrolling to the Bottom of the Page
To scroll down to the bottom of the page, you can use the following script. This is particularly useful for loading additional content on dynamic websites.
driver.execute_script("window.scrollTo(0, document.body.scrollHeight);")
This JavaScript code scrolls the browser window to the height of the document body, effectively moving to the bottom of the page.
Scrolling to a Specific Element
If you want to scroll to a specific element on the page, you can use the scrollIntoView() method. This is useful when interacting with elements not visible in the current viewport.
element = driver.find_element(By.ID, "element_id")
driver.execute_script("arguments[0].scrollIntoView(true);", element)
This code finds an element by its ID and scrolls the page until the element is in view.
Handling Infinite Scrolling
For pages that continuously load content as you scroll, you can implement a loop to scroll down repeatedly until no more new content is loaded. Here’s an example of how to handle infinite scrolling:
import time

last_height = driver.execute_script("return document.body.scrollHeight")

while True:
    driver.execute_script("window.scrollTo(0, document.body.scrollHeight);")
    time.sleep(2)  # Wait for new content to load
    new_height = driver.execute_script("return document.body.scrollHeight")
    if new_height == last_height:
        break
    last_height = new_height
This loop scrolls to the bottom of the page, waits for new content to load, and checks if the scroll height has increased. If the height remains the same, it breaks out of the loop, indicating that no more content is loading.
Scrolling Horizontally
In some cases, you might need to scroll horizontally, for example, to interact with elements in a wide table. Use the following script to scroll horizontally:
driver.execute_script("window.scrollBy(1000, 0);")
This code scrolls the page 1000 pixels to the right. Adjust the value as needed for your specific use case.
These scrolling techniques with Selenium ensure all necessary content is loaded and accessible for interaction or scraping. These methods are essential for effectively navigating and extracting data from dynamic websites.
Step 6: Interacting with Elements
Interacting with web page elements often involves clicking buttons or links and inputting text into fields before scraping their content.
Selenium provides various strategies to locate elements on a page using the By class and the find_element() and find_elements() methods.
Here’s how you can use these locator strategies to interact with elements:
Locating Elements
Selenium offers multiple ways to locate elements on a webpage using the find_element() method for a single element and the find_elements() method for various elements:
- By ID: Locate an element by its unique ID attribute.
driver.find_element(By.ID, "element_id")
- By Name: Locate an element by its name attribute.
driver.find_element(By.NAME, "element_name")
- By Class Name: Locate elements by their CSS class name.
driver.find_element(By.CLASS_NAME, "element_class")
- By Tag Name: Locate elements by their HTML tag name.
driver.find_element(By.TAG_NAME, "element_tag")
- By Link Text: Find hyperlinks by their exact visible text.
driver.find_element(By.LINK_TEXT, "visible_text")
- By Partial Link Text: Locate hyperlinks by a partial match of their visible text.
driver.find_element(By.PARTIAL_LINK_TEXT, "partial_text")
- By CSS Selector: Use CSS selectors to locate elements based on CSS rules.
driver.find_element(By.CSS_SELECTOR, "css_selector")
- By XPath: Locate elements using their XPATH. XPath is a powerful way to locate elements using path expressions.
driver.find_element(By.XPATH, "xpath_expression")
Clicking an Element
To click on an element, locate it using one of the strategies above and then use the click() method.
# Example: Clicking a button by ID
button = driver.find_element(By.ID, "button_id")
button.click()

# Example: Clicking a link by Link Text
link = driver.find_element(By.LINK_TEXT, "Click Here")
link.click()
Typing into a Textbox
To input text into a field, locate the element and use the send_keys() method.
# Example: Typing into a textbox by Name
textbox = driver.find_element(By.NAME, "username")
textbox.send_keys("your_username")

# Example: Typing into a textbox by XPath
textbox = driver.find_element(By.XPATH, "//input[@name='username']")
textbox.send_keys("your_username")
Retrieving Text from an Element
Locate the element’s text content and use the text attribute to get the text content.
# Example: Retrieving text by Class Name
element = driver.find_element(By.CLASS_NAME, "content")
print(element.text)

# Example: Retrieving text by Tag Name
element = driver.find_element(By.TAG_NAME, "p")
print(element.text)
Getting Attribute Values
After locating the element, use the get_attribute() method to retrieve attribute values, such as URLs, from anchor tags.l
# Example: Getting the href attribute from a link by Tag Name
link = driver.find_element(By.TAG_NAME, "a")
print(link.get_attribute("href"))

# Example: Getting src attribute from an image by CSS Selector
img = driver.find_element(By.CSS_SELECTOR, "img")
print(img.get_attribute("src"))
You can effectively interact with various elements on a webpage using these locator strategies provided by Selenium’s By class. Whether you need to click a button, enter text into a form, retrieve text, or get attribute values, these methods will help you efficiently automate your web scraping tasks.
Step 7: Identifying Honeypots
Honeypots are elements deliberately hidden from regular users but visible to bots. They are designed to detect and block automated activities like web scraping. Selenium allows you to detect and avoid interacting with these elements effectively.
You can use CSS selectors to identify elements hidden from view using styles like display: none; or visibility: hidden;. Selenium’s find_elements method with By.CSS_SELECTOR is handy for this purpose:
elements = driver.find_elements(By.CSS_SELECTOR, '[style*="display:none"], [style*="visibility:hidden"]')
for element in elements:
    if not element.is_displayed():
        continue  # Skip interacting with honeypot elements
Here, we check if the element is not displayed on the webpage using the is_displayed() method. This ensures that interactions are only performed with elements intended for user interaction, thus bypassing potential honeypots.
A common form of honeypot is a disguised button element. These buttons are visually hidden from users but exist within the HTML structure of the page:
<button id="fakeButton" style="display: none;">Click Me</button>
In this scenario, the button is intentionally hidden. An automated bot programmed to click all buttons on a page might interact with this hidden button, triggering security measures on the website. Legitimate users, however, would never encounter or engage with such hidden elements.
Using Selenium, you can effectively navigate around these traps by verifying the visibility of elements before interacting with them. As previously mentioned, the is_displayed() method confirms whether an element is visible to users. Here’s how you can implement this safeguard in your Selenium script:
from selenium import webdriver

# Set your WebDriver options
chrome_options = webdriver.ChromeOptions()

# Initialize the WebDriver
driver = webdriver.Chrome(options=chrome_options)

# Navigate to a sample website
driver.get("https://example.com")

# Locate the hidden button element
button_element = driver.find_element_by_id("fakeButton")

# Check if the element is displayed
if button_element.is_displayed():
    # Element is visible; proceed with interaction
    button_element.click()
else:
    # Element is likely a honeypot, skip interaction
    print("Detected a honeypot element, skipping interaction")

# Close the WebDriver session
driver.quit()
Things to note when identifying and avoiding honeypots:
- Always use
is_displayed()to check if an element is visible before interacting with it, distinguishing between real UI elements and hidden traps like honeypots - When automating interactions (like clicks or form submissions), ensure your script avoids accidentally interacting with hidden or non-visible elements
- Follow website rules and legal guidelines when scraping data to stay ethical and avoid getting flagged by website security measures
By integrating these practices into your Selenium scripts, you enhance their reliability and ethical compliance, safeguarding your automation efforts while respecting the intended use of web resources.
Step 8: Waiting for Elements to Load
Dynamic websites often load content asynchronously, which means elements may appear on the page after the initial page load.
To avoid errors in your web scraping process, it’s crucial to wait for these elements to appear before interacting with them. Selenium’s WebDriverWait and expected_conditions allow us to wait for specific conditions to be met before proceeding.
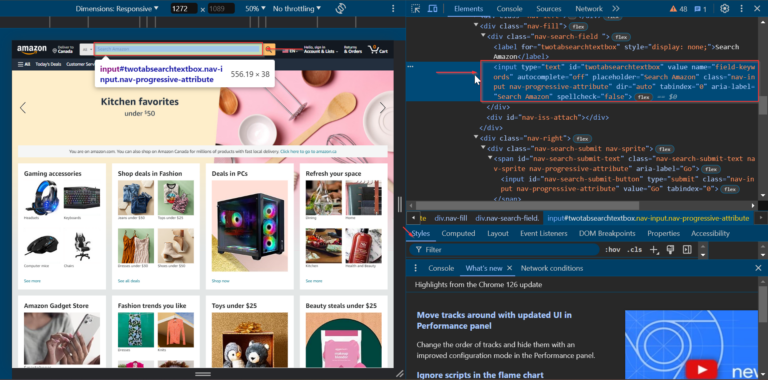
In this example, I’ll show you how to wait for the search bar to load on Amazon’s homepage, perform a search, and then extract the ASINs of Amazon products in the search results.
To begin, we’ll locate the search bar element on the homepage. Navigate to Amazon, right-click on the search bar, and select “Inspect” to open the developer tools.
We can see that the search bar element has the id of twotabsearchtextbox.
Let’s start by setting up our Selenium WebDriver and navigating to Amazon’s homepage.
from selenium import webdriver
from selenium.webdriver.common.by import By
from selenium.webdriver.support.ui import WebDriverWait
from selenium.webdriver.support import expected_conditions as EC
import time

# Set up the web driver
chrome_options = webdriver.ChromeOptions()

# Uncomment the line below to run Chrome in headless mode
# chrome_options.add_argument("--headless")
driver = webdriver.Chrome(options=chrome_options)

# Open Amazon's homepage
driver.get("https://amazon.com/")
Next, use WebDriverWait to wait for the search bar element to be present before interacting with it. This ensures that the element is fully loaded and ready for interaction.
# Wait for the search bar to be present
search_bar = WebDriverWait(driver, 10).until(
    EC.presence_of_element_located((By.ID, "twotabsearchtextbox"))
)
Next, enter your search term into the search bar using the send_keys() method and submit the form using the submit() method. In this example, we’ll search for headphones.
# Perform a search for "headphones"
search_bar.send_keys("headphones")

# Submit the search form (press Enter)
search_bar.submit()
Include a short wait using the time.sleep() method to ensure that the search results page has enough time to load.
# Wait for the search results to load
time.sleep(10)
After the search results have loaded, extract the ASINs of the products in the search results. We’ll use BeautifulSoup to parse the page source and extract the data.
from bs4 import BeautifulSoup

html = driver.page_source
soup = BeautifulSoup(html, 'html.parser')
products = []

# Extract product ASINs
productsHTML = soup.select('div[data-asin]')
for product in productsHTML:
    if product.attrs.get('data-asin'):
        products.append(product.attrs['data-asin'])

print(products)
Finally, close the browser and end the WebDriver session.
# Quit the WebDriver
driver.quit()
Putting it all together, the complete code looks like this:
import time
from bs4 import BeautifulSoup
from selenium import webdriver
from selenium.webdriver.common.by import By
from selenium.webdriver.support.ui import WebDriverWait
from selenium.webdriver.support import expected_conditions as EC

# Set up the web driver
chrome_options = webdriver.ChromeOptions()
# Uncomment the line below to run Chrome in headless mode
# chrome_options.add_argument("--headless")
driver = webdriver.Chrome(options=chrome_options)

# Open Amazon's homepage
driver.get("https://amazon.com/")

# Wait for the search bar to be present
search_bar = WebDriverWait(driver, 10).until(
    EC.presence_of_element_located((By.ID, "twotabsearchtextbox"))
)

# Perform a search for "headphones"
search_bar.send_keys("headphones")

# Submit the search form (press Enter)
search_bar.submit()

# Wait for the search results to load
time.sleep(10)

# Extract product ASINs
html = driver.page_source
soup = BeautifulSoup(html, 'html.parser')
products = []

productsHTML = soup.select('div[data-asin]')
for product in productsHTML:
    if product.attrs.get('data-asin'):
        products.append(product.attrs['data-asin'])

print(products)

# Quit the WebDriver
driver.quit()
Now, you can effectively use WebDriverWait to handle dynamic elements and ensure they are loaded before interacting with them. This approach makes your web scraping scripts more reliable and effective.
For more information on what to do with Amazon Product ASINs after extracting them, check out this guide on how to run an Amazon competitive analysis.
Step 9: Export Scraped Data to a CSV File
Once you’ve extracted the product ASINs, you’ll want to save them for later use. Exporting your data to a CSV file is a simple and efficient way to store it. Let’s use Python’s csv module to write the ASINs into a file.
Here’s how:
import csv

# File name for the CSV
filename = "amazon_asins.csv"

# Write ASINs to CSV
with open(filename, mode="w", newline="", encoding="utf-8") as file:
    writer = csv.writer(file)
    writer.writerow(["ASIN"])  # Add a header row
    for asin in products:
        writer.writerow([asin])  # Write each ASIN to a new row

print(f"Data successfully exported to {filename}")
Now, the extracted ASINs are saved in a CSV file, making them easy to analyze or share with others.
Optional: Export Scraped Data to a JSON File [optional]
If you prefer JSON format for its compatibility with modern applications, here’s how to save the ASINs as a .json file:
import json

# File name for the JSON
filename = "amazon_asins.json"

# Write ASINs to JSON
with open(filename, mode="w", encoding="utf-8") as file:
    json.dump(products, file, indent=4)

print(f"Data successfully exported to {filename}")
Step 10: Clean Scraped Data for Analysis
Scraped data can often include duplicates or missing values, which can affect the accuracy of your analysis. Cleaning the data ensures it’s ready for further use. Here’s how to handle these common issues with Python’s pandas library:
1. Removing Duplicate Entries
Duplicates occur when the same ASIN appears multiple times in the scraped data. Removing duplicates ensures that each ASIN is unique.
import pandas as pd

# Load ASINs into a DataFrame
data = pd.DataFrame(products, columns=["ASIN"])

# Remove duplicate ASINs
data = data.drop_duplicates()

print(f"Number of unique ASINs: {data.shape[0]}")
The drop_duplicates() function identifies and removes duplicate rows, ensuring every ASIN in the dataset is unique.
2. Handling Missing Values
Sometimes, scraped data may have missing ASINs. It’s essential to handle these to maintain a clean dataset. There are two main approaches:
- Filling missing values with a placeholder.
- Dropping rows with missing values.
Here’s an example:
# Check for missing values
missing_count = data["ASIN"].isnull().sum()

if missing_count > 0:
    # Option 1: Drop rows with missing ASINs
    data = data.dropna(subset=["ASIN"])
    print(f"Dropped {missing_count} rows with missing ASINs.")
else:
    print("No missing values found.")
Dropping rows ensures that the dataset contains only valid entries.
Once duplicates are removed and missing values are handled, you can save the cleaned data:
# Save cleaned data to a CSV file
data.to_csv("cleaned_amazon_asins.csv", index=False)

print("Cleaned data saved to cleaned_amazon_asins.csv")
This simple cleaning process ensures your dataset is ready for accurate analysis or integration into other workflows.
Handle HTML Tables with Selenium
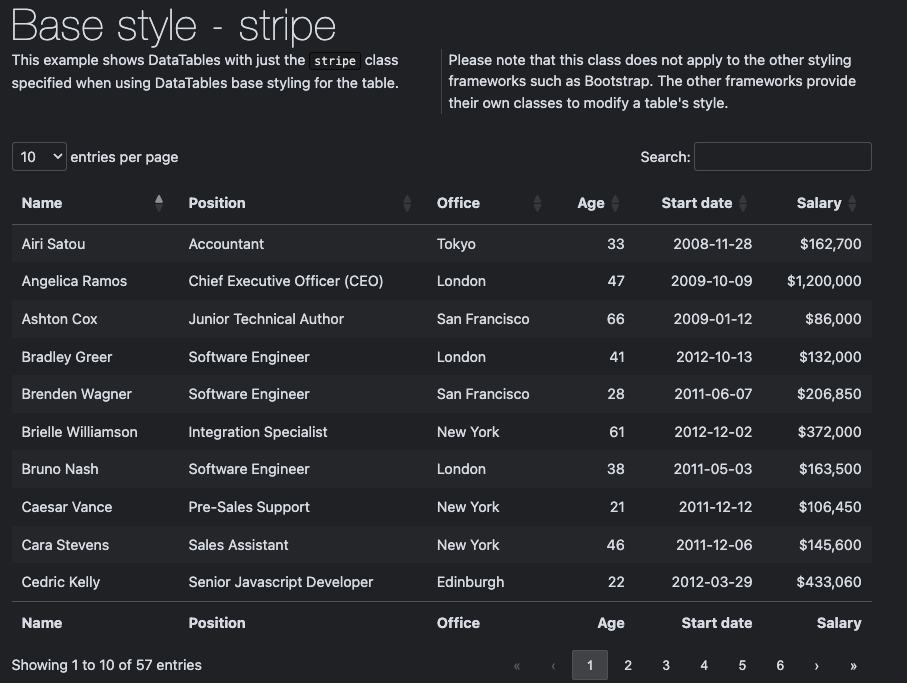
HTML tables, especially dynamic ones like those on DataTables, often use JavaScript for pagination, sorting, and filtering. To scrape all data across multiple pages, we must dynamically interact with the table and handle pagination programmatically.
Here’s how to do it:
Step 1: Load the Table and Extract Headers
First, we navigate to the webpage containing the table and locate the table element using its ID. We extract the headers to ensure the data is labeled correctly when we save it later.
from selenium import webdriver
from selenium.webdriver.common.by import By
from selenium.webdriver.support.ui import WebDriverWait
from selenium.webdriver.support import expected_conditions as EC

# Set up the web driver
driver = webdriver.Chrome()

# Navigate to the DataTables example page
driver.get("https://datatables.net/examples/styling/stripe.html")

# Locate the table and extract headers
table = driver.find_element(By.ID, "example")
headers = [header.text for header in table.find_elements(By.TAG_NAME, "th")]

print("Table Headers:", headers)
Code Breakdown:
- We are using
find_elementwith theBy.IDselector, we pinpoint the table by its unique ID (example). - We find all
<th>elements inside the table to get the column names, storing them in a list for later use.
Step 2: Extract Rows from the Current Page
Now, we grab the data rows that are currently visible in the table. Each row (<tr>) contains multiple cells (<td>), which we extract and store in a list.
# Initialize table data storage
table_data = []

# Extract rows from the current page
rows = table.find_elements(By.CSS_SELECTOR, "tbody tr")
for row in rows:
    # Extract all cells in the row
    cells = row.find_elements(By.TAG_NAME, "td")
    if cells:  # Skip empty rows
        table_data.append([cell.text for cell in cells])
Code Breakdown:
- We use
find_elementsto get all<tr>elements inside the<tbody>of the table. Each<tr>represents a data row. - For each row, we extract its
<td>elements (the data cells) and store their text content. - Some rows might not contain data; we use a condition (
if cells) to ignore them.
Step 3: Handle Pagination and Scrape All Pages
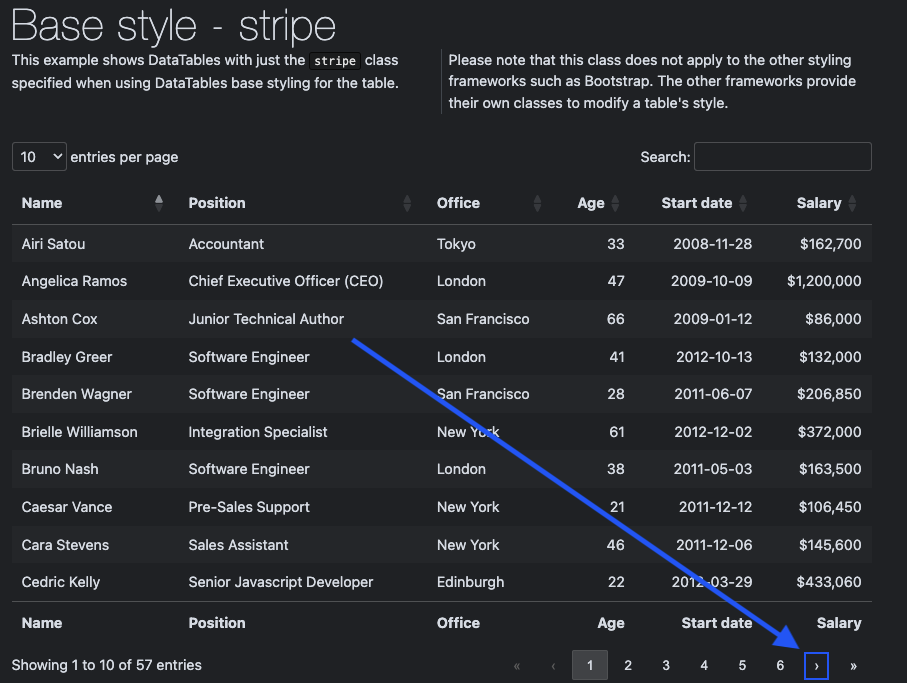
Dynamic tables often use pagination to show only a subset of rows at a time. We click the “Next” button to scrape all rows until we reach the last page.
from selenium.webdriver.support.ui import WebDriverWait
from selenium.webdriver.support import expected_conditions as EC

while True:
    # Extract rows from the current page
    rows = table.find_elements(By.CSS_SELECTOR, "tbody tr")
    for row in rows:
        cells = row.find_elements(By.TAG_NAME, "td")
        if cells:
            table_data.append([cell.text for cell in cells])

    # Check if the "Next" button is disabled
    try:
        next_button = driver.find_element(By.CSS_SELECTOR, ".dt-paging-button.next")
        if "disabled" in next_button.get_attribute("class"):
            print("Reached the last page.")
            break

        # Click the "Next" button
        next_button.click()

        # Wait for the new page to load
        WebDriverWait(driver, 10).until(
            EC.presence_of_all_elements_located((By.CSS_SELECTOR, "tbody tr"))
        )
    except Exception as e:
        print(f"Error while navigating: {e}")
        break

print(f"Total rows scraped: {len(table_data)}")
Code Breakdown:
- We repeat the same logic to extract rows and cells, appending them to the
table_datalist. - We use
find_elementto locate the button with the class.paginate_button.next. - If the button’s
classattribute contains “disabled,” we know we’ve reached the last page. - When the “Next” button is enabled, we click it to load the next page.
- We use
WebDriverWaitto ensure the rows on the next page have loaded before proceeding.
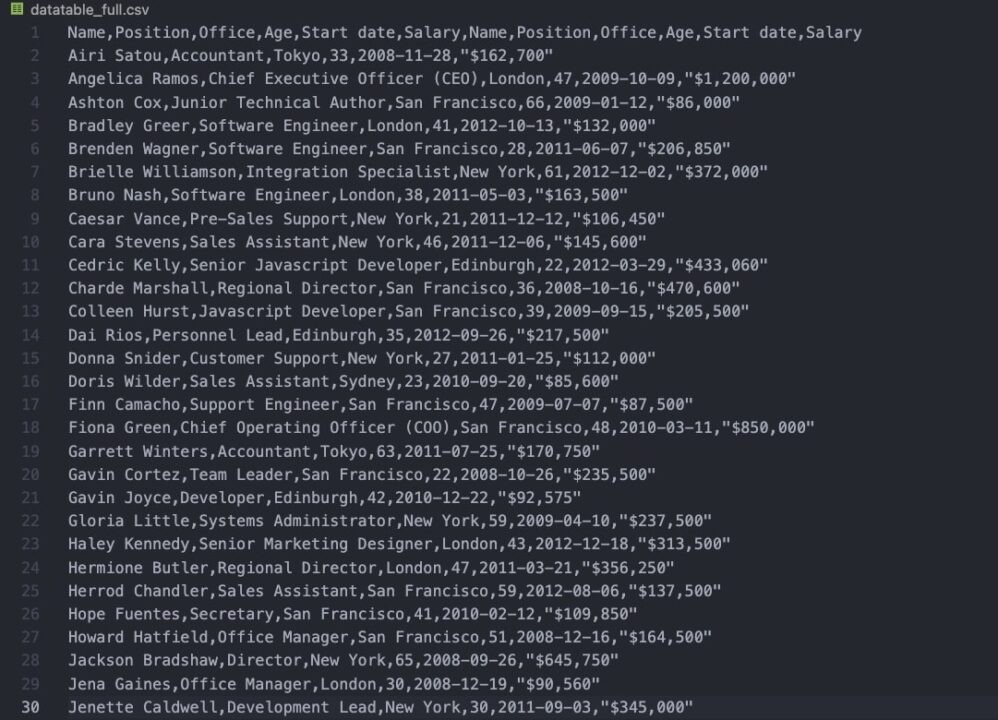
Step 4: Save Data to a CSV File
After scraping all rows across all pages, we save the data to a CSV file for analysis.
import csv

# Save the data to a CSV file
filename = "datatable_full.csv"
with open(filename, mode="w", newline="", encoding="utf-8") as file:
    writer = csv.writer(file)
    writer.writerow(headers)  # Write the headers
    writer.writerows(table_data)  # Write the rows

print(f"Data saved to {filename}")
Here’s how your file should look like (there should be a total of 60 rows scraped):
Scrape Data from Multiple Sources
Scraping websites like IMDb involves navigating dynamically loaded pages, extracting data from multiple elements, and saving it in a unified format for further analysis.
In this section, we’ll use Selenium to scrape IMDb’s top 100 movies and additional details for each movie. Here’s how to do it step by step:
Step 1: Set Up the Selenium WebDriver
First, we initialize the Selenium WebDriver and navigate to the IMDb page listing the top 100 movies sorted by user ratings.
from selenium import webdriver
from selenium.webdriver.common.by import By
import csv
import time

# Set up the driver
driver = webdriver.Chrome()
driver.get("https://www.imdb.com/search/title/?groups=top_100&sort=user_rating,desc")
Step 2: Extract the Main Movie Data
We extract the movie title, rating, and link on the main page for additional details.
# Locate movies
movies = driver.find_elements(By.CLASS_NAME, "ipc-metadata-list-summary-item")
data = []

for movie in movies:
    title = movie.find_element(By.CLASS_NAME, "ipc-title-link-wrapper")
    link = title.get_attribute("href")
    rating = movie.find_element(By.CLASS_NAME, "ipc-rating-star--rating").text
    data.append({"Title": title.text, "Link": link, "Rating": rating})

# Print the extracted data
print("Main data collected.")
Code Breakdown:
- Using find_elements with the ipc-metadata-list-summary-item class, we locate each movie block.
- For each movie, we:
- Get the title using the ipc-title-link-wrapper class.
- Extract the rating using the ipc-rating-star–rating class.
- Extract the hyperlink to the movie’s detailed page for additional data.
Step 3: Navigate to Each Movie’s Detail Page
Next, we visit each movie’s detail page to scrape additional information, like the description.
for movie in data:
    driver.get(movie["Link"])
    time.sleep(2)  # Wait for the page to load

    try:
        description = driver.find_element(By.CSS_SELECTOR, ".sc-3ac15c8d-3.bMUzwm").text
        movie["Description"] = description
    except:
        movie["Description"] = "N/A"
        print(f"Error while extracting description for {movie['Title']}")
Code Breakdown:
- Use the Link captured earlier to visit each movie’s detail page.
- Use the CSS selector .sc-3ac15c8d-3.bMUzwm to locate the movie’s description.
- If the selector is missing or fails to load, we store “N/A” as the description and log an error.
Step 4: Save Data to a CSV File
Once all the data is collected, we save it to a CSV file for further use.
# Save to CSV
filename = "imdb_top_100.csv"
with open(filename, mode="w", newline="", encoding="utf-8") as file:
    writer = csv.DictWriter(file, fieldnames=["Title", "Rating", "Description", "Link"])
    writer.writeheader()
    writer.writerows(data)

print(f"Data saved to {filename}")
Code Breakdown:
- We define the field names (
Title,Rating,Description,Link) to match the keys in our data dictionary. - Use
writerowsto write all movie data into the CSV file.
Using Proxies in Python Selenium
When scraping websites, huge and well-protected sites, you may encounter rate limits, IP bans, or other measures to prevent automated access. Using proxies helps to circumvent these issues by distributing requests across multiple IP addresses, making your scraping activities less detectable.
ScraperAPI’s proxy mode provides an easy and reliable way to manage proxies without manually configuring and rotating them.
Why Use Proxies?
- Avoid IP Bans: You can prevent your scraper from being blocked by rotating IP addresses.
- Bypass Rate Limits: Distributing requests across multiple IPs helps you avoid hitting rate limits imposed by the website.
- Access Geographically Restricted Content: Proxies can help you access content restricted to specific regions.
Setting Up ScraperAPI with Selenium
To use ScraperAPI’s proxy mode with Selenium, follow these steps:
1. Sign Up for ScraperAPI:
First, create a free ScraperAPI account and get your API key with 5,000 API credits.
2. Install Selenium Wire:
To configure Selenium to use ScraperAPI’s proxy pool, use Selenium Wire instead of the standard Selenium. Install Selenium Wire with:
pip install selenium-wire
3. Configure SeleniumWire to Use ScraperAPI Proxy:
Set up your proxy options to use ScraperAPI’s proxy port and include them in your WebDriver configuration.
from selenium import webdriver
from selenium.webdriver.chrome.options import Options
from seleniumwire import webdriver

API_KEY = 'YOUR_API_KEY'

proxy_options = {
    'proxy': {
        'http': f'http://scraperapi:{API_KEY}@proxy-server.scraperapi.com:8001',
        'https': f'http://scraperapi:{API_KEY}@proxy-server.scraperapi.com:8001',
        'no_proxy': 'localhost,127.0.0.1'
    }
}

chrome_options = Options()

driver = webdriver.Chrome(seleniumwire_options=proxy_options)
4. Perform Web Scraping Tasks:
Now, perform your web scraping tasks as usual. SeleniumWire will route all requests through the ScraperAPI proxy, providing all the benefits of using proxies.
from selenium.webdriver.common.by import By
from selenium.webdriver.support.ui import WebDriverWait
from selenium.webdriver.support import expected_conditions as EC
import time

# Open example website
driver.get("https://quotes.toscrape.com/")

# Wait for a quote to be present
quote = WebDriverWait(driver, 10).until(
    EC.presence_of_element_located((By.CLASS_NAME, "text"))
)

# Print the first quote
print(quote.text)

# Wait for the page to load
time.sleep(5)

# Quit the WebDriver
driver.quit()
By integrating ScraperAPI’s proxy mode with Selenium using Selenium Wire, you can significantly improve the efficiency and reliability of your web scraping tasks. This setup helps you manage IP rotations seamlessly, bypass rate limits, and access geographically restricted content without the hassle of manual proxy management.
Using ScraperAPI’s proxy mode with Selenium simplifies proxy management and enhances your scraping capabilities by providing a robust solution for handling dynamic and protected websites.
Optimizing Your Selenium Scraper’s Performance
Web scraping with Selenium can be resource-intensive, especially with dynamic pages or large datasets. However, with a few tweaks and optimizations, you can significantly improve the speed and efficiency of your scraper.
Here are some proven tips and tricks to help you get the most out of Selenium.
1. Block Unnecessary Resources
Many websites load resources like images, videos, and JavaScript execution that are irrelevant to scraping. Blocking these can speed up your scraper dramatically.
from selenium.webdriver.chrome.options import Options
# Set up Chrome options
chrome_options = webdriver.ChromeOptions()
chrome_prefs = {
     "profile.default_content_setting_values": {
          "images": 2,
          "javascript": 2,
     }
}
chrome_options.experimental_options["prefs"] = chrome_prefs
# Pass options to the WebDriver
driver = webdriver.Chrome(options=chrome_options)
By disabling images and stylesheets, the browser loads only the essential elements needed for scraping, reducing page load times.
2. Run the Browser in Headless Mode
Running the browser in headless mode (without a graphical interface) reduces overhead and speeds up the scraping process.
chrome_options.add_argument("--headless") # Run in headless mode
Headless mode eliminates the need to render the browser UI, allowing the scraper to focus solely on data extraction.
3. Optimize WebDriver Waits
Using smart waits prevents unnecessary delays while ensuring elements are loaded before interacting with them. Choose WebDriverWait over fixed delays like time.sleep().
from selenium.webdriver.support.ui import WebDriverWait
from selenium.webdriver.support import expected_conditions as EC

# Wait for a specific element to load
wait = WebDriverWait(driver, 10)
element = wait.until(EC.presence_of_element_located((By.ID, "example_id")))
Explicit waits only pause the script until the required element appears, optimizing runtime compared to fixed waits.
4. Use Faster Locators
Choosing efficient locators can save milliseconds on every interaction. Opt for IDs or class names over complex XPath or CSS selectors whenever possible.
# Efficient locators
driver.find_element(By.ID, "example_id")  # Fast
driver.find_element(By.CLASS_NAME, "example_class")  # Fast

# Less efficient locators
driver.find_element(By.CSS_SELECTOR, "div.example > span")  # Slower
driver.find_element(By.XPATH, "//div[@class='example']//span")  # Slowest
ID-based locators are the fastest, directly targeting specific elements and reducing search complexity.
5. Limit Browser Features
Turning off certain browser features like JavaScript and pop-ups can improve performance when these features are unnecessary.
chrome_options.add_argument("--disable-popup-blocking")
chrome_options.add_argument("--disable-notifications")
Turning off these features prevents the browser from handling irrelevant tasks that slow down scraping.
Common Challenges of Web Scraping with Selenium & Their Solutions
Web scraping with Selenium opens up opportunities for collecting data from dynamic websites, but it’s not without its hurdles. Here are some of the most common challenges you may encounter while using Selenium for web scraping, along with practical solutions to overcome them:
1. High Resource Consumption
Selenium operates real browser instances, which makes it more resource-intensive than lightweight scraping tools. Running multiple browser sessions in parallel can quickly overwhelm your system’s CPU and memory.
Solution:
- Run Selenium in headless mode to eliminate the overhead of rendering a graphical user interface.
- Disable unnecessary features like images, CSS, and JavaScript when scraping them is not required.
- For large-scale projects, consider distributing the workload using Selenium Grid or integrating tools like ScraperAPI to offload resource-intensive tasks.
2. Slow Execution Speed
Compared to HTML parsers like BeautifulSoup or Scrapy, Selenium is slower because it fully renders web pages and simulates browser interactions.
Solution:
- Use explicit waits instead of fixed delays to optimize performance. This ensures that Selenium waits only as long as needed for specific elements to load.
- Optimize locators by using fast and specific selectors like By.ID or By.CLASS_NAME rather than complex XPath queries.
3. Handling Anti-Scraping Mechanisms
Many websites implement anti-bot measures such as CAPTCHAs, honeypots, and rate-limiting to prevent scraping. These measures can block your requests or flag your IP address.
Solution:
- Rotate IPs and user agents using tools like ScraperAPI to avoid detection.
- Implement logic to detect and bypass honeypot traps.
- Use CAPTCHA-solving services or manually intervene for websites requiring frequent human verification.
4. Dynamic Content Loading
Selenium is often used for JavaScript-heavy sites, but dealing with elements that load dynamically can be tricky. Elements might not appear until the user scrolls or interacts with the page.
Solution:
- Use Selenium’s scrolling capabilities to load additional content. Automate scrolling until all elements are rendered.
- Employ explicit waits with conditions like presence_of_element_located to ensure elements are fully loaded before interacting with them.
5. Difficulty in Scaling
Selenium is designed for browser automation, not large-scale data collection. Scraping large datasets or multiple websites simultaneously can be challenging.
Solution:
- Scale using Selenium Grid to run parallel browser sessions on distributed nodes.
- Offload large-scale scraping to a dedicated tool like ScraperAPI for faster, more efficient data collection.
6. Error Handling and Debugging
Unexpected issues, such as missing elements, timeouts, or changes in website structure, can disrupt your scraper.
Solution:
- Implement robust error handling using try-except blocks to manage unexpected failures gracefully.
- Use logging to track issues and understand what went wrong during execution.
- Regularly update your scraper to adapt to website changes, especially for frequently visited sites.
By addressing these challenges strategically, you can unlock Selenium’s full potential as a reliable tool for scraping even the most complex and dynamic websites. With the right optimizations and complementary tools, Selenium can handle tasks that other scrapers can’t.
Scale Web Scraping with Selenium
Scaling web scraping projects with Selenium allows you to handle larger datasets, scrape multiple websites simultaneously, and achieve higher efficiency. However, scaling involves addressing challenges related to resource usage, task distribution, and anti-scraping measures. This section explores the tools, tips, and challenges in scaling Selenium for web scraping.
Selenium Grid
Selenium Grid is a powerful tool that enables you to run multiple instances across different machines and environments. It is beneficial for large-scale web scraping projects where efficiency and parallel execution are essential.
What Selenium Grid Offers:
- Parallel Execution: You can run multiple browser instances simultaneously to scrape different sections of a website or numerous websites simultaneously.
- Distributed Workload: Tasks can be distributed across a network of machines (nodes) to balance the load and optimize performance.
- Cross-Browser Support: Selenium Grid allows you to test or scrape across different browsers and versions, ensuring compatibility and flexibility.
How Selenium Grid Works:
- Hub: This central server manages and distributes all tasks to connected nodes.
- Nodes: These are machines running browser instances that execute the tasks the hub assigns.
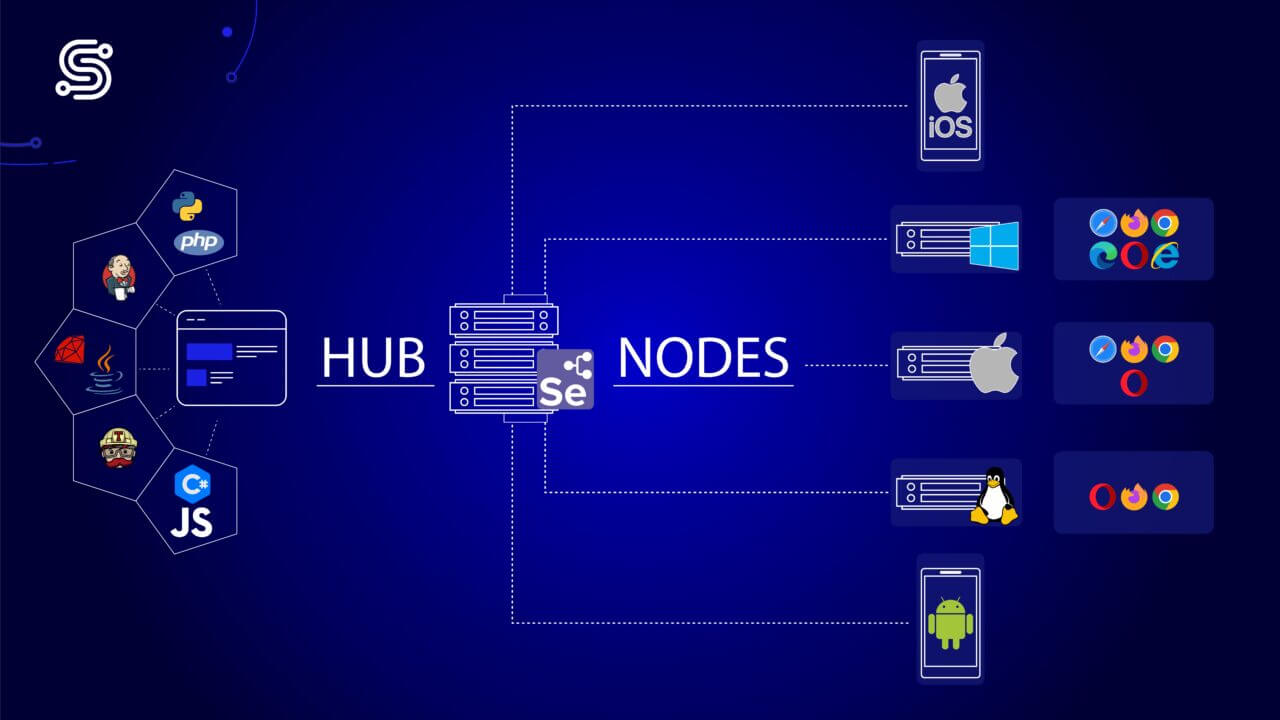
This setup allows you to scale your scraping operations while maintaining control and efficiency.
Tips and Tricks to Scale Selenium for Web Scraping
Scaling Selenium efficiently requires thoughtful strategies to optimize resource usage and task management. Here are some tips to help you scale effectively:
- Run in Headless Mode: Eliminate the graphical interface to reduce resource consumption and improve speed.
- Block Unnecessary Resources: Disable images, CSS, and JavaScript to reduce page load times unless these elements are required for scraping.
- Integrate ScraperAPI for Heavy Lifting: For complex or high-traffic websites, use ScraperAPI to manage proxies, handle CAPTCHAs, and bypass rate limits. This reduces the load on your Selenium setup and ensures a higher success rate.
- Use Smart Task Distribution: Assign different sections of the website or separate websites to specific nodes to avoid redundancy.
- Rotate IPs with ScraperAPI: ScraperAPI can handle IP rotation seamlessly, distributing requests across multiple IPs to minimize the risk of detection and blocking.
- Monitor Resource Usage: Centralize logging and resource monitoring to track performance and identify bottlenecks.
- Process Data in Batches: Write scraped data incrementally to files or databases to avoid memory bottlenecks during large-scale scraping.
Challenges of Scaling with Selenium
While Selenium provides powerful capabilities for web scraping, scaling comes with its own set of challenges that must be addressed:
1. High Resource Consumption
- Selenium uses actual browser instances, which consume significant CPU, memory, and disk I/O.
- Running multiple instances in parallel can quickly exhaust system resources.
Solution: Use headless browsers, optimize browser settings, or offload complex scraping tasks to a service like ScraperAPI to reduce the burden on your setup.
2. Latency Issues
- Distributing tasks across geographically dispersed nodes can introduce latency, slowing the scraping process.
Solution: Deploy nodes closer to the target servers or use ScraperAPI to handle distributed requests globally with minimal latency.
3. Risk of IP Blocking
- Websites may detect and block scraping activities if too many requests originate from the same IP address.
Solution: Use ScraperAPI for automatic IP rotation and CAPTCHAs handling, ensuring uninterrupted scraping even on heavily monitored websites.
4. Debugging and Error Handling
- Debugging issues across multiple nodes can be challenging, especially with intermittent or node-specific failures.
Solution: Implement centralized logging and error monitoring to track and resolve issues efficiently.
5. Website Restrictions
- Websites may have anti-bot measures, like CAPTCHAs or rate limits, which can disrupt scraping operations.
Solution: Integrate ScraperAPI to easily handle CAPTCHAs and bypass restrictions, allowing Selenium to focus on the main scraping logic.
Rendering JavaScript Sites Without Selenium
When scraping websites that rely heavily on JavaScript to render content, using a headless browser like Selenium can be resource-intensive and slow.
An alternative is using ScraperAPI, which provides a rendering feature that allows you to render dynamic content quickly and efficiently without needing Selenium. This feature can significantly speed up your scraping tasks and simplify your code.
Why Use ScraperAPI’s Rendering Feature?
- Efficiency: Render JavaScript-heavy sites faster than using a headless browser.
- Simplicity: Simplify your scraping code by offloading the rendering task to ScraperAPI.
- Scalability: Handle more requests without the overhead of managing multiple browser instances
Setting Up ScraperAPI for Rendering
To use ScraperAPI’s rendering feature, you must make a simple HTTP GET request to ScraperAPI with specific parameters.
1. Sign Up for ScraperAPI:
First, sign up for an account at ScraperAPI and get your API key.
2. Make a Request with Rendering:
Use your preferred HTTP library to make a request to ScraperAPI with the render parameter set to true.
Here’s how you can do it using Python’s requests library.
import requests

API_KEY = 'YOUR_API_KEY'
URL = 'https://quotes.toscrape.com/'

params = {
    'api_key': API_KEY,
    'url': URL,
    'render': 'true'
}

response = requests.get('https://api.scraperapi.com', params=params)

if response.status_code == 200:
    html_content = response.text
    print(html_content)
else:
    print(f"Failed to retrieve the page. Status code: {response.status_code}")
3. Parse the Rendered HTML:
After receiving the rendered HTML content, you can use BeautifulSoup to parse and extract the required data.
from bs4 import BeautifulSoup

soup = BeautifulSoup(html_content, 'html.parser')
quotes = soup.find_all('span', class_='text')

for quote in quotes:
    print(quote.text)
By using ScraperAPI’s rendering feature, you can efficiently scrape JavaScript-heavy sites without the need for a headless browser like Selenium. This approach not only speeds up your scraping tasks but also reduces the complexity of your code.
For more details on how to use ScraperAPI’s rendering feature, check out the ScraperAPI documentation.
Using Rendering Instructions with ScraperAPI
ScraperAPI’s Render Instruction Set provides advanced capabilities for handling complex JavaScript-heavy websites and simulating user interactions. This feature allows you to replicate actions like typing into search bars, clicking buttons, or waiting for elements to load, making it ideal for scraping dynamic websites that require precise control.
In this example, we’ll use ScraperAPI to interact with IMDb’s search bar, type the movie title “Inception,” and extract the resulting search suggestions. ScraperAPI’s render instruction set makes this process seamless by automating user interactions.
import requests
from bs4 import BeautifulSoup

# ScraperAPI setup
url = 'https://api.scraperapi.com/'
headers = {
    'x-sapi-api_key': 'YOUR_API_KEY',  # Replace with your ScraperAPI key
    'x-sapi-render': 'true',  # Enable JavaScript rendering
    'x-sapi-instruction_set': '[{"type": "input", "selector": {"type": "css", "value": "#suggestion-search"}, "value": "Inception"}, {"type": "wait","value": 10}]'
}
payload = {
    'url': 'https://www.imdb.com'  # Target URL
}

response = requests.get(url, params=payload, headers=headers)

# Parse the rendered HTML with BeautifulSoup
soup = BeautifulSoup(response.text, 'html.parser')

# Extract search suggestions
suggestions = soup.find_all("a", class_='sc-iJCSeZ jCdGGi searchResult searchResult--const')

# Print search suggestions
for suggestion in suggestions:
    print(suggestion.text)
Here’s a breakdown of this code snippet:
1. Simulating User Interactions
The x-sapi-instruction_set header enables precise actions like typing and waiting:
{"type": "input"}simulates typing “Inception” into the search bar identified by the CSS selector#suggestion-search.{"type": "wait", "value": 10}pauses the execution for 10 seconds, giving the page enough time to render the search results.
2. Rendering JavaScript Content
The x-sapi-render header ensures that all JavaScript content, including dynamic suggestions, is fully loaded before the response is returned. This makes ScraperAPI a powerful alternative to traditional headless browsers.
3. Parsing and Extracting Data
BeautifulSoup processes the rendered HTML to locate the search suggestion elements (a tags with the class sc-iJCSeZ jCdGGi searchResult searchResult--const). These elements are then looped through to extract and print the suggestion text.
Advantages of the Render Instruction Set
- Precision: Simulate user actions to handle highly dynamic elements that depend on JavaScript interactions.
- Efficiency: Avoid the overhead of managing browser sessions with tools like Selenium, simplifying your scraping code.
- Flexibility: Customize instructions to match specific workflows, such as typing, clicking, or waiting for asynchronous content.
By leveraging ScraperAPI’s Render Instruction Set, you can easily tackle even the most complex scraping challenges, ensuring accuracy and efficiency in extracting dynamic web content.For more details on how to use ScraperAPI’s Render Instruction Set, check out the ScraperAPI documentation.
Wrapping Up
In this article, we’ve covered essential techniques for web scraping using Selenium and ScraperAPI.
Here’s a summary of what you’ve learned:
- Configuring Selenium for web scraping tasks, navigating to websites, and effectively interacting with elements, including dealing with honeypots.
- Locating and interacting with various elements on a webpage, such as clicking buttons and entering text into input fields, while avoiding hidden traps like honeypots.
- The significance of waiting for elements to fully load using
WebDriverWait, ensuring they are ready for interaction and to avoid issues with hidden elements, including honeypots. - Utilizing ScraperAPI’s proxy mode to prevent IP bans, surpassing rate limits, and accessing content restricted by geographic location.
- Leveraging ScraperAPI’s rendering engine and rendering instruction sets feature to efficiently scrape content from dynamic websites, overcoming challenges posed by content loading and interactive elements.
Ready to take your web scraping projects to the next level? Test ScraperAPI and experience seamless proxy management and efficient rendering benefits. Sign up for a free trial at ScraperAPI and start scraping smarter today!
For more detailed guides and advanced techniques, visit the ScraperAPI blog and documentation.
Until next time, happy scraping!
Selenium Web Scraping FAQs
Yes, Selenium is highly effective for web scraping, especially for dynamic websites that use JavaScript. It allows you to simulate user interactions like clicking, scrolling, and waiting for elements to load, making it ideal for extracting data from complex web pages. Selenium is a go-to tool when traditional scrapers like BeautifulSoup or Scrapy cannot handle dynamic content.
Yes, Selenium is suitable for web scraping, especially for projects needing interaction with JavaScript-driven sites or complex user workflows. However, consider factors like project scale, costs for handling large datasets, and ongoing maintenance. Evaluating alternatives like ScraperAPI can provide cost-effective solutions for efficient and compliant scraping operations.
Yes, web scraping with Selenium is legal, but its legality depends on the website and jurisdiction. Scraping public data is usually acceptable, but violating a website’s terms of service or extracting sensitive or copyrighted information without permission can lead to legal issues. Always check the website’s terms of service and ensure compliance with local data privacy laws.
Selenium and BeautifulSoup serve different purposes and are often used together. Selenium is better for scraping JavaScript-heavy websites or when you need to interact with dynamic elements. BeautifulSoup excels at parsing static HTML and processing data quickly. Using Selenium to render content and BeautifulSoup to extract it is the most efficient approach for many projects.
Selenium is suitable for crawling small-scale or interactive websites where user-like actions are needed. However, tools like Scrapy are more efficient for high-speed or large-scale crawling. Selenium’s browser-based approach makes it slower and resource-intensive, but it’s perfect for situations where dynamic content or complex workflows require browser-level interaction.
Python’s readability, versatility, and robust libraries like Selenium make it a preferred choice for web scraping. Selenium’s ability to automate browser actions, handle dynamic content, and integrate seamlessly with Python’s ecosystem makes it popular for scraping tasks requiring interactive navigation and complex workflows.
The best alternative to Selenium depends on the specific needs of your project. For large-scale or high-speed scraping tasks, Scrapy is more efficient, while Puppeteer and Playwright handle JavaScript-heavy sites faster than Selenium.
You can also use ScraperAPI to simplify proxy management, CAPTCHA handling, and JavaScript rendering without losing any of the benefits of using Selenium.
That said, while these tools excel in specific tasks, Selenium is ideal for projects needing detailed browser interaction.