


The following guide on web scraping with JavaScript and Node.js will enable you to scrape virtually any page. Node.js is a fast-growing, easy-to-use runtime environment made for JavaScript, which makes it perfect for web scraping JavaScript efficiently and with a low barrier to entry.
Today, we’re going to learn how to build a JavaScript web scraper and make it find a specific string of data on both static and dynamic pages. If you read through to the end of our guide, in addition to showing you how to build a web scraper from scratch, we’ll teach you a simple trick to go around most major roadblocks you’ll encounter when scraping websites at scale.
Can Javascript be Used for Web Scraping?
Yes, Javascript can be used for web scraping as there are many libraries and frameworks built in JavaScript to perform web scraping at various scales – of course, you would use Node.js to work with JS in the backend.
By combining different web scraping tools, like ScraperAPI, and libraries like Cheerio and Axios, you can build complex, highly efficient scrapers to collect web data at scale.
Why Is JavaScript a Good Choice for Web Scraping?
Web scraping with JavaScript has a number of advantages. We summarized them in the following points:
- There are popular libraries and frameworks with a strong ecosystem behind each of them that offer advanced web scraping capabilities.
- JavaScript’s native database structure is JSON, which is the most commonly used to share data across APIs.
- The browser automation libraries make it easy to automate web scraping tasks such real-time web scraping.
- Javascript is an all-in-one language when combined with Node.js. You can build your frontend, your backend, your tooling, and your web scraper in the same language.
Web Scraping Libraries for JavaScript
To perform web scraping from end-to-end, you will usually need at least two libraries: one for retrieving the web page content and a second one to extract the data in the content downloaded.
Depending on the complexity of the website you want to scrape, you will need a different library.
Here are the popular web scraping libraries for JavaScript:
- Axios: an HTTP client library that runs in the browser and in Node.js. You can use it to download the HTML content of web pages, and it works best for static websites that do not render JavaScript.
- Playwright: a modern browser automation library that supports cross-browser testing and scraping. It was built with automation and web scraping in mind. It is the most downloaded library on NPM in this category.
- Puppeteer: a Node.js library providing a convenient and powerful API that allows developers to interact with web pages and perform various actions like clicking buttons, filling out forms, taking screenshots, scraping data, and much more.
Cheerio: a Node.js library that provides a flexible implementation of the core jQuery. It allows you to parse an HTML document, target DOM elements to select, and extract data from them.
Before We Start: What You Need to Know About Web Scraping with JavaScript
This JavaScript web scraping tutorial is for junior developers, so we’ll cover all the basics you need to understand to build your first JavaScript web scraper.
However, to get the most out of our guide, we would recommend that you:
- Have experience with JavaScript (or at least familiarity with it)
- Have basic knowledge of web page structure
- Know how to use DevTools to extract selectors of elements (we’ll show you either way)
Note: While JavaScript Scraping is relatively straightforward, if you’ve never used JavaScript before, check out the w3bschool JavaScript tutorial, or for a more in-depth course, go through freeCodeCamp’s Javascript course.
Of course, web scraping comes with its own challenges, but don’t worry. At the end of this article, we’ll show you a quick solution that’ll make your scraper run smoothly and hassle-free.
Knowing how to create a web scraper from scratch is an essential step on your learning journey to becoming a master scraper, so let’s get started.
How to Build and Scrape Static Pages with JavaScript
Web scraping can be broken down into two basic steps:
- Fetching the HTML source code and
- Parsing the data to collect the information we need.
We’ll explore how to do each of these by gathering the price of an organic sheet set from Turmerry’s website.
Step 1: Install Node.js on Your Computer
To begin, go to https://nodejs.org/en/download/ to download Node.js and follow the prompts until it’s all done. A Node.js scraper allows us to take advantage of JavaScript web scraping libraries like Cheerio- more on that shortly.
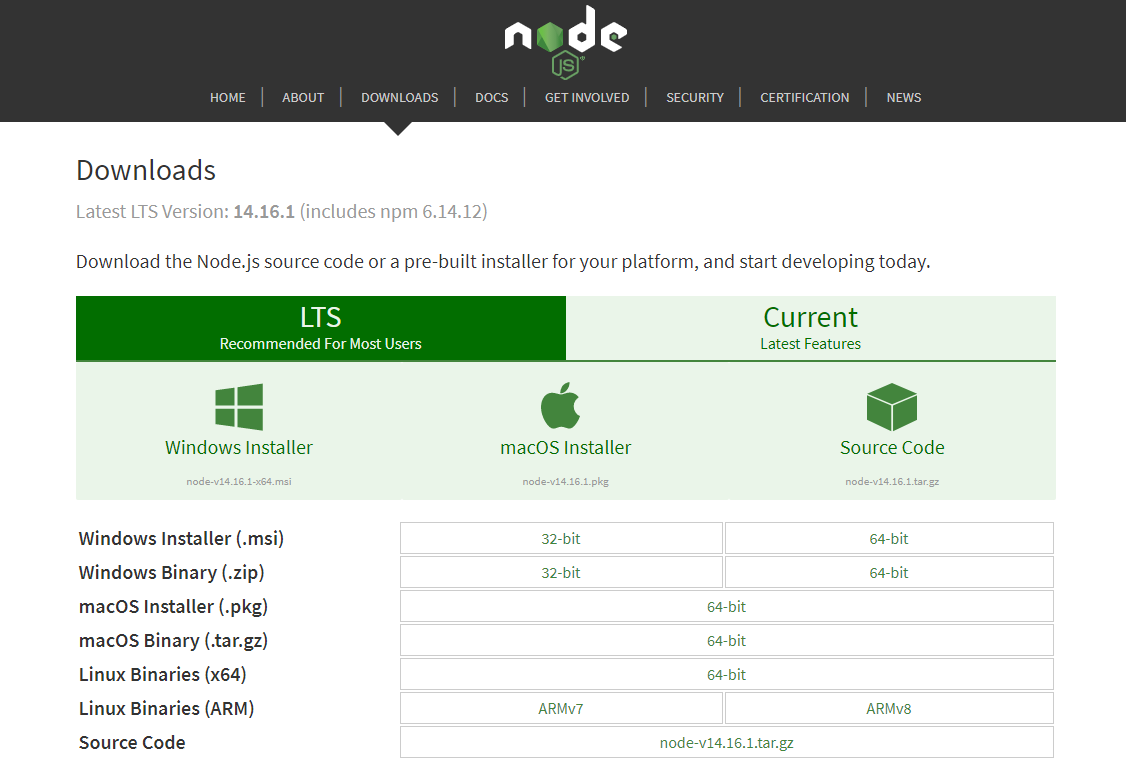
The download includes npm, which is a package manager for Node.js. Npm will let us install the rest of the dependencies we need for our web scraper.
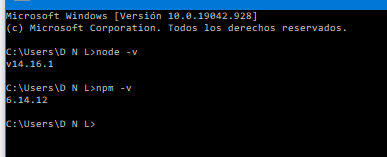
After it’s done installing, go to your terminal and type node -v and npm -v to verify everything is working properly.
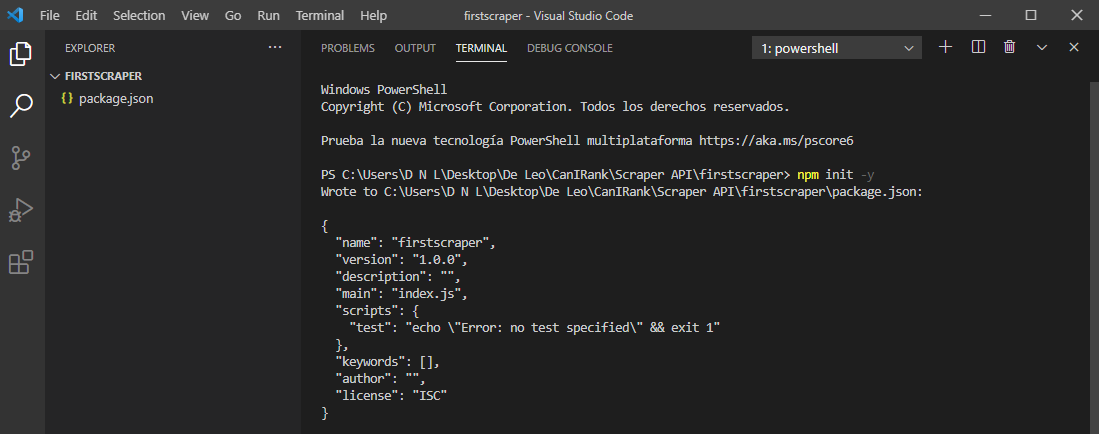
Step 2: Get Your Workspace Ready
After Node.js is installed, create a new folder called “firstscraper” and type npm init -y to initialize a package.json file.
Then we’ll install our dependencies by running npm install axios cheerio puppeteer and waiting a few minutes for it to install.
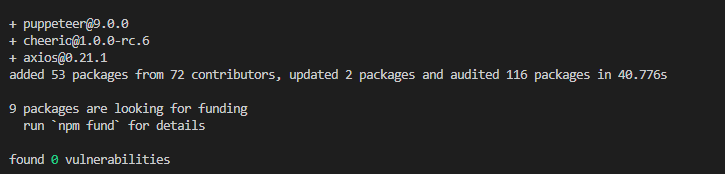
* Installing puppeteer will take a little longer as it needs to download chromium as well.
Axios is a promise-based HTTP client for Node.js that allows us to send a request to a server and receive a response. In simple terms, we’ll use Axios to fetch the HTML code of the web page.
On the other hand, Cheerio is a jquery implementation for Node.js that makes it easier to select, edit, and view DOM elements.
We’ll talk more about the last library, puppeteer, when scraping dynamic pages later in this article.
Step 3: Fetch the HTML Code Using Axios
With everything ready, click on “new file”, name it scraperapi.js, and type the following function to fetch the HTML of the product page we want to collect data from:
const axios = require('axios');
const url = 'https://www.turmerry.com/collections/organic-cotton-sheet-sets/products/percale-natural-color-organic-sheet-sets';
    axios(url)
        .then(response => {
            const html = response.data;
            console.log(html);
        })
        .catch(console.error);
We use const axios = require('axios') to declare Axios in our project and add const url and give it the URL of the page we want to fetch.
Axios will send a request to the server and bring a response we’ll store in const html so we can then call it and print it on the console.
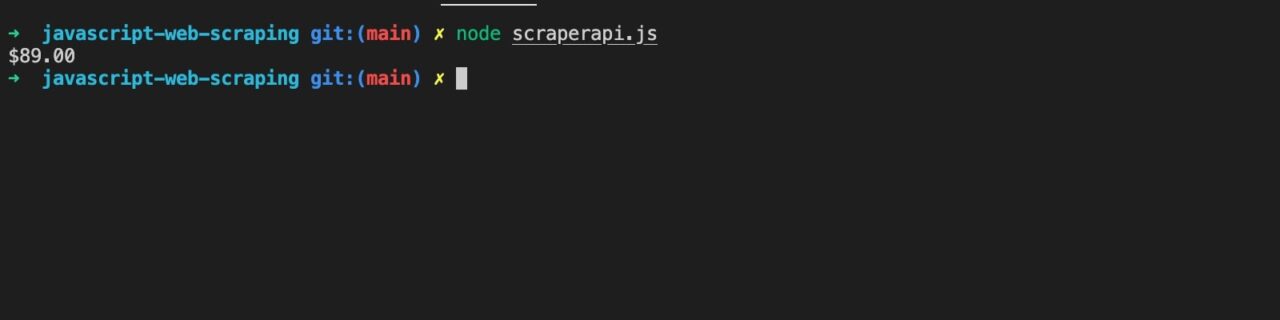
After running the scraper using node scraperapi.js in the terminal, it will pull a long and unreadable string of HTML.
Now, let’s introduce cheerio to parse the HTML and only get the information we are interested in.
Step 4: Select the Elements You Want to Collect
Before we actually add cheerio to our project, we need to identify the elements we want to extract from the HTML.
To do this, we’ll use our browser’s dev tools.
First, we’ll open Turmerry’s product page and press Ctrl + shift + c to open the inspector tool.
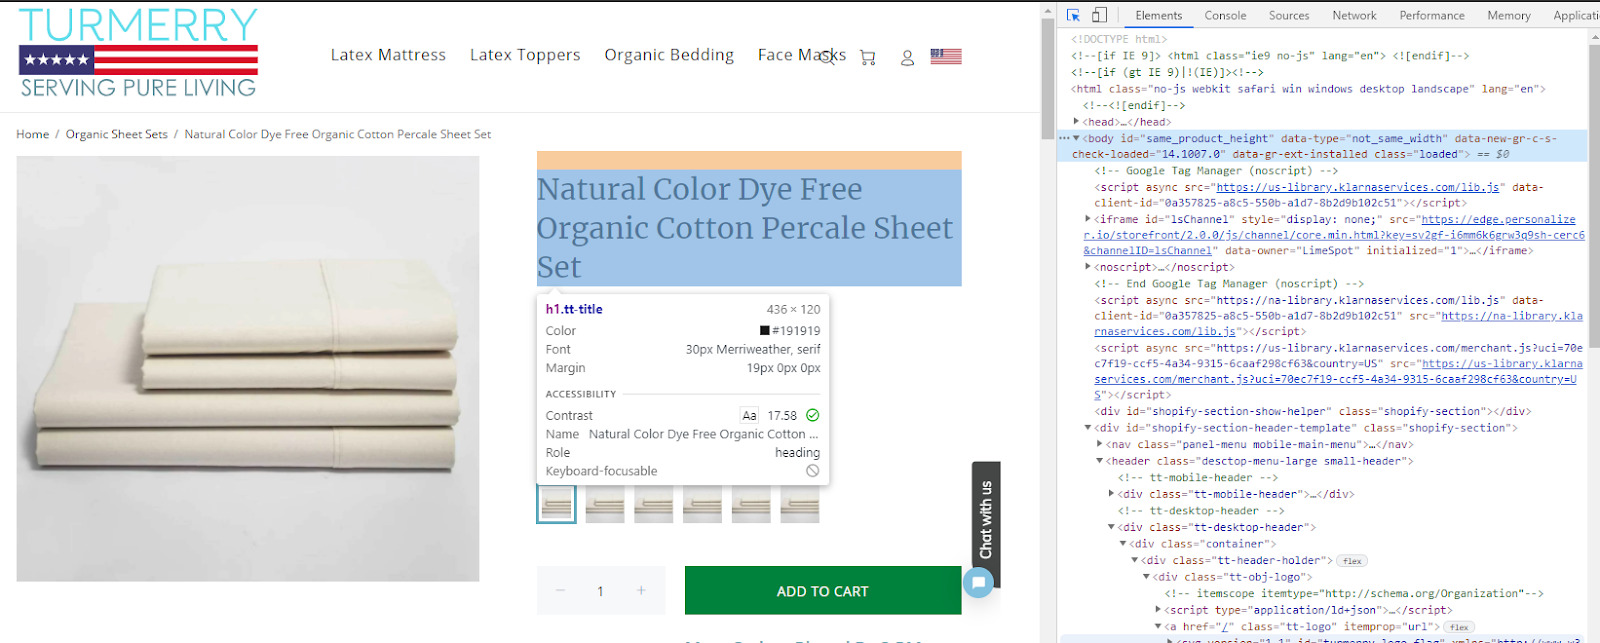
There is a lot of information about the product, such as description, reviews, size, and price. We want to retrieve the price for this product.
The current price is $89.00; when clicking on it, the inspector tool will take you to the corresponding line of code where you can get the element class.

The HTML tag containing the retail price has a “new-price” class applied. Also, note that the parent HTML tag has a class “hulkbaseprice” applied. Now that we have this information, we can go ahead and add Cheerio to our file.
Step 5: Parse the HTML Using Cheerio
First thing first, add const cheerio = require('cheerio') to the top of your file to import our library into the project and then pass the HTML document to Cheerio using const $ = cheerio.load(html).
After loading the HTML, we’ll use the price’s CSS class and his parent CSS class in this code const salePrice = $('.hulkbaseprice .new-price').text() to store the text containing the class within salePrice variable.
Once you update your code, it should look something like this:
const axios = require('axios');
const cheerio = require('cheerio');

const url = 'https://www.turmerry.com/collections/organic-cotton-sheet-sets/products/percale-natural-color-organic-sheet-sets';

axios(url).then(response => {
	const html = response.data;
	const $ = cheerio.load(html);

	const salePrice = $('.hulkbaseprice .new-price').text();

	console.log(salePrice);
}).catch(console.error);
After running your program, it will print in the console the content of the tag having the class name “new-price” :
If we provide more URLs, we’ll be able to collect all selling prices for all products in a fraction of the time it would take us to do it by hand.
Note: Web scraping using cheerio has many additional uses- if you’d like to dive deeper into this library, check out cheerio’s documentation.
How to Build and Scrape Dynamic Pages with JavaScript
When you navigate to a dynamic page, your browser will need to render JavaScript scripts to access the content before displaying it for you. This might not be an issue for us, but it is for our scraper.
Axios, and any HTTP client for that matter, will not wait for the JavaScript to execute before returning a response. So if we use our scraper as it is right now, we won’t really get anything.
Here’s where Puppeteer will come in handy.
In simple terms, Puppeteer is a node.js library that allows you to control a headless chromium-browser directly from your terminal. You can do pretty much all the interactions a user can do in a web browser, such as scrolling down, clicking, taking screenshots, and more.
If the content you want to scrape won’t load until you execute a script by clicking on a button, you can script these actions using Puppeteer and make the data available for your scraper to take.
For this example, let’s say that you want to create new content around web scraping with JavaScript and thought to scrape the r/webscraping subreddit for ideas by collecting the titles of the posts.
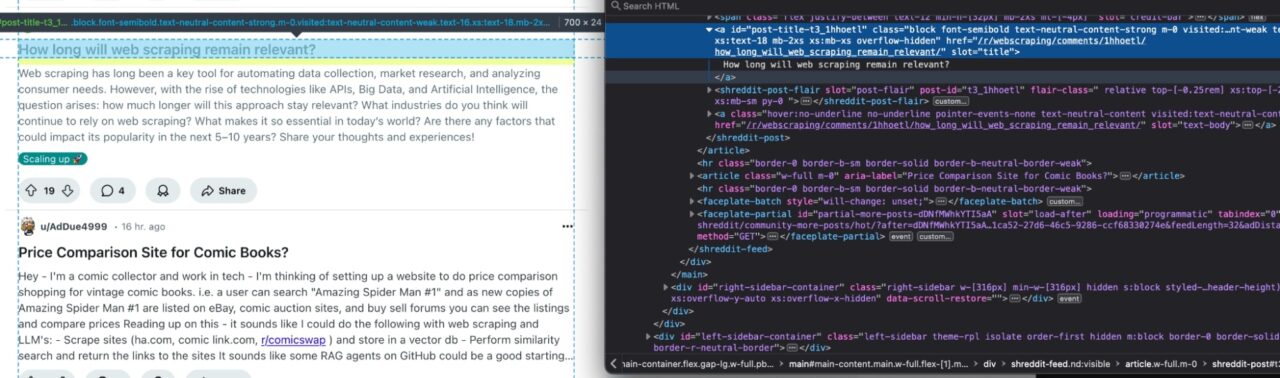
If we inspect a post in this subreddit, we’ll notice a few things right away:
- First, classes are randomly generated, so there’s no sense in us trying to latch on to them.
- Second, the post titles are wrapped by
aanchor tag having an ID starting with the prefix “post-title-”.
Let’s create a new JS file, name it scraperapi2.js, and add const puppeteer = require('puppeteer') to import the library into the project. Then, add the following code:
const cheerio = require('cheerio');
const puppeteer = require('puppeteer');

const scrapedHeadlines = [];

(async () => {
	const browser = await puppeteer.launch();
	const page = await browser.newPage();
})();
First, we’re using let scraped_headlines = [ ] to declare where our data will be stored. Then, we write an async function to enable us to use the await operator.
Note: although you could build a scraper using .then( ) callbacks, it will just limit your scraper’s scalability and make it harder to scrape more than one page at a time.
After that’s set, we’re telling Puppeteer to launch the browser, wait (await) for the browser to be launched, and then open a new page.
Now, let’s open a try statement and use the next block of code to tell the browser to which URL to go to and for Puppeteer to get the HTML code after it renders:
try {
	await page.goto('https://www.reddit.com/r/webscraping/');

	const bodyHTML = await page.evaluate(() => document.body.innerHTML);
}
We are already familiar with the next step. Because we got the HTML document, we’ll need to send it to Cheerio so we can use our CSS selectors and get the content we need:
try {
    	await page.goto('https://www.reddit.com/r/webscraping');
    	const bodyHTML = await page.evaluate(() => document.body.innerHTML);
    	const $ = cheerio.load(bodyHTML);
    	const articleHeadlines = $('a[id*="post-title"]');

    	articleHeadlines.each((_index, element) => {
        	const title = $(element).text().replaceAll('\n', '').trim();
        	scrapedHeadlines.push({ 'title': title });
    	});
}
In this case, we added 'a[id*="post-title"]' in the first selector to tell our web scraper where to look for the data and return the text within the anchor tag; once we get the text, we apply the function replaceAll() to remove break lines and apply the function trim() to remove white spaces before and after the text.
Lastly, we use the push() method to add to the array of headlines a new object containing the title we retrieved, making it easier to read.
After updating your code, it should look like this:
const cheerio = require('cheerio');
const puppeteer = require('puppeteer');

const scrapedHeadlines = [];

(async () => {
    const browser = await puppeteer.launch({ headless: false });
    const page = await browser.newPage();

    try {
        await page.goto('https://www.reddit.com/r/webscraping');
    	  const bodyHTML = await page.evaluate(() => document.body.innerHTML);
        const $ = cheerio.load(bodyHTML);
    	  const articleHeadlines = $('a[id*="post-title"]');

    	  articleHeadlines.each((_index, element) => {
            const title = $(element).text().replaceAll('\n', '').trim();
        	scrapedHeadlines.push({ 'title': title });
    	  });
    } catch(err) {
        console.log(err);
    }

    await browser.close();

    console.log(scrapedHeadlines)}
)();
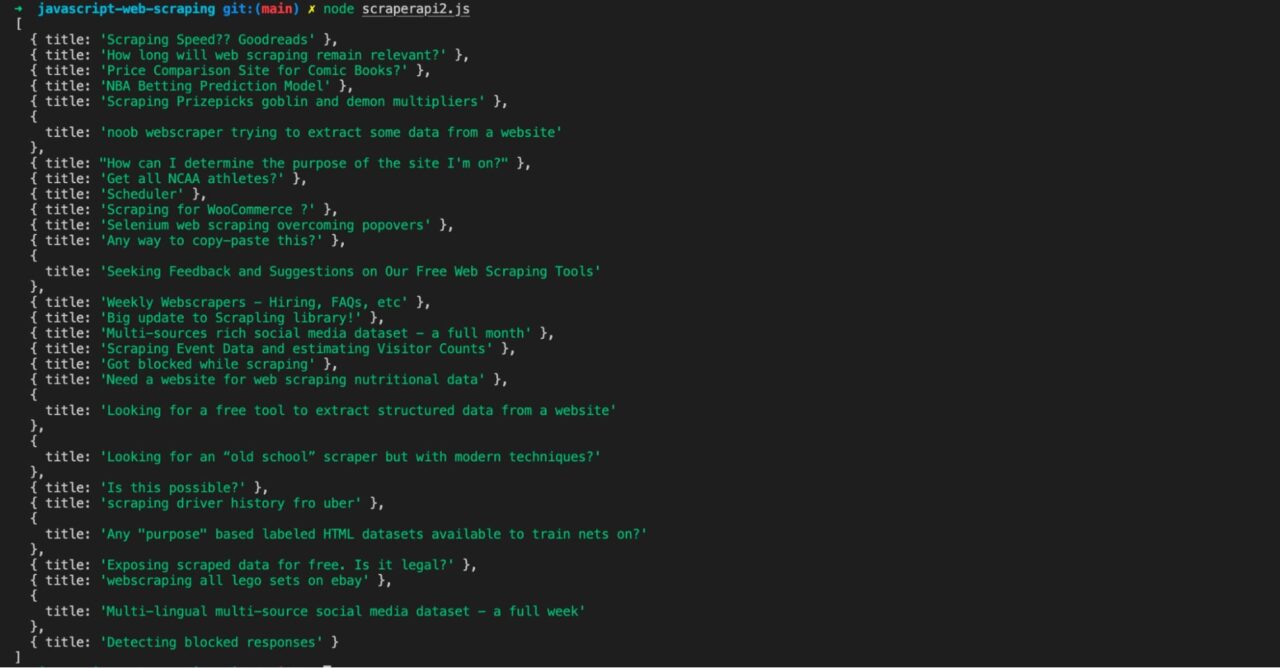
You can now test your code using node scraperapi2.js. It should return all the subreddit post titles it can find on the rendered page:
Note: For a more in-depth look at this library, here’s Puppeteer’s documentation.
Alternatives to Puppeteer for Web Scraping
Now you know how to build a JavaScript web scraper using PupNightmare. It is simple but effective.
Nightmare is a high-level browser automation library exposing simple methods to render a web page and interact with it. It uses Electron to launch a browser that provides better performance than PhantomJS.
Note: Nightmare is not actively maintained; we recommend not to use it unless you have to.
To start, let’s install the Node.js package with the following command:peteer, but depending on the project requirements, it might not always be the ideal choice because you’re seeking better cross-browser support, higher scalability, or a lightweight solution.
There are web scraping tools and frameworks available in the Javascript ecosystem, each designed to cater to specific needs. We can list Selenium, Nightmare, and Playwright. Let’s explore the two latter in the following sections.
npm install nightmare
The code for retrieving the content of the subreddit web page with Nightmare
const nightmare = Nightmare();

const bodyHTML = await nightmare
	.goto('https://www.reddit.com/r/webscraping')
	.wait('body')
	.evaluate(() => document.body.innerHTML)
	.end();
Now that we have the HTML page, we can extract the data using Cheerio, as shown earlier.
Create a new file named “scraperapi-nightmare.js” and add the final code for our web scraper using Nightmare.
const Nightmare = require('nightmare');
const cheerio = require('cheerio');

const scrapedHeadlines = [];

(async () => {
    const nightmare = Nightmare();

    try {
        const bodyHTML = await nightmare
        	.goto('https://www.reddit.com/r/webscraping')
        	.wait('body')
        	.evaluate(() => document.body.innerHTML)
        	.end();

    	  const $ = cheerio.load(bodyHTML);
    	  const articleHeadlines = $('a[id*="post-title"]');

    	  articleHeadlines.each((index, element) => {
        	const title = $(element).text().replaceAll('\n', '').trim();
        	scrapedHeadlines.push({ 'title': title });
    	  });
    } catch (err) {
        console.log(err);
    }

    console.log(scrapedHeadlines);
})();
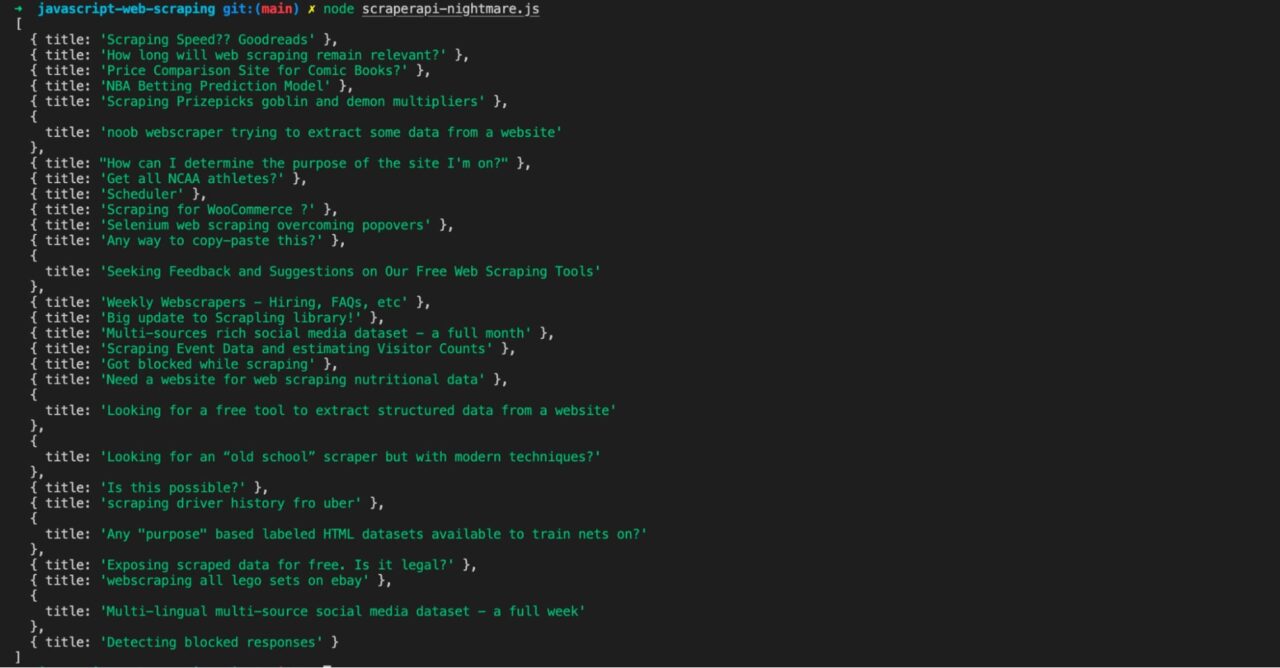
Run the web scraper with the code “node scraperapi-nightmare.js” and you will see the same output as before.
To learn more about how to work with Nightmare, check out the documentation.
Playwright: new cross-platform alternative to Puppeteer
Playwright is a modern browser automation library that supports cross-browser testing and scraping, working seamlessly with Chromium, WebKit, and Firefox. Compared to Puppeteer, it offers advanced features like handling multiple browser contexts and intercepting network traffic.
It is developed and maintained by Microsoft and supports many programming languages. It is designed with scraping and automation in mind.
To start with Playwright, you will need to download the browsers used for web scraping. We will use the Playwright CLI to achieve it using the command below:
npx playwright install
Now, let’s install the Node.js package for Playwright.
npm install playwright
Create a file named “scraperapi-playwright.js” and add the code below:
const cheerio = require('cheerio');
const { chromium } = require('playwright');

const scrapedHeadlines = [];

(async () => {
    const browser = await chromium.launch({ headless: false });
    const page = await browser.newPage();

    try {
        await page.goto('https://www.reddit.com/r/webscraping');
    	  const bodyHTML = await page.content();
    	  const $ = cheerio.load(bodyHTML);
    	  const articleHeadlines = $('a[id*="post-title"]');

    	  articleHeadlines.each((index, element) => {
        	const title = $(element).text().replaceAll('\n', '').trim();
        	scrapedHeadlines.push({ 'title': title });
    	  });
    } catch (err) {
    	  console.log(err);
    }

    await browser.close();

    console.log(scrapedHeadlines);
})();
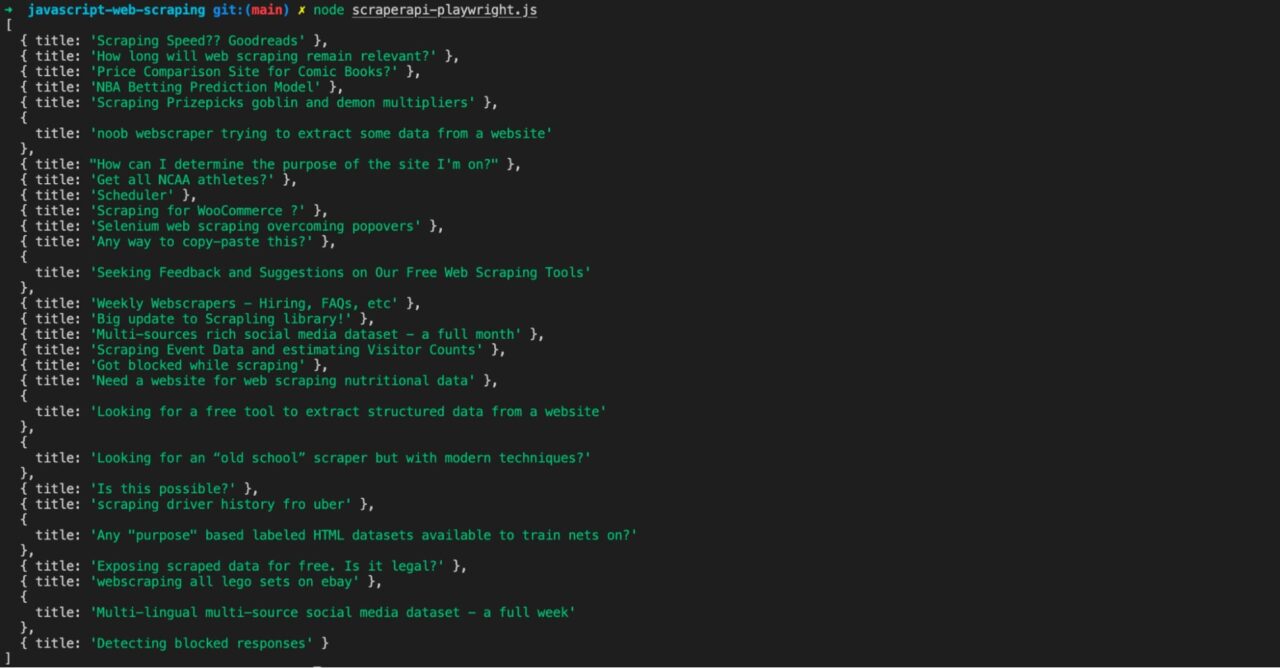
Run the web scraper with the code “node scraperapi-playwright.js” and see the same output.
Bypass Web Scraping Bot Blockers with ScraperAPI
As you’ve seen in this tutorial, building a web scraper is a straightforward project with a lot of potential. The real problem with homemade scrapers, however, is scalability.
One of the challenges you’ll be facing is handling, for example, CAPTCHAs. While running your program, your IP address can get identified as a fraudulent user, getting your IP banned.
If you run your scraper on a server hosted in a data center, you’re even more likely to be blocked instantly. Why? Because datacenter IPs are less trusted, getting your requests flagged as “non-person requests.”
All these roadblocks make web scraping so challenging and are why we developed an API that can handle all of them automatically: from rotating IP addresses, handling CAPTCHAs, and rendering JavaScript, ScraperAPI handles everything with a single API call.
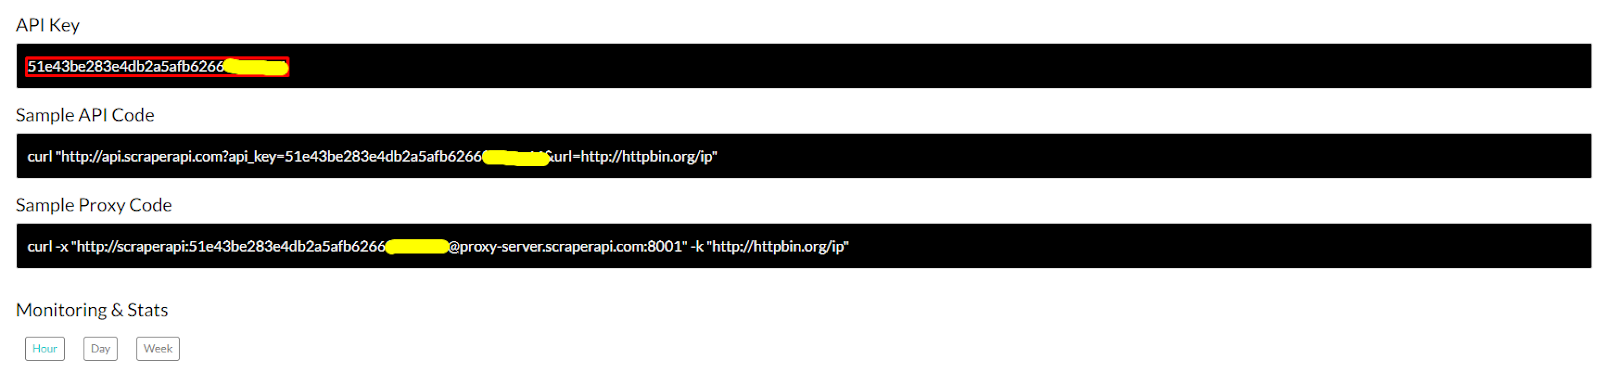
To learn how to integrate ScraperAPI with our scrapers, we’ll need to create a new ScraperAPI account – you’ll get 1000 free API credits right off the bat, so you have more than enough for trying the API out.
After signing up, you’ll get access to your API key and some sample code for you to use as a reference.
Now, let’s integrate ScraperAPI with our Axios scraper:
Integrating ScraperAPI with Axios Requests
This is super straightforward. All we need to do is to add our API key as a const and then tell Axios to use our ScraperAPI endpoint:
let axios = require('axios');
const cheerio = require('cheerio')<
const API_KEY = ''YOUR_API_KEY''
const url = 'https://www.turmerry.com/collections/organic-cotton-sheet-sets/products/percale-natural-color-organic-sheet-sets';
axios('https://api.scraperapi.com/', {
    params: {
        'url': url,
        'api_key': API_KEY,
}})
Now every request will go through ScraperAPI, and it will return with the HTML we can then pass to Cheerio as before.
Also, because it’s fully integrated with our scraper, we can add other parameters to our code to add more functionalities through the API.
An excellent use case for this is scraping a JavaScript site without using a headless browser.
By setting render=true, ScraperAPI will use a headless chromium browser to execute the script and return with the fully loaded HTML.
Here’s the final Axios + Cheerio code:
let axios = require('axios');
const cheerio = require('cheerio');
const API_KEY = '51e43be283e4db2a5afb6266xxxxxxxx'
const render = 'true'
const url = 'https://www.turmerry.com/collections/organic-cotton-sheet-sets/products/percale-natural-color-organic-sheet-sets';
axios('https://api.scraperapi.com/', {
    params: {
        'url': url,
        'api_key': API_KEY,
        'render' : render
    }})
.then(response => {
    const html = response.data;
    const $ = cheerio.load(html)
    const salePrice = $('.sale-price').text()
    console.log(salePrice);
})
.catch(console.error);
Integrating ScraperAPI with Puppeteer
You’re probably thinking: if I can render JavaScript with ScraperAPI, why would I need a Puppeteer implementation?
The reason is simple. ScraperAPI will execute the JavaScript necessary for the page to load. However, if you need to interact with the page (like to scroll or click a button), you’ll need to use your own headless browser – in this case, Puppeteer.
For this example, we’ll add the following code to set our proxy configuration, right after declaring our dependencies:
const cheerio = require('cheerio');
const puppeteer = require('puppeteer');
PROXY_USERNAME = 'scraperapi';
PROXY_PASSWORD = 'API_KEY'; // <-- enter your API_Key here
PROXY_SERVER = 'proxy-server.scraperapi.com';
PROXY_SERVER_PORT = '8001';
Next we set our scraper to use ScraperAPI as a proxy within our async function:
(async () => {
const browser = await puppeteer.launch({
ignoreHTTPSErrors: true,
args: [
'--proxy-server=https://${PROXY_SERVER}:${PROXY_SERVER_PORT}'
]
});
const page = await browser.newPage();
await page.authenticate({
    username: PROXY_USERNAME,
    password: PROXY_PASSWORD,
});
After updating your code, it should look like this:
const cheerio = require('cheerio');
const puppeteer = require('puppeteer');
PROXY_USERNAME = 'scraperapi';
PROXY_PASSWORD = '51e43be283e4db2a5afb6266xxxxxxxx';
PROXY_SERVER = 'proxy-server.scraperapi.com';
PROXY_SERVER_PORT = '8001';
let scraped_headlines = []; (async () => {
    const browser = await puppeteer.launch({
    ignoreHTTPSErrors: true,
    args: [
        '--proxy-server=https://${PROXY_SERVER}:${PROXY_SERVER_PORT}'
    ]
});
const page = await browser.newPage();
await page.authenticate({
    username: PROXY_USERNAME,
    password: PROXY_PASSWORD,
});
try {
    await page.goto('https://www.reddit.com/r/webscraping/', {timeout: 180000});
    let bodyHTML = await page.evaluate(() => document.body.innerHTML);
    let $ = cheerio.load(bodyHTML);
    let article_headlines = $('a[href*="/r/webscraping/comments"] > div')
    article_headlines.each((index, element) => {
        title = $(element).find('h3').text()
        scraped_headlines.push({
            'title': title
        })
    });
}
catch(err) {
console.log(err);
}
await browser.close();
console.log(scraped_headlines)
})();
And there you go, your API is ready to use!
Integrating ScraperAPI with Playwright
Similar to Puppeteer, you must provide the proxy server when creating a Chromium browser instance with Playwright.
Once the browser is created, perform a proxy authentication within a browser context. Once done, you can use the browser instance to navigate to a web page and retrieve the content.
The code below shows how to integrate Playwright with ScraperAPI.
const cheerio = require('cheerio');
const { chromium } = require('playwright');

const PROXY_SERVER = 'proxy-server.scraperapi.com';
const PROXY_SERVER_PORT = '8001';
const PROXY_USERNAME = 'scraperapi';
const PROXY_PASSWORD = 'YOUR_API_KEY';

const scrapedHeadlines = [];

(async () => {
   const browser = await chromium.launch({
       args: [
        	`--proxy-server=https://${PROXY_SERVER}:${PROXY_SERVER_PORT}`,
        	'--ignore-certificate-errors'
        ]
    });

    const context = await browser.newContext({
    	  httpCredentials: {
        	username: PROXY_USERNAME,
        	password: PROXY_PASSWORD
    	  }
    });

    const page = await context.newPage();

    try {
    	  await page.goto('https://www.reddit.com/r/webscraping');
    	  const bodyHTML = await page.content();
    	  const $ = cheerio.load(bodyHTML);
    	  const articleHeadlines = $('a[id*="post-title"]');

    	  articleHeadlines.each((index, element) => {
        	const title = $(element).text().replaceAll('\n', '').trim();
        	scrapedHeadlines.push({ 'title': title });
    	  });
    } catch(err) {
    	  console.log(err);
    }

    await browser.close();

    console.log(scrapedHeadlines);
})();
Replace the YOUR_API_KEY with a valid one and execute the web scraper. You will get the same result as if you were not using the ScraperAPI proxy.
Integrating ScraperAPI with Nightmare
With Nightmare, we set the ScraperAPI proxy host when creating a Nightmare instance and the Proxy authentication just before navigating to the web page we want to scrape.
The code below shows how to integrate Playwright with ScraperAPI.
const cheerio = require('cheerio');
const Nightmare = require('nightmare');

const PROXY_SERVER = 'proxy-server.scraperapi.com';
const PROXY_SERVER_PORT = '8001';
const PROXY_USERNAME = 'scraperapi';
const PROXY_PASSWORD = 'YOUR_API_KEY';

const nightmare = Nightmare({
	switches: {
    	'proxy-server': `https://${PROXY_SERVER}:${PROXY_SERVER_PORT}`,
    	'ignore-certificate-errors': true
	}
});

const scrapedHeadlines = [];

(async () => {
	try {
    	await nightmare
        	.authentication(PROXY_USERNAME, PROXY_PASSWORD)
        	.goto('https://www.reddit.com/r/webscraping')
        	.wait('body')
        	.evaluate(() => document.body.innerHTML)
        	.then(bodyHTML => {
            	const $ = cheerio.load(bodyHTML);
            	const articleHeadlines = $('a[id*="post-title"]');

            	articleHeadlines.each((index, element) => {
                	const title = $(element).text().replaceAll('\n', '').trim();
                	scrapedHeadlines.push({ 'title': title });
            	});
        	})
        	.catch(err => {
            	console.log(err);
        	});
	} catch (err) {
    	console.log(err);
	}

	await nightmare.end();

	console.log(scrapedHeadlines);
})();
Wrapping Up
Congratulations! You’ve just successfully built a JavaScript web scraper. You can now begin to collect data at scale. Remember to use ScraperAPI to prevent your web scrapers from being detected by bots or your IP from being banned.
Sign up to ScraperAPI and test our web scraping tool for free for 7 days. After that, you can choose our forever free plan (1,000 API credits monthly) or upgrade to one of our advanced plans.
To get the most out of ScraperAPI and support your web scraping projects, follow this ScraperAPI cheat sheet. There, you’ll find the best practices for web scraping using our API, along with some of the major challenges you’ll face in more detail.
Also, save this puppeteer integration with ScraperAPI sample code to follow every time you’re building a new project. It will definitely cut some coding time.
We hope you enjoyed this tutorial and that you learned a thing or two from it. If you have any questions, don’t hesitate to contact our support team, they’ll be happy to help.
Until next time, happy scraping!
FAQs about JavaScript Web Scraping
Both are great choices for web scraping, and each language has many libraries and frameworks for web scraping with strong communities behind them.
Python is easy to start with, but Javascript has the advantage of being the language interpreted by the browser, so the execution is native when web scraping is done in JavaScript.
– Choose Python if you need to scrape large volumes of data or prefer a specialized scraping library.
– Choose JavaScript if you’re targeting JavaScript-heavy sites that already use JavaScript for development or need powerful browser automation
There is no best JavaScript web scraping library because the best depends on the website’s complexity you want to scrape and which scale you want. Here are our recommendations:
– For Dynamic websites: Playwright or Puppeteer.
– For Static Websites: Axios.
– For Enterprise-Scale Scraping: ScraperAPI.
– For Discovery or Simple Tasks: Nightmare.js.
For the above cases, Cheerio is the best for parsing and extracting data from HTML pages.
Note: Usually, looking at the most downloaded on NPM can give you a hint on which library is the best.
