Tabular data is one of the best sources of data on the web. They can store a massive amount of useful information without losing its easy-to-read format, making it gold mines for data-related projects.
Whether it is to scrape football data or extract stock market data, we can use Python to quickly access, parse and extract data from HTML tables, thanks to Requests and Beautiful Soup.
Also, we have a little black and white surprise for you at the end, so keep reading!
Understanding HTML Table’s Structure
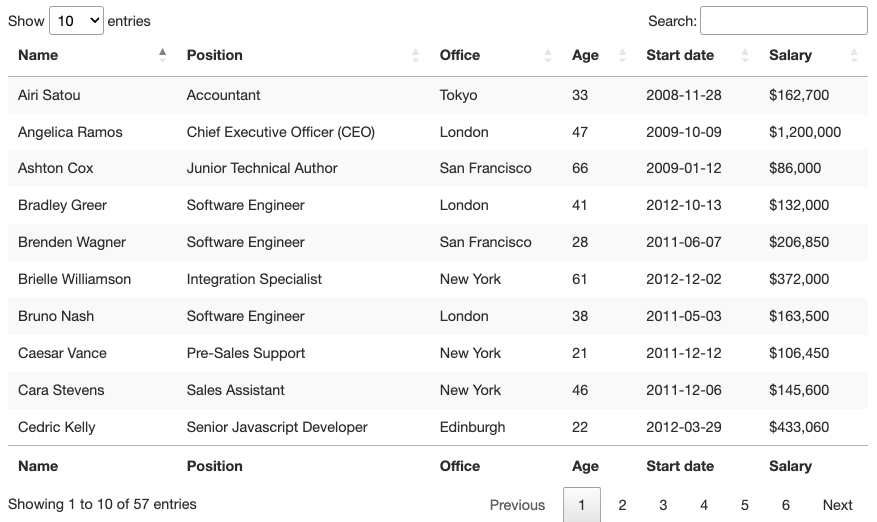
Visually, an HTML table is a set of rows and columns displaying information in a tabular format. For this tutorial, we’ll be scraping the table above:
To be able to scrape the data contained within this table, we’ll need to go a little deeper into its coding.
Generally speaking, HTML tables are actually built using the following HTML tags:
<table>: It marks the start of an HTML table<th>or<thead>: Defines a row as the heading of the table<tbody>: Indicates the section where the data is<tr>: Indicates a row in the table<td>: Defines a cell in the table
However, as we’ll see in real-life scenarios, not all developers respect these conventions when building their tables, making some projects harder than others. Still, understanding how they work is crucial for finding the right approach.
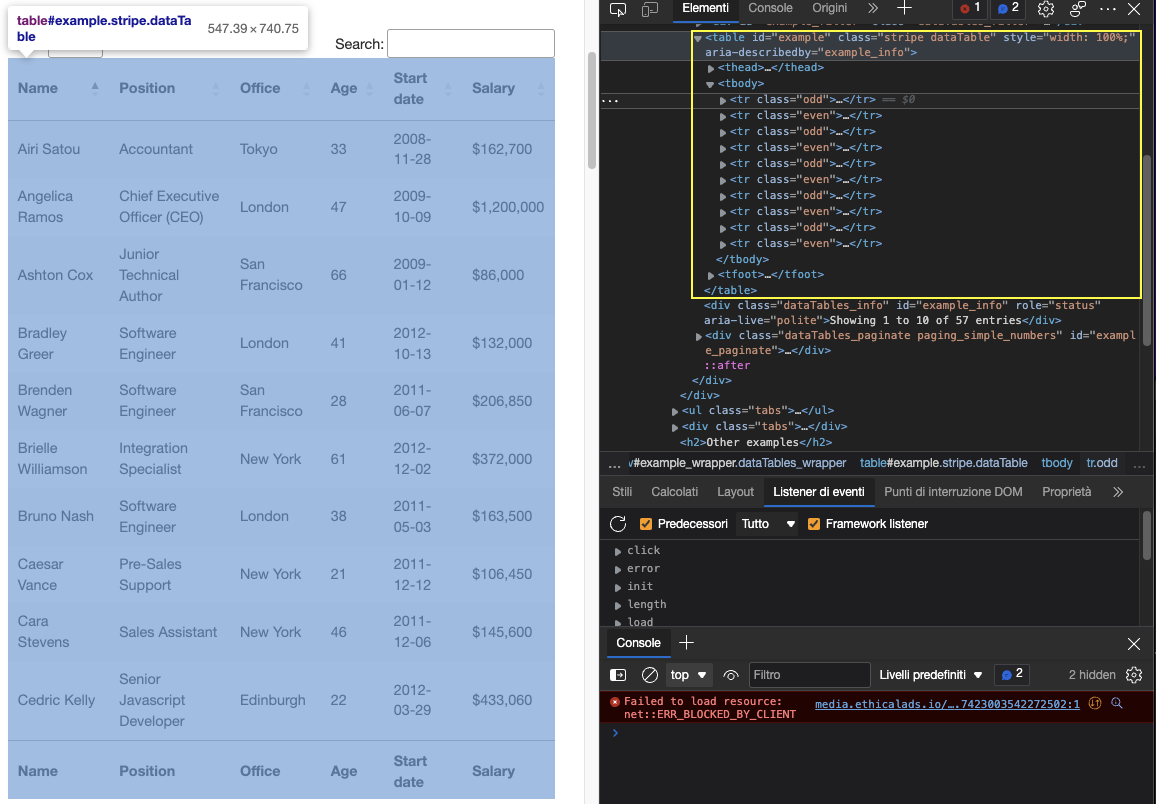
Let’s enter the table’s URL (https://datatables.net/examples/styling/stripe.html) in our browser and inspect the page to see what’s happening under the hood.
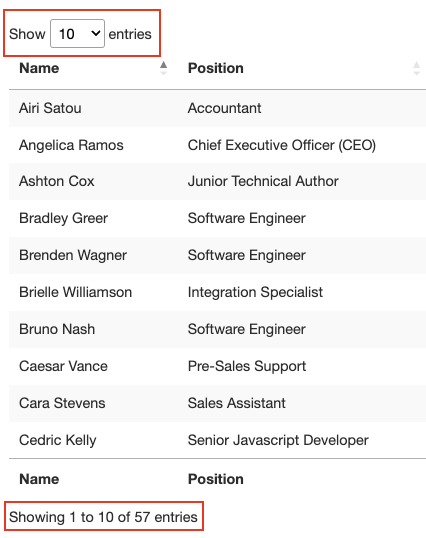
This is why this is a great page to practice scraping tabular data with Python. There’s a clear <table> tag pair opening and closing the table and all the relevant data is inside the <tbody> tag. It only shows ten rows which matches the number of entries selected on the front-end.
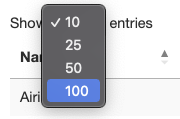
A few more things to know about this table is that it has a total of 57 entries we’ll want to scrape and there seems to be two solutions to access the data. The first is clicking the drop-down menu and selecting “100” to show all entries:
Or clicking on the next button to move through the pagination.
So which one is gonna be? Either of these solutions will add extra complexity to our script, so instead, let’s check where’s the data getting pulled from first.
Of course, because this is an HTML table, all the data should be on the HTML file itself without the need for an AJAX injection. To verify this, Right Click > View Page Source. Next, copy a few cells and search for them in the Source Code.
We did the same thing for a couple more entries from different paginated cells and yes, it seems like all our target data is in there even though the front-end doesn’t display it.
And with this information, we’re ready to move to the code!
Scraping HTML Tables Using Python’s Beautiful Soup
Because all the employee data we’re looking to scrape is on the HTML file, we can use the Requests library to send the HTTP request and parse the respond using Beautiful Soup.
Note: If you’re new to web scraping, we’ve created a web scraping in Python tutorial for beginners. Although you’ll be able to follow along without experience, it’s always a good idea to start from the basics.
1. Sending Our Main Request
Let’s create a new directory for the project named python-html-table, then a new folder named bs4-table-scraper and finally, create a new python_table_scraper.py file.54
From the terminal, let’s pip3 install requests beautifulsoup4 and import them to our project as follows:
</p>
import requests
from bs4 import BeautifulSoup
<p>
To send an HTTP requests with Requests, all we need to do is set an URL and pass it through requests.get(), store the returned HTML inside a response variable and print response.status_code.
Note: If you’re totally new to Python, you can run your code from the terminal with the command python3 python_table_scraper.py.
</p>
url = 'https://datatables.net/examples/styling/stripe.html'

response = requests.get(url)

print(response.status_code)
<p>
If it’s working, it’s going to return a 200 status code. Anything else means that your IP is getting rejected by the anti-scraping systems the website has in placed. A potential solution is adding custom headers to your script to make your script look more human – but that might not be sufficient. Another solution is using an web scraping API to handle all these complexities for you.
2. Integrating ScraperAPI to Avoid Anti-Scraping systems
ScraperAPI is an elegant solution to avoid almost any type of anti-scraping technique. It uses machine learning and years of statistical analysis to determine the best headers and IP combinations to access the data, handle CAPTCHAs and rotate your IP between each request.
To start, let’s create a new ScraperAPI free account to redeem 5000 free APIs and our API Key. From our account’s dashboard, we can copy our key value to build the URL of the request.
</p>
http://api.scraperapi.com?api_key={Your_API_KEY}&url={TARGET_URL}
<p>
Following this structure, we replace the holders with our data and send our request again:
</p>
import requests
from bs4 import BeautifulSoup

url = 'http://api.scraperapi.com?api_key=51e43be283e4db2a5afbxxxxxxxxxxxx&url=https://datatables.net/examples/styling/stripe.html'

response = requests.get(url)

print(response.status_code)
<p>
Awesome, it’s working without any hiccup!
3. Building the Parser Using Beautiful Soup
Before we can extract the data, we need to turn the raw HTML into formatted or parsed data. We’ll store this parsed HTML into a soup object like this:
</p>
soup = BeautifulSoup(response.text, 'html.parser')
<p>
From here, we can traverse the parse tree using the HTML tags and their attributes.
If we go back to the table on the page, we’ve already seen that the table is enclosed between <table> tags with the class stripe dataTable, which we can use to select the table.
</p>
table = soup.find('table', class_ = 'stripe')
print(table)
<p>
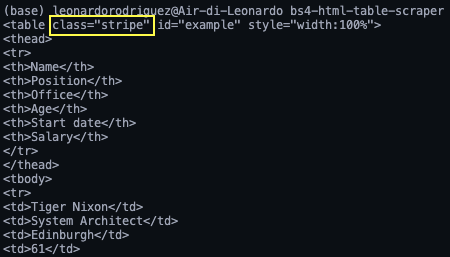
Note: After testing, adding the second class (dataTable) didn’t return the element. In fact, in the return elements, the table’s class is only stripe. You can also use id = ‘example’.
Here’s what it returns:
Now that we grabbed the table, we can loop through the rows and grab the data we want.
4. Looping Through the HTML Table
Thinking back to the table’s structure, every row is represented by a <tr> element, and within them there’s <td> element containing data, all of this is wrapped between a <tbody> tag pair.
To extract the data, we’ll create two for looks, one to grab the <tbody> section of the table (where all rows are) and another to store all rows into a variable we can use:
</p>
for employee_data in table.find_all('tbody'):
rows = employee_data.find_all('tr')
print(rows)
<p>
In rows we’ll store all the <tr> elements found within the body section of the table. If you’re following our logic, the next step is to store each individual row into a single object and loop through them to find the desired data.
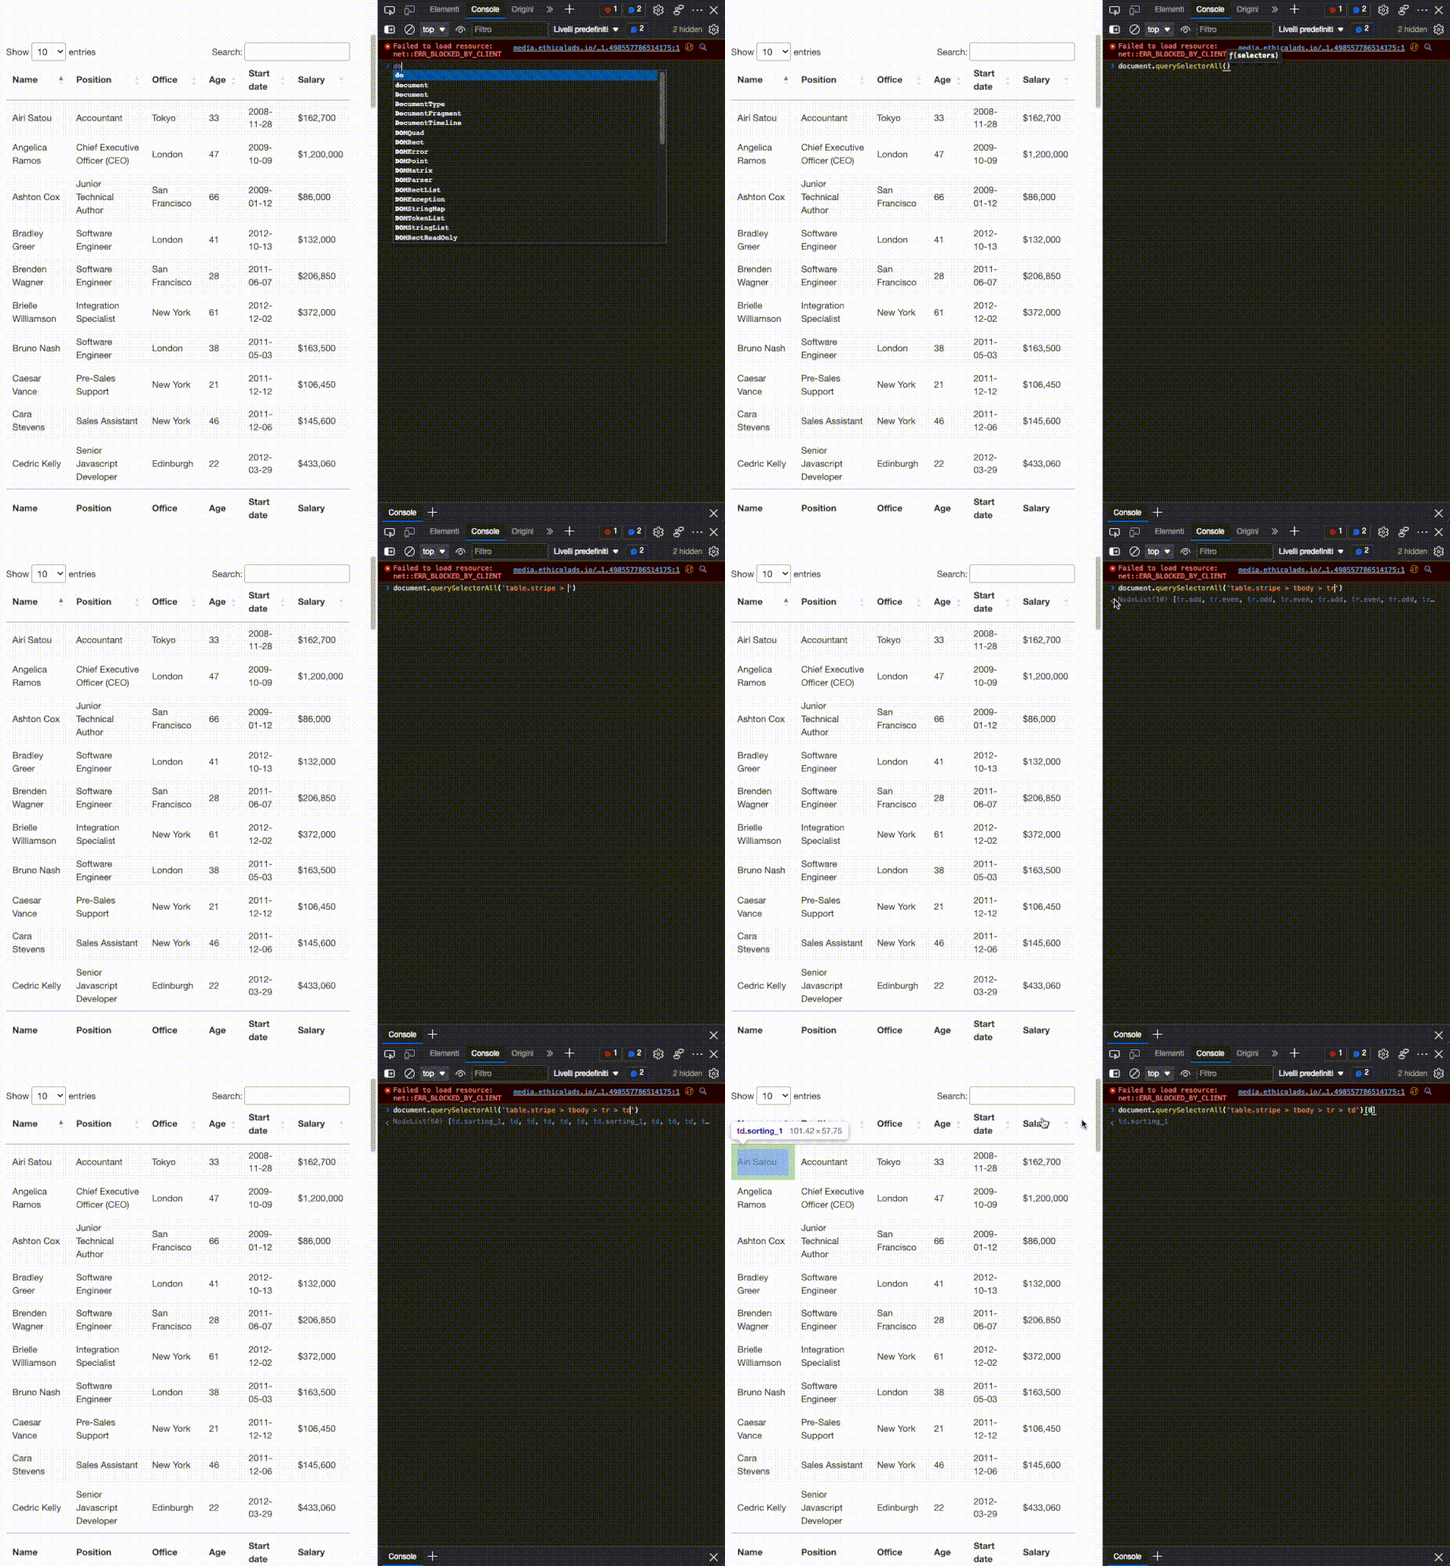
For starters, let’s try to pick the first employee’s name on our browser’s console using the .querySelectorAll() method. A really usuful feature of this method is that we can go deeper and deeper into the hierarchy implementing the greater than (>) symbol to define the parent element (on the left) and the child we want to grab (on the right).
</p>
document.querySelectorAll('table.stripe &amp;amp;gt; tbody &amp;amp;gt; tr &amp;amp;gt; td')[0]
<p>That couldn’t work any better. As you see, once we grab all <td> elements, these become a nodelist. Because we can’t rely on a class to grab each cell, all we need to know is their position in the index and the first one, name, is 0.
From there, we can write our code like this:
</p>
for row in rows:
name = row.find_all('td')[0].text
print(name)
<p>
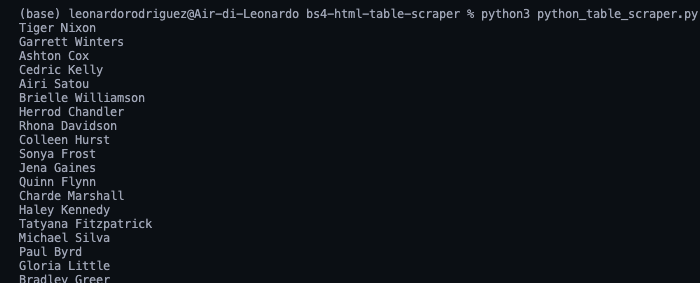
In simple terms, we’re taking each row, one by one, and finding all the cells inside, once we have the list, we grab only the first one in the index (position 0) and finish with the .text method to only grab the element’s text, ignoring the HTML data we don’t need.
There they are, a list with all the names employees names! For the rest, we just follow the same logic:
</p>
position = row.find_all('td')[1].text
office = row.find_all('td')[2].text
age = row.find_all('td')[3].text
start_date = row.find_all('td')[4].text
salary = row.find_all('td')[5].text
<p>
However, having all this data printed on our console isn’t super helpful. Instead, let’s store this data into a new, more useful format.
5. Storing Tabular Data Into a JSON File
Although we could easily create a CSV file and send our data there, that wouldn’t be the most manageble format if we can to create something new using the scraped data.
Still, here’s a project we did a few months ago explaining how to create a CSV file to store scraped data.
The good news is that Python has its own JSON module for working with JSON objects, so we don’t need to install anything, just import it.
</p>
import json
<p>
But, before we can go ahead and create our JSON file, we’ll need to turn all this scraped data into a list. To do so, we’ll create an empty array outside of our loop.
</p>
employee_list = []
<p>
And then append the data to it, with each loop appending a new object to the array.
</p>
employee_list.append({
	'Name': name,
	'Position': position,
	'Office': office,
	'Age': age,
	'Start date': start_date,
	'salary': salary
})

<p>
If we print(employee_list), here’s the result:
Still a little messy, but we have a set of objects ready to be transformed into JSON.
Note: As a test, we printed the length of employee_list and it returned 57, which is the correct number of rows we scraped (rows now being objects within the array).
Importing a list to JSON just requires two lines of code:
</p>
with open('json_data', 'w') as json_file:
json.dump(employee_list, json_file, indent=2)
<p>- First, we open a new file passing in the name we want for the file
(json_data)and ‘w’ as we want to write data to it. - Next, we use the
.dump()function to, well, dump the data from the array(employee_list)andindent=2so every object has it’s own line instead of everything being in one unreadable line.
6. Running the Script and Full Code
If you’ve been following along, your codebase should look like this:
</p>
#dependencies
import requests
from bs4 import BeautifulSoup
import json

url = 'http://api.scraperapi.com?api_key=51e43be283e4db2a5afbxxxxxxxxxxx&url=https://datatables.net/examples/styling/stripe.html'

#empty array
employee_list = []

#requesting and parsing the HTML file
response = requests.get(url)
soup = BeautifulSoup(response.text, 'html.parser')

#selecting the table
table = soup.find('table', class_ = 'stripe')

#storing all rows into one variable
for employee_data in table.find_all('tbody'):
rows = employee_data.find_all('tr')

#looping through the HTML table to scrape the data
for row in rows:
name = row.find_all('td')[0].text
position = row.find_all('td')[1].text
office = row.find_all('td')[2].text
age = row.find_all('td')[3].text
start_date = row.find_all('td')[4].text
salary = row.find_all('td')[5].text

#sending scraped data to the empty array
employee_list.append({
	'Name': name,
	'Position': position,
	'Office': office,
	'Age': age,
	'Start date': start_date,
	'salary': salary
})

#importing the array to a JSON file
with open('employee_data', 'w') as json_file:
json.dump(employee_list, json_file, indent=2)
<p>
Note: We added some comments for context.
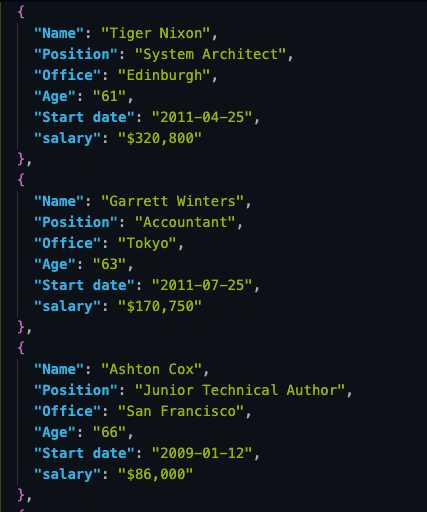
And here’s a look at the first three objects from the JSON file:
Storing scraped data in JSON format allow us to repurpose the information for new applications or
Scrape HTML Tables with Complex Headers.
Scraping data from HTML tables is pretty straightforward, but what happens when you encounter a table with more complex structures, such as nested tables, rowspans, or colspans? In these cases, you might need to implement more sophisticated parsing logic.
Before we begin, see what the target table</a > looks like below:
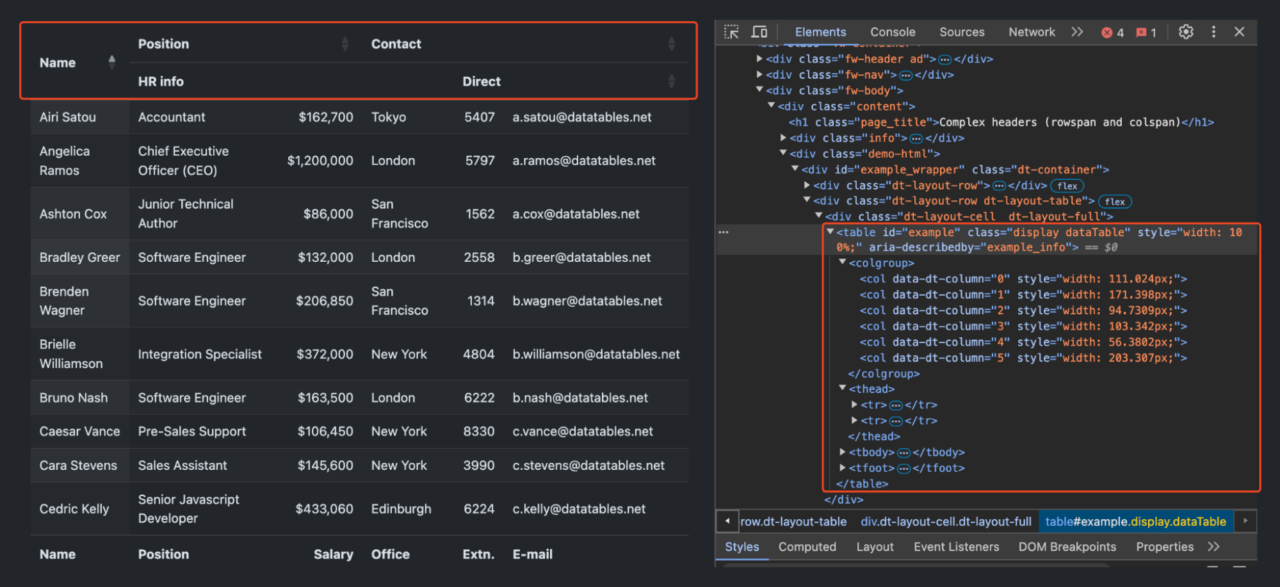
As you can see, this table has a two-level header structure:
- The first row contains broader categories: “Name“, “Position“, and “Contact“.
- The second row further breaks down these categories.
Let’s scrape that table!
Setting Up the Scraping Environment
First, we must import the required libraries. ScraperAPI will help us handle any anti-scraping measures the website might have in place, including managing headers and rotating IPs if necessary:
<pre class="wp-block-syntaxhighlighter-code">import requests
from bs4 import BeautifulSoup
import pandas as pd

api_key = 'YOUR_API_KEY'
url = 'https://datatables.net/examples/basic_init/complex_header.html'</pre
>
Creating the Scraping Function
Let’s proceed to create a function scrape_complex_table that will handle the entire scraping process. This function will take our URL as input and return a pandas DataFrame containing the structured table data:
</pre>
<pre class="wp-block-syntaxhighlighter-code">def scrape_complex_table(url):
    # Send a request to the webpage
    payload = {'api_key': api_key, 'url': url}
    response = requests.get('https://api.scraperapi.com', params=payload)
    soup = BeautifulSoup(response.text, 'html.parser')</pre
>
This function uses requests.get to send a GET request to ScraperAPI, which in turn fetches the target webpage. We then parse the HTML content using BeautifulSoup.
Locating the Target Table
We locate the table in the parsed HTML using its id attribute.
</pre>
<pre class="wp-block-syntaxhighlighter-code"># Find the target table
    table = soup.find('table', id='example')</pre
>
This line finds the first <table> element with id='example'.
Extracting and Combining Headers
We extract the first and second levels of headers and combine them to form a single list of column names.
</pre>
<pre class="wp-block-syntaxhighlighter-code"># Extract and combine headers
    headers_level1 = [th.text.strip() for th in table.select('thead tr:nth-of-type(1) th')]
    headers_level2 = [th.text.strip() for th in table.select('thead tr:nth-of-type(2) th')]

    combined_headers = []
    for i, header in enumerate(headers_level1):
        if header == 'Name':
            combined_headers.append(header)
        elif header == 'Position':
            combined_headers.extend([f"{header} - {col}" for col in ['Title', 'Salary']])
        elif header == 'Contact':
            combined_headers.extend([f"{header} - {col}" for col in ['Office', 'Extn.', 'Email']])</pre
>
Here, we use CSS selectors to target the header rows. We then loop through the first-level headers and, depending on the header, append appropriate second-level headers to our combined_headers list.
Extracting Data from the Table Body
We extract the data from each row in the table body.
</pre>
<pre class="wp-block-syntaxhighlighter-code"># Extract data from table body
    rows = []
    for row in table.select('tbody tr'):
        cells = [cell.text.strip() for cell in row.find_all('td')]
        rows.append(cells)</pre
>
This code loops through each <tr> in the <tbody>, extracts the text from each <td>, and stores the data in the rows list.
Creating the DataFrame
We’ll create a Pandas DataFrame using the combined headers and extracted data. This DataFrame organizes our data into a structured format with appropriate column names.
</pre>
<pre class="wp-block-syntaxhighlighter-code"># Create DataFrame
    df = pd.DataFrame(rows, columns=combined_headers)
    return df</pre
>
Running the Scraper and Saving Data
We call the scrape_complex_table function, display the first few rows of the DataFrame, and save it to a CSV file.
</pre>
<pre class="wp-block-syntaxhighlighter-code">result_df = scrape_complex_table(url)

# Display the first few rows of the result
print(result_df.head())

result_df.to_csv('complex_table_data.csv', index=False)
print("Data has been saved to 'complex_table_data.csv'")</pre
>
This will print the top rows of the DataFrame and save the entire data to a file named complex_table_data.csv.
Putting It All Together
Here’s what the complete code should look like after combining all the steps:
</pre>
<pre class="wp-block-syntaxhighlighter-code">import requests
from bs4 import BeautifulSoup
import pandas as pd

api_key = 'your_api_key_here'  # Replace with your actual ScraperAPI key

url = 'https://datatables.net/examples/basic_init/complex_header.html'

def scrape_complex_table(url):

    payload = {'api_key': api_key, 'url': url}
    response = requests.get('https://api.scraperapi.com', params=payload)
    soup = BeautifulSoup(response.text, 'html.parser')

    # Find the target table
    table = soup.find('table', id='example')

    # Extract and combine headers
    headers_level1 = [th.text.strip() for th in table.select('thead tr:nth-of-type(1) th')]
    headers_level2 = [th.text.strip() for th in table.select('thead tr:nth-of-type(2) th')]

    combined_headers = []
    for i, header in enumerate(headers_level1):
        if header == 'Name':
            combined_headers.append(header)
        elif header == 'Position':
            combined_headers.extend([f"{header} - {col}" for col in ['Title', 'Salary']])
        elif header == 'Contact':
            combined_headers.extend([f"{header} - {col}" for col in ['Office', 'Extn.', 'Email']])

    # Extract data from table body
    rows = []
    for row in table.select('tbody tr'):
        cells = [cell.text.strip() for cell in row.find_all('td')]
        rows.append(cells)


    df = pd.DataFrame(rows, columns=combined_headers)
    return df

# Scrape the table
result_df = scrape_complex_table(url)

# Display the first few rows of the result
print(result_df.head())

result_df.to_csv('complex_table_data.csv', index=False)
print("Data has been saved to 'complex_table_data.csv'")</pre
>
Note: Make sure you have replaced 'your_api_key_here' with your actual ScraperAPI key before running the script.
Scraping Paginated HTML Tables with Python
When dealing with large datasets, tables are often split across multiple pages to improve loading times and user experience. Traditionally, this would require setting up a headless browser with tools like Selenium. However, we can achieve the same results more efficiently using ScraperAPI’s Render Instruction Set.
Note: Check this in-depth tutorial on web scraping with Selenium</a > to learn more.
Understanding Pagination Handling
From our established example</a >, the table is paginated with “>” and “<” buttons.
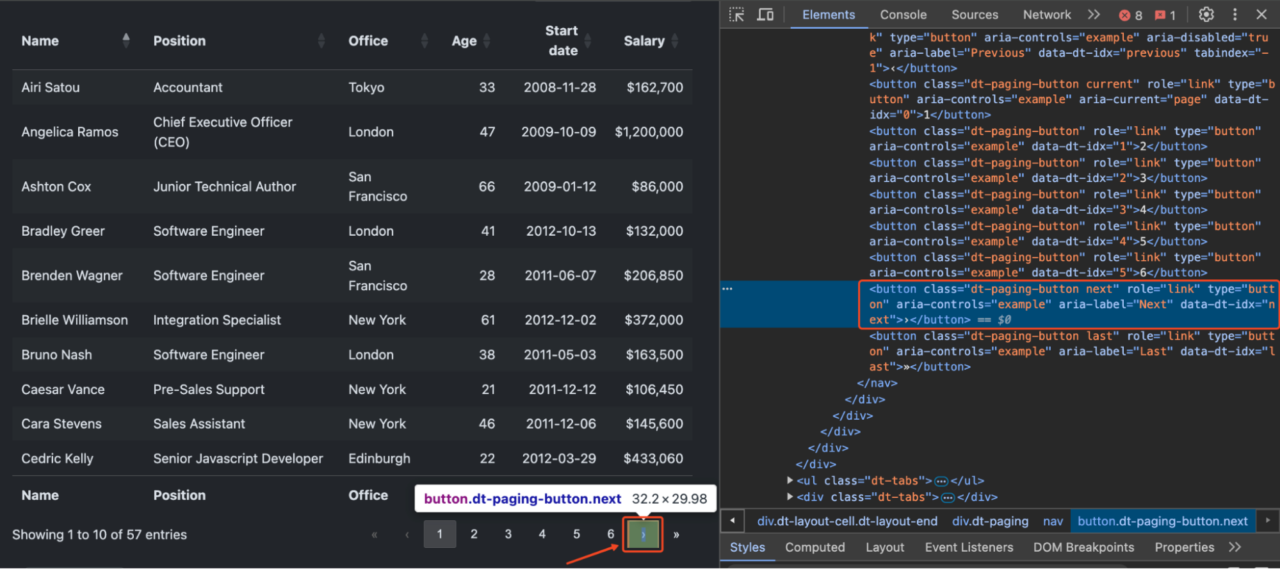
To scrape all the data, we need to:
- Load the initial page
- Click the “>” button
- Wait for new data to load
- Repeat until all pages are processed
Using ScraperAPI’s Render Instructions Set
Instead of manually controlling a browser, we can send instructions to ScraperAPI’s headless browser through their API.
Let’s quickly demonstrate how to scrape a paginated table using ScraperAPI’s Render Instruction Set:
Configuring ScraperAPI and Render Instructions
First, we’ll set up our ScraperAPI key and the target URL we want to scrape. Remember to replace 'your_api_key' with your actual ScraperAPI key.
</pre>
<pre class="wp-block-syntaxhighlighter-code">api_key = 'your_api_key'  # Replace with your actual ScraperAPI key

target_url = 'https://datatables.net/examples/styling/stripe.html'</pre
>
Now, we’ll define the set of render instructions.
</pre>
<pre class="wp-block-syntaxhighlighter-code"># Configuration for ScraperAPI's render instructions
config = [{
    "type": "loop",
    "for": 5,  # Number of times to execute the instructions
    "instructions": [
        {
            "type": "click",
            "selector": {
                "type": "css",
                "value": "button.dt-paging-button.next"
            }
        },
        {
            "type": "wait",
            "value": 3  # Wait time in seconds after clicking
        }
    ]
}]</pre
>
The loop Instruction repeats the set of instructions a specified number of times ("for": 5). While the click instruction simulates a click on the “>” button to navigate to the next page.
Making the Request to ScraperAPI
After defining the render instructions, we need to convert the config dictionary to a JSON string because ScraperAPI requires the instructions to be in JSON format when included in the request headers.
</pre>
<pre class="wp-block-syntaxhighlighter-code">config_json = json.dumps(config)</pre
>
We then prepare the headers and payload for the GET request to ScraperAPI:
</pre>
<pre class="wp-block-syntaxhighlighter-code"># Headers to include ScraperAPI instructions
headers = {
    'x-sapi-api_key': api_key,
    'x-sapi-render': 'true',
    'x-sapi-instruction_set': config_json
}

# Payload with the target URL
payload = {'url': target_url}</pre
>
In the headers:
'x-sapi-api_key'is where you include your ScraperAPI key for authentication.'x-sapi-render'is set to ‘true’ to enable rendering with a headless browser, allowing the execution of JavaScript and dynamic content loading.- ‘
x-sapi-instruction_set'contains the render instructions in JSON format, which we previously converted withjson.dumps(config).
The payload simply includes the 'url' key with the target_url value, which indicates the webpage we want to scrape.
Processing the Table Data
Once we have the response, we can process the table data using BeautifulSoup:
</pre>
<pre class="wp-block-syntaxhighlighter-code"># Parse the HTML content
soup = BeautifulSoup(response.text, 'html.parser')
employee_list = []

# Find and process the table
table = soup.find('table', class_='stripe')

# Extract data from all rows
for employee_data in table.find_all('tbody'):
    rows = employee_data.find_all('tr')

    for row in rows:
        cells = row.find_all('td')
        employee_list.append({
            'Name': cells[0].text,
            'Position': cells[1].text,
            'Office': cells[2].text,
            'Age': cells[3].text,
            'Start date': cells[4].text,
            'salary': cells[5].text
        })

# Save the data to a JSON file
with open('employee_data.json', 'w') as json_file:
    json.dump(employee_list, json_file, indent=2)</pre
>
Benefits of Using Render Instructions
Using ScraperAPI’s Render Instructions offers several benefits over traditional browser automation:
- No need to install and manage Selenium or a WebDriver
- Simpler code with fewer dependencies
- Better handling of anti-bot measures through ScraperAPI
- More reliable execution with built-in waits and retries
- It can be easily deployed to servers without browser dependencies
Dealing with Errors while Scraping HTML Tables
HTML tables on real websites often have complex layouts, making them difficult for beginners to scrape. These tables may include mixed data types, nested elements, merged cells, and other intricate structures that make table parsing difficult during scraping.
Let’s explore some common issues and their solutions to make your table scraping more efficient and reliable:
1. Handling Empty Cells and Missing Data
Empty cells or missing data can cause your scraping script to fail or produce incomplete results. Here’s how to handle them gracefully:
</pre>
<pre class="wp-block-syntaxhighlighter-code">def extract_cell_data(cell):
    # Handle empty cells
    if not cell:
        return "N/A"

    # Handle cells with only whitespace
    if cell.text.strip() == "":
        return "N/A"

    return cell.text.strip()</pre
>
2. JavaScript-Injected Tables
Some tables are dynamically generated using JavaScript, meaning the data isn’t present in the initial HTML response but is injected into the page after being rendered by a browser. Traditional scraping methods may fail to retrieve this content since they don’t execute JavaScript.
</pre>
<pre class="wp-block-syntaxhighlighter-code">[
  {
    "type": "input",
    "selector": { "type": "css", "value": "#searchInput" },
    "value": "cowboy boots"
  },
  {
    "type": "click",
    "selector": {
      "type": "css",
      "value": "#search-form button[type=\"submit\"]"
    }
  },
  {
    "type": "wait_for_selector",
    "selector": { "type": "css", "value": "#content" }
  }
]</pre
>
Note: To learn more about scraping javascript tables</a >, kindly refer to our in-depth guide.
3. Malformed HTML Tables
Some tables might have an invalid HTML structure or missing closing tags. A better parser to use in this instance would be html5lib</a >. Here’s how to handle them:
</pre>
<pre class="wp-block-syntaxhighlighter-code">def clean_table_html(html_content):
    # Use html5lib parser for better handling of malformed HTML
    soup = BeautifulSoup(html_content, 'html5lib')

    # Function to check if table is valid
    def is_valid_table(table):
        if not table.find('tr'):
            return False
        rows = table.find_all('tr')
        if not rows:
            return False
        return True

    # Find all tables and process only valid ones
    tables = []
    for table in soup.find_all('table'):
        if is_valid_table(table):
            # Clean up any invalid nested tables
            for nested_table in table.find_all('table'):
                nested_table.decompose()
            tables.append(table)

    return tables</pre
>
4. Using Pandas over MechanicalSoup or BeautifulSoup
Using Pandas for scraping HTML tables saves a lot of time and makes code more reliable because you select the entire table, not individual items that may change over time.
The read_html method lets you directly fetch tables without parsing the entire HTML document. It’s way faster for extracting tables since it’s optimized for this specific task. It also directly returns a DataFrame, which makes it easy to clean, transform, and analyze the data.
Scraping HTML Tables Using Pandas
Before you leave the page, we want to explore a second approach to scrape HTML tables. In a few lines of code, we can scrape all tabular data from an HTML document and store it into a dataframe using Pandas.
Create a new folder inside the project’s directory (we named it pandas-html-table-scraper) and create a new file name pandas_table_scraper.py.
Let’s open a new terminal and navigate to the folder we just created (cd pandas-html-table-scraper) and from there install pandas:
</p>
pip install pandas
<p>
And we import it at the top of the file.
</p>
import pandas as pd
<p>
Pandas has a function called read_html() which basically scrape the target URL for us and returns all HTML tables as a list of DataFrame objects.
However, for this to work, the HTML table needs to be structured at least somewhat decently, as the function will look for elements like <table> to identify the tables on the file.
To use the function, let’s create a new variable and pass the URL we used previously to it:
</p>
employee_data = pd.read_html('http://api.scraperapi.com?api_key=51e43be283e4db2a5afbxxxxxxxxxxxx&url=https://datatables.net/examples/styling/stripe.html')
<p>
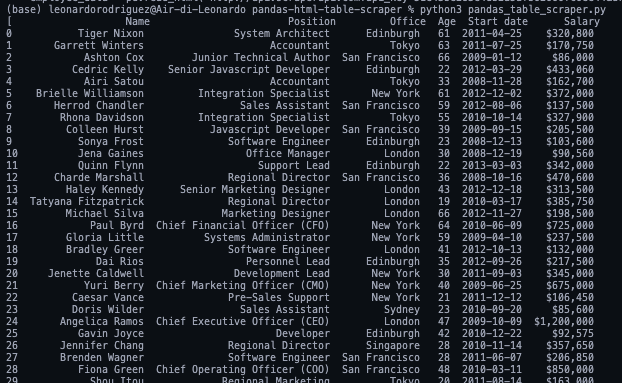
When printing it, it’ll return a list of HTML tables within the page.
If we compare the first three rows in the DataFrame they’re a perfect match to what we scraped with Beautiful Soup.
To work with JSON, Pandas can has a built-in .to_json() fuction. It’ll convert a list of DataFrame objects into a JSON string
All we need to do is calling the method on our DataFrame and pass in the path, the format (split, data, records, index, etc.) and add the indent to make it more readable:
</p>
employee_data[0].to_json('./employee_list.json', orient='index', indent=2)
<p>
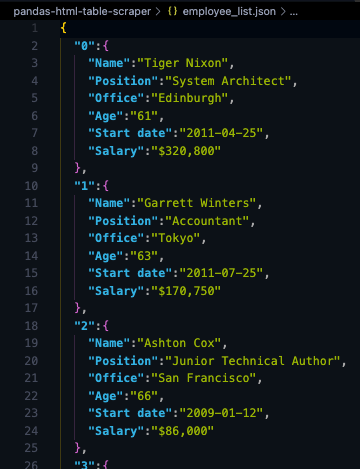
If we run our code now, here’s the resulting file:
Notice that we needed to select our table from the index ([0])because .read_html() returns a list not a single object.
Here’s the full code for your reference:
</p>
import pandas as pd

employee_data = pd.read_html('http://api.scraperapi.com?api_key=51e43be283e4db2a5afbxxxxxxxxxxxx&url=https://datatables.net/examples/styling/stripe.html')

employee_data[0].to_json('./employee_list.json', orient='index', indent=2)
<p>
Armed with this new knowledge, you’re ready to start scraping virtually any HTML table on the web. Just remember that if you understand how the website is structured and the logic behind it, there’s nothing you can’t scrape.
That said, these methods will only work as long as the data is inside the HTML file. If you encounter a dynamically generated table, you’ll need to find a new approach. For these type of tables, we’ve created a step-by-step guide to scraping JavaScript tables with Python without the need for headless browsers.
Until next time, happy scraping!
Scraping HTML Tables FAQs
What kind of data can HTML tables contain?
HTML tables can contain a wide variety of data types. They are commonly used to display structured information such as text, numbers, dates, images, links, and even nested tables. This makes them suitable for representing data like financial reports, product listings, and statistical data – which we can then scrape for analysis.
What are the best tools to scrape HTML tables?
Some of the best tools for scraping HTML tables include Python libraries like BeautifulSoup and Pandas. These tools allow you to easily extract table data and manipulate it. For more complex scenarios, Scraping APIs like ScraperAPI can handle dynamic content and bypass anti-scraping measures.
How Can I Scrape Dynamic Tables?
To scrape dynamic tables that are generated or updated using JavaScript, you need tools that can render JavaScript content. Tools like ScraperAPI can fetch the fully loaded page, allowing you to extract the dynamic table data. Alternatively, you can use webdrivers like Selenium or PlayWright, which can simulate a real user interacting with the browser, loading dynamic content before scraping.
