Pricing is at the core of every business, brand, and product. A good pricing strategy can get you to the top of the market, while a bad model can be your downfall. So, if you’re looking to increase your chances of success, price scraping might be the most critical tool in your arsenal.
Collecting pricing data gives you insights into market dynamics and helps you make data-driven decisions to enhance competitiveness; all from data that is publicly available across the web.
By leveraging price scraping, you can:
- Inform your pricing strategy to stay competitive
- Automatically adjust prices based on market conditions, demand fluctuations, and competitor pricing (dynamic pricing)
- Spot market trends and adapt to sudden changes
- Identify pricing opportunities
- Keep a close eye on your competitors
And much more. To help you get started, we’ll explore some of the best tools you can use to gather pricing information at scale, and two effective methods to do it on your own.
Top 3 Tools for Price Scraping
There’s a sea of tools and services available for monitoring pricing data, so instead of giving you a hundred different solutions that do mostly the same thing, we listed three solutions. If you’re unsure what road to take, think about your budget, data needs, and expertise level (yours or your team’s), and you’ll quickly understand the best solution for you.
Resource: How to Choose a Data Collection Tool
1. Python
Python is a high-level, versatile, and easy-to-read programming language. It’s known for its simplicity and extensive libraries.
Since it’s open-source, Python is free to use for any type of application (business or personal) and has opened the doors for an extensive community that is always ready to help.
Thanks to libraries like Requests, Beautiful Soup, and Pandas, scraping publicly available pricing information and, with enough knowledge, manipulating this information is a very straightforward process. However, what sets Python apart from other languages (at least for this task) is that it has become a standard in the data industry. There’s no shortage of free educational content, libraries, and tools to collect and analyze data at scale.
Resource: Web Scraping Guide Using Python & Beautiful Soup
Alternative
If you’re not interested in Python, JavaScript (in a Node.js environment) is another great programming language to build data collectors.
Thanks to tools like Axios and Cheerio, you can build highly sophisticated web scrapers, and for websites requiring user interaction (like single-page applications).
Resource: How to Web Scrape With JavaScript & Node.js
2. DataPipeline
DataPipeline is ScraperAPI’s low-code solution for building data collectors and scheduling scraping jobs with a visual interface.
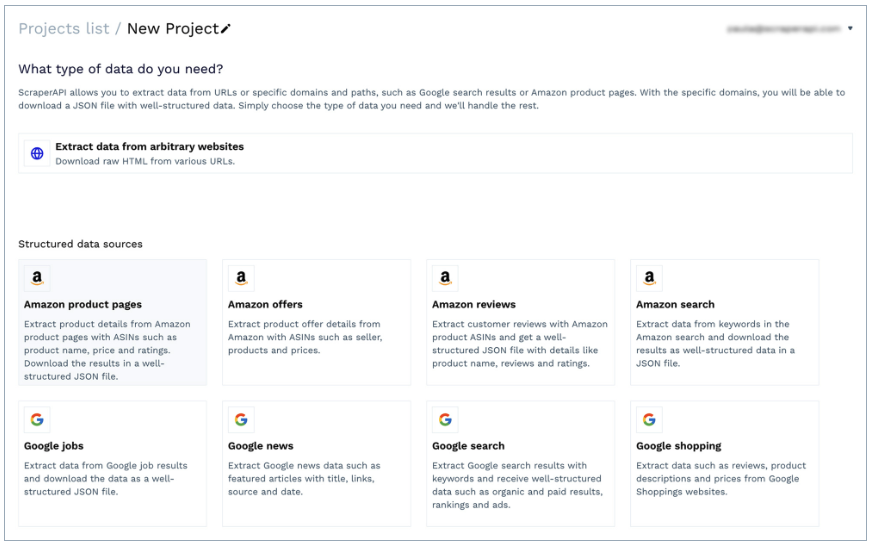
Thanks to its simple interface, it can be used by non-technical professionals to gather data from any URL without writing a single line of code. In addition, it offers specific templates for domains like Amazon (product pages, search, offers, etc.) and Google Shopping. It allows you to retrieve product information – including pricing – as structured JSON data.
Best of all, it comes with a built-in scheduler. You can use it to set specific intervals for scraping jobs, making it possible to monitor products and URLs regularly in just a couple of clicks.
Alternative
If you have coding experience, you can use ScraperAPI’s structured data endpoints to turn product pages into JSON. When sending a get() request through one of these endpoints, ScraperAPI will bypass any anti-scraping mechanism, take all relevant elements from the product page or search result, and return everything in structured key pairs (JSON).
You’ll still have the flexibility of building a complete solution from scratch but with easier-to-manipulate data formats.
3. Mindrest
Mindrest is a complete off-the-shelf price monitoring and price optimization software. It is designed to work from the get-go without much input from your end.
Of course, the trade-off when using these kinds of software is customization and price.
Because price monitoring software needs to serve as many companies as possible to be profitable, it also means that the software is designed to fit as many use cases as possible, and changing parts of the software to fit your workflows can be more challenging.
Still, this can be the perfect choice for businesses (with the budget to afford the service) that don’t want to build in-house solutions or don’t have enough human resources to handle the project (like data analysts to process the collected data).
Alternative
A similar but more affordable solution is Prisync. The software can monitor several platforms (like Shopify stores) and implement dynamic pricing based on the data it finds, making it a great, done-for-you solution for mid-level businesses.
Collect Pricing Data with DataPipeline (Low-Code Method)
Let’s explore the low code method first, which is quite straightforward.
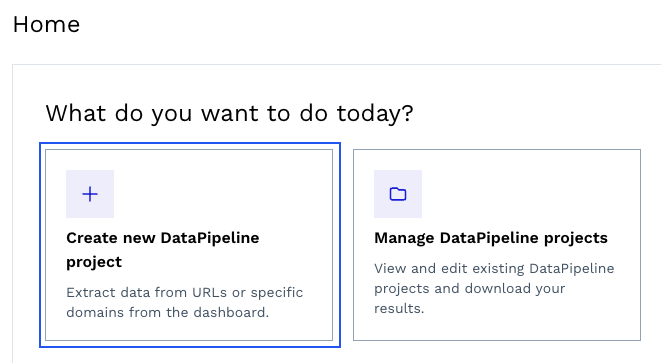
To get started, create a free ScraperAPI account, navigate to your dashboard, and click on “Create new DataPipeline project.”
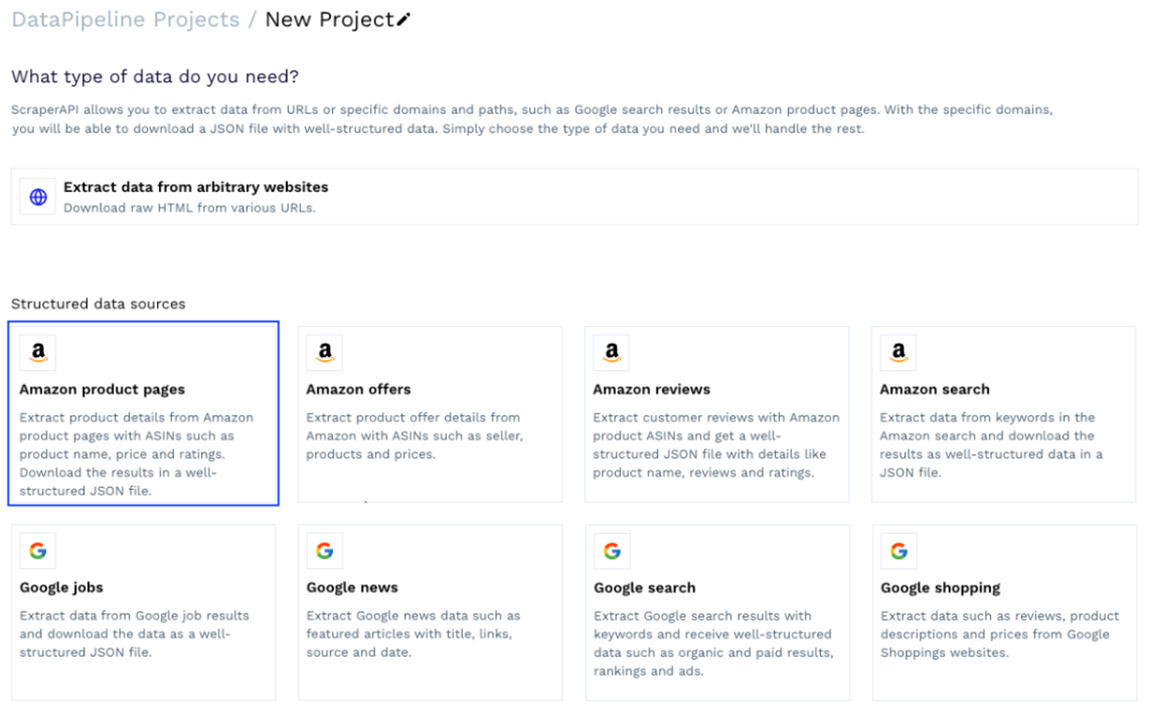
We can choose one of the ready-made templates or create a project to collect data from arbitrary URLs. Let’s use the “Amazon product pages” template for this project.
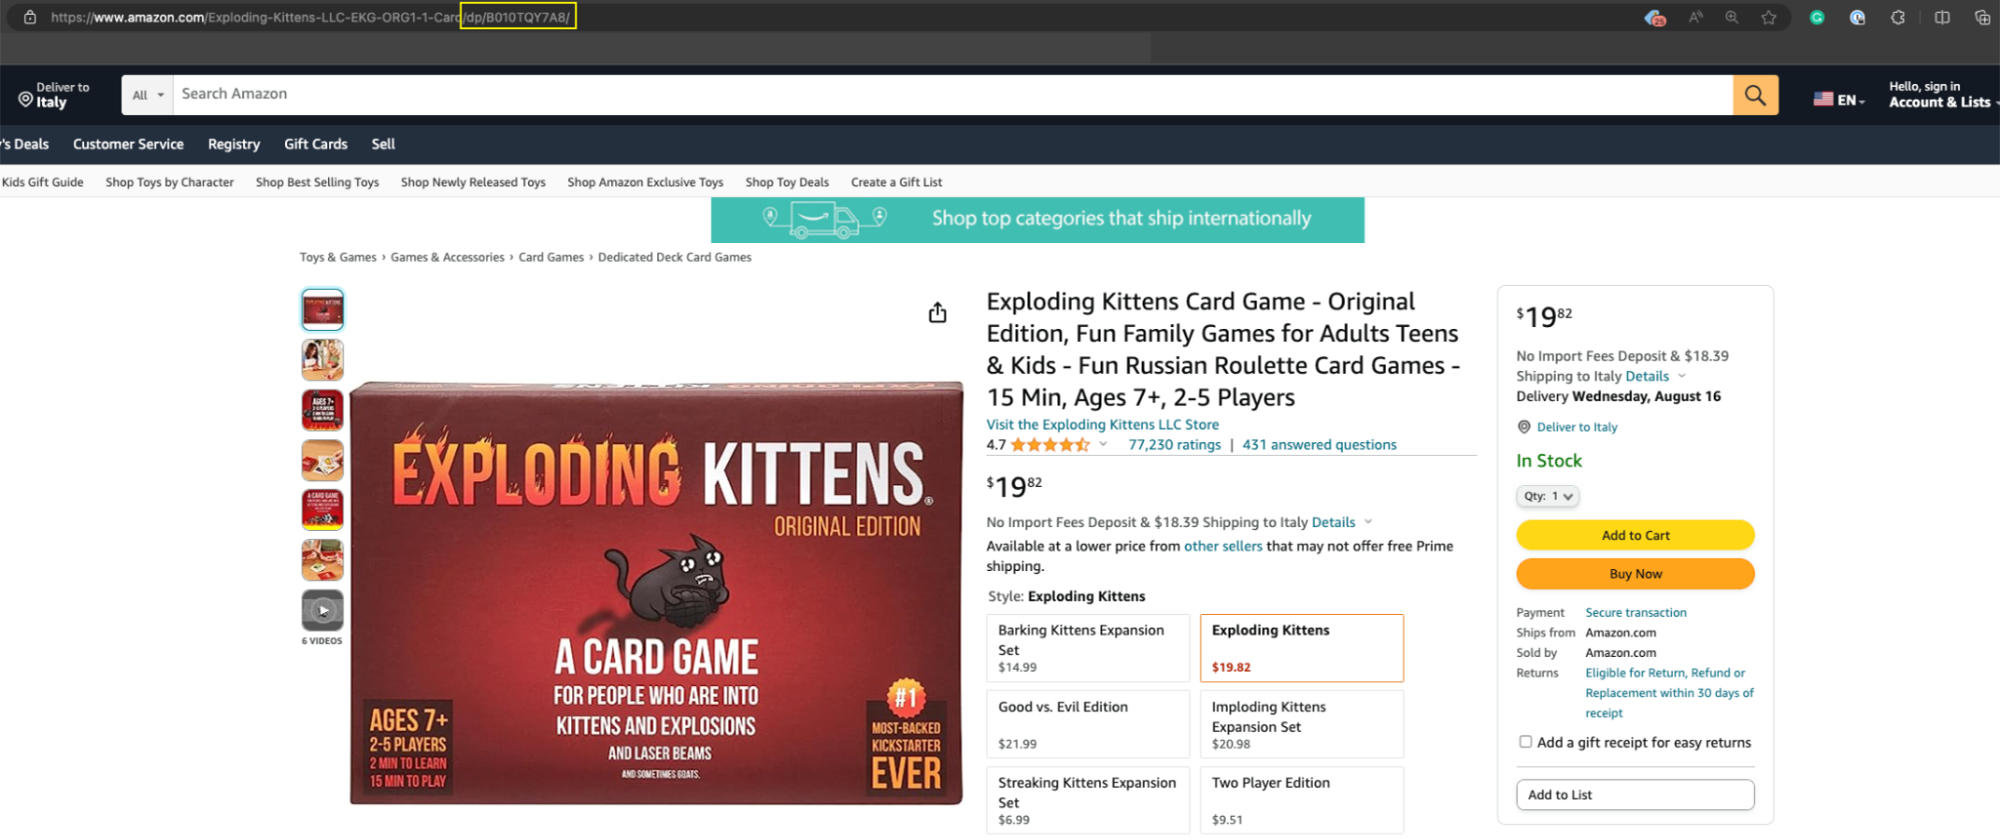
This template will ask you for a few details about the scraping job, but the most important element is the product ASIN – a unique number Amazon assigns to every product listed on the platform, and you can easily find it in the product URL, usually after /db/.
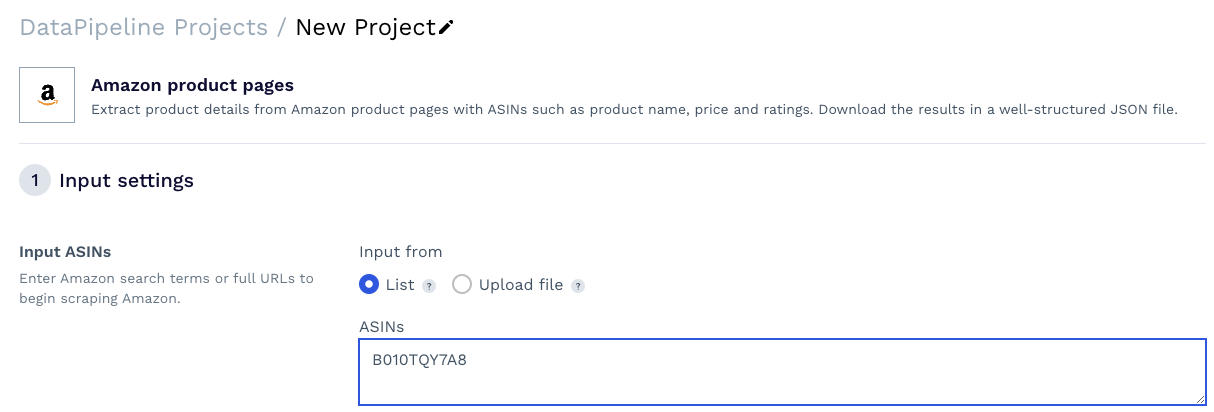
Copy the product ASIN and paste it into the text box within the tool.
Resource: Collect Product ASINs at Scale
Next, click on the dropdown menu and look for the US. You can leave the TLD empty.

The country code defines the location from where you want DataPipeline to send the requests. The TLD tells it which Amazon domain to send it to. When TLD is not defined, like in our case, it defaults to the US TLD, which is amazon.com.
Note: This will come in handy when collecting localized data.
The second step of the setup is where the magic happens. First, you can decide how you want to receive your data – we chose to download the file, but you can also set up a Webhook to receive the information directly into an application, data warehouse, etc.
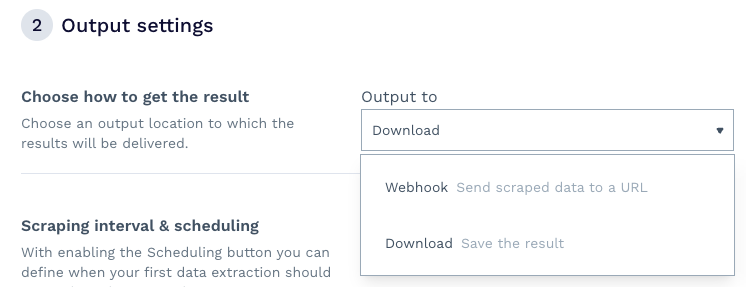
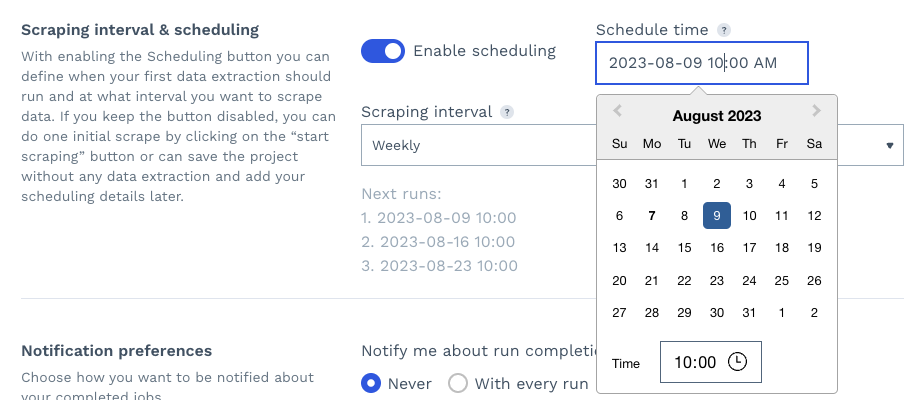
Second, by enabling scheduling, you can set a day, time, and interval for the scraping job to rerun automatically, effectively monitoring your competitors’ product pages.
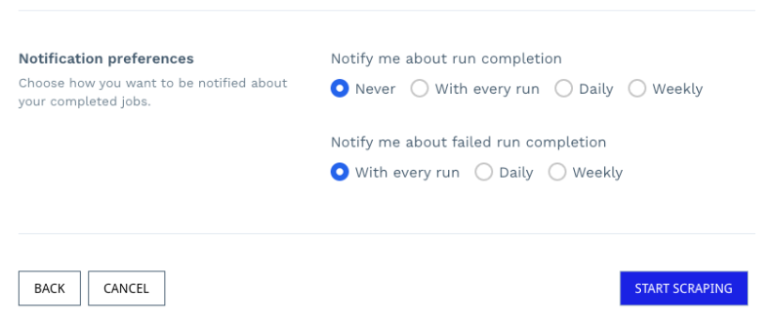
Finally, you can set your notifications preferences and click on “start scraping” to run your project.
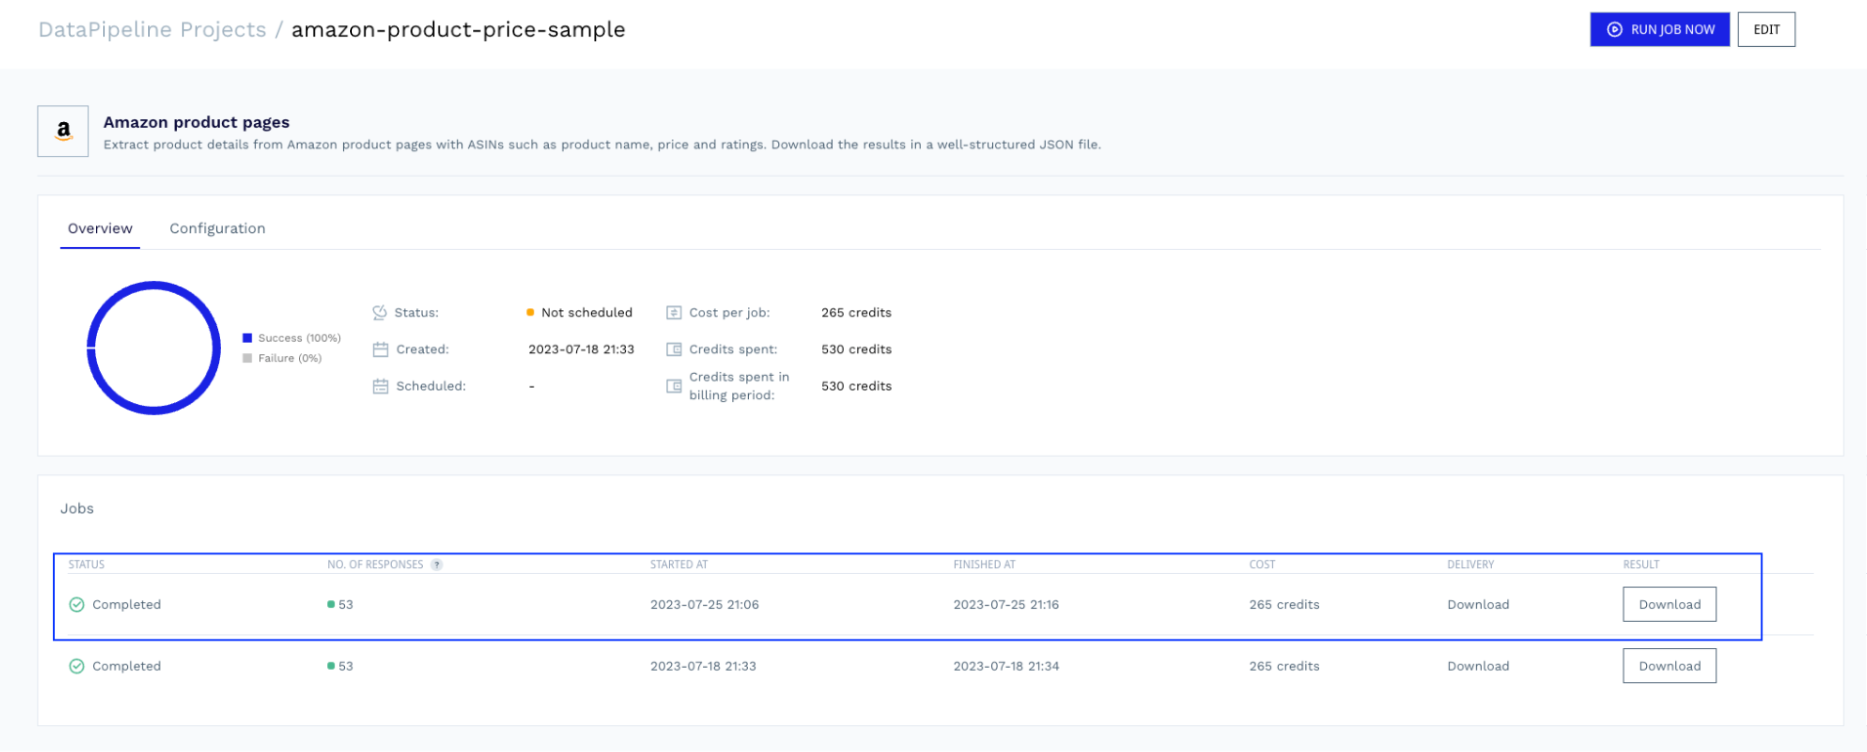
Once the job is complete, you can return to the project and download the file with the data ready for parsing.
Check the full Amazon product sample response DataPipeline returns.
Scrape Pricing Data with Python (Technical Method)
For simplicity’s sake, we’ll collect pricing data from books.toscrape.com. More specifically, we’ll collect the name, price, UPC, and availability from the first book listed on the page.
Setting Up Your Project
Let’s create a new directory for our project, create a Python file and import our dependencies at the top.
import requests
from bs4 import BeautifulSoup
import pandas as pd
Next, create a free ScraperAPI account if you haven’t already, copy your API key from the dashboard, and add the following payload variable to your file.
payload = {
	'api_key': 'YOUR_API_KEY',
	'url': 'https://books.toscrape.com/catalogue/a-light-in-the-attic_1000/index.html',
	'country_code': 'us'
}
In a real project – especially for complex sites – websites will quickly spot your scripts and block them from accessing the web, which can also result in your IP getting blacklisted indeterminately.
To avoid any risks and automate the most technically challenging aspect of web scraping (like rotating proxies, handling CAPTCHAs, and geotargeting), we’ll use ScraperAPI’s standard endpoint.
Also, notice that we’ll add the URL we want to scrape (https://books.toscrape.com/catalogue/a-light-in-the-attic_1000/index.html) and the location of the proxies we want ScraperAPI to use (US-based proxies).
Now we’re ready to send our request.
Sending Your Request
To send a request through ScraperAPI, let’s make a get() request to the https://api.scraperapi.com endpoint, with the payload as params.
response = requests.get('https://api.scraperapi.com', params=payload)
ScraperAPI will use machine learning and years of statistical analysis to choose the right IP and headers combination to bypass the site’s anti-scraping mechanism. Once it accesses the content, it’ll return the raw HTML and store it in response.
However, to pick elements from the response, we need to parse the response, and that’s where BeautifulSoup enters.
soup = BeautifulSoup(response.content, 'html.parser')
This will generate a parse tree we can now navigate using CSS selectors.
Building Your Parser
Because we’ll want to export this data, let’s create an empty array where we’ll format the extracted elements.
book_data = []
Before writing the code, we must understand where the data sits within the HTML structure. Navigate to the page and open DevTools to see the page’s HTML.
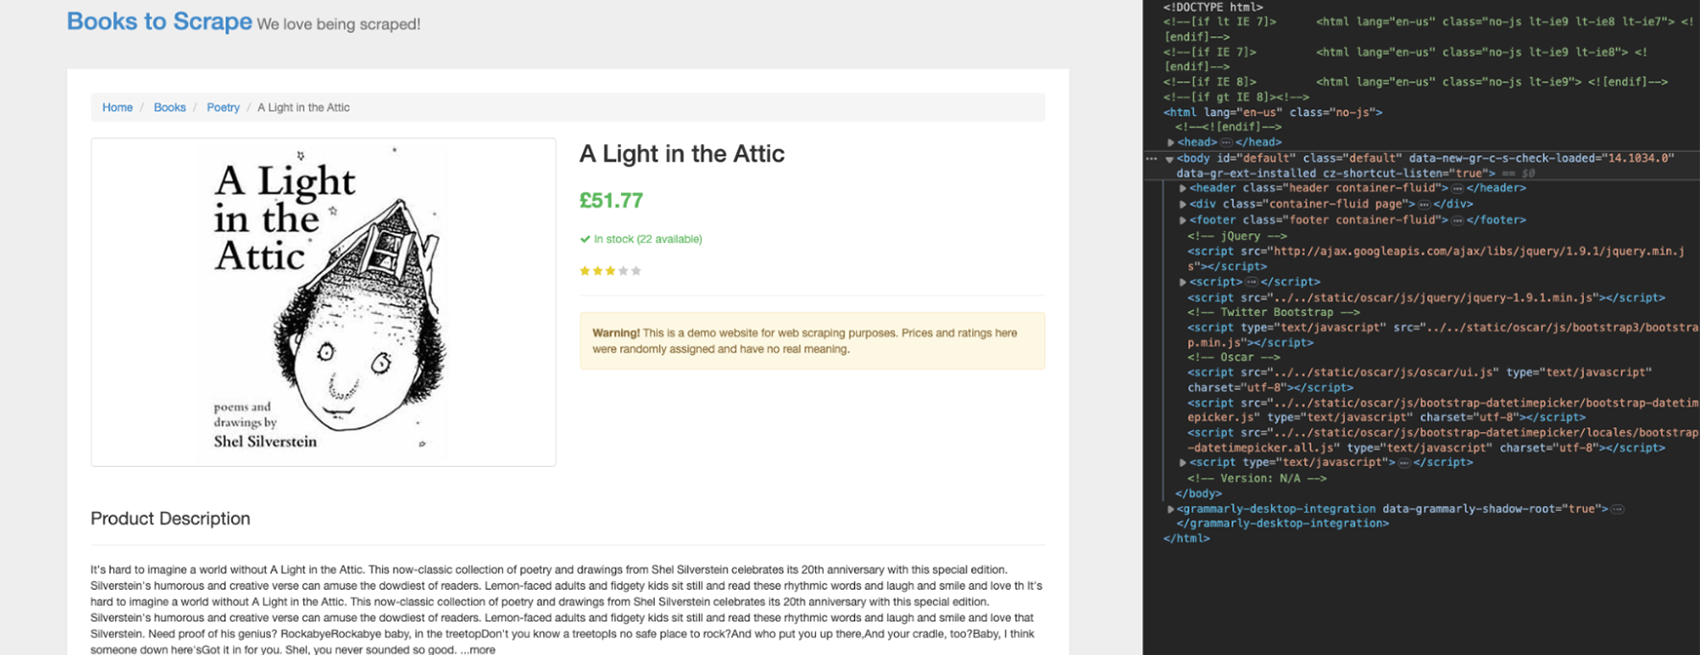
Click on the book’s name at the top using the inspector tool.
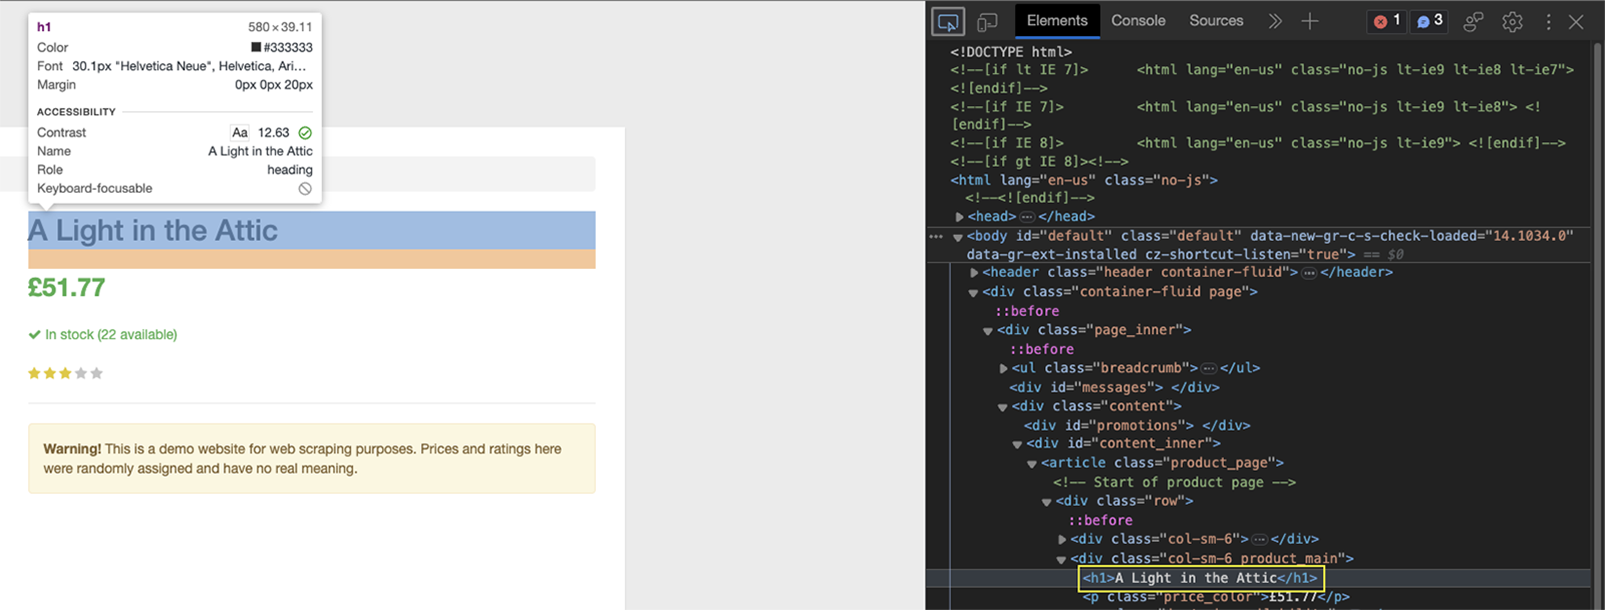
As you can see, the element is wrapped between h1 tags, and it’s the only h1 element on the page.
Before extracting the book’s name, let’s create the logic to append the data to the empty array (book_data.append()), and inside it, we’ll format the information.
book_data.append({
'Name': soup.find('h1').text,
})
Because the parse tree is stored in soup, we can now use the .find() method on it to target the h1 element and then ask it to return the text inside that element.
Do the same thing for the price.
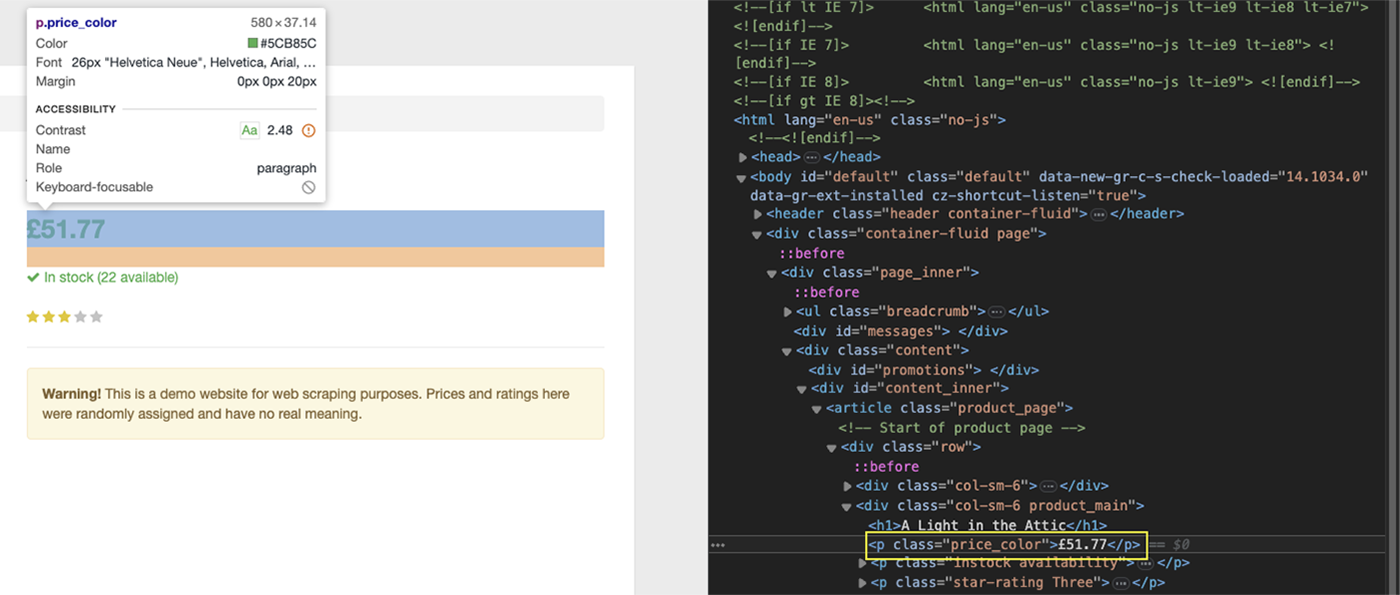
In this case, the price is wrapped between p tags, but there are many on the page, so what can we do?
If you pay closer attention, this specific p tag has a price_color class we can target using the proper CSS selector:
book_data.append({
	'Name': soup.find('h1').text,
	'Price': soup.find('p', class_='price_color').text,
})
However, the next two elements are inside a table, which requires a different strategy.
Extracting Product Data from Tables
Tables are a bit more difficult to scrape (sometimes) than other elements because they are made of tags with no particular attributes to target, like classes or IDs. Instead, we can use the position of each element within the table to target the data.

In the image above, you can see that the table’s main content is inside the tbody tag – this is the case for most tables – and each row is represented by a tr tag.
Then, inside the tr tag are two tags containing the name of the detail (th) and the value (td).
With this structure, we should be able to target the UPC, for example, by finding all the tr tags on the page, selecting the first in the list, and then returning the text from the respective td.
Let’s test this in the browser’s console:
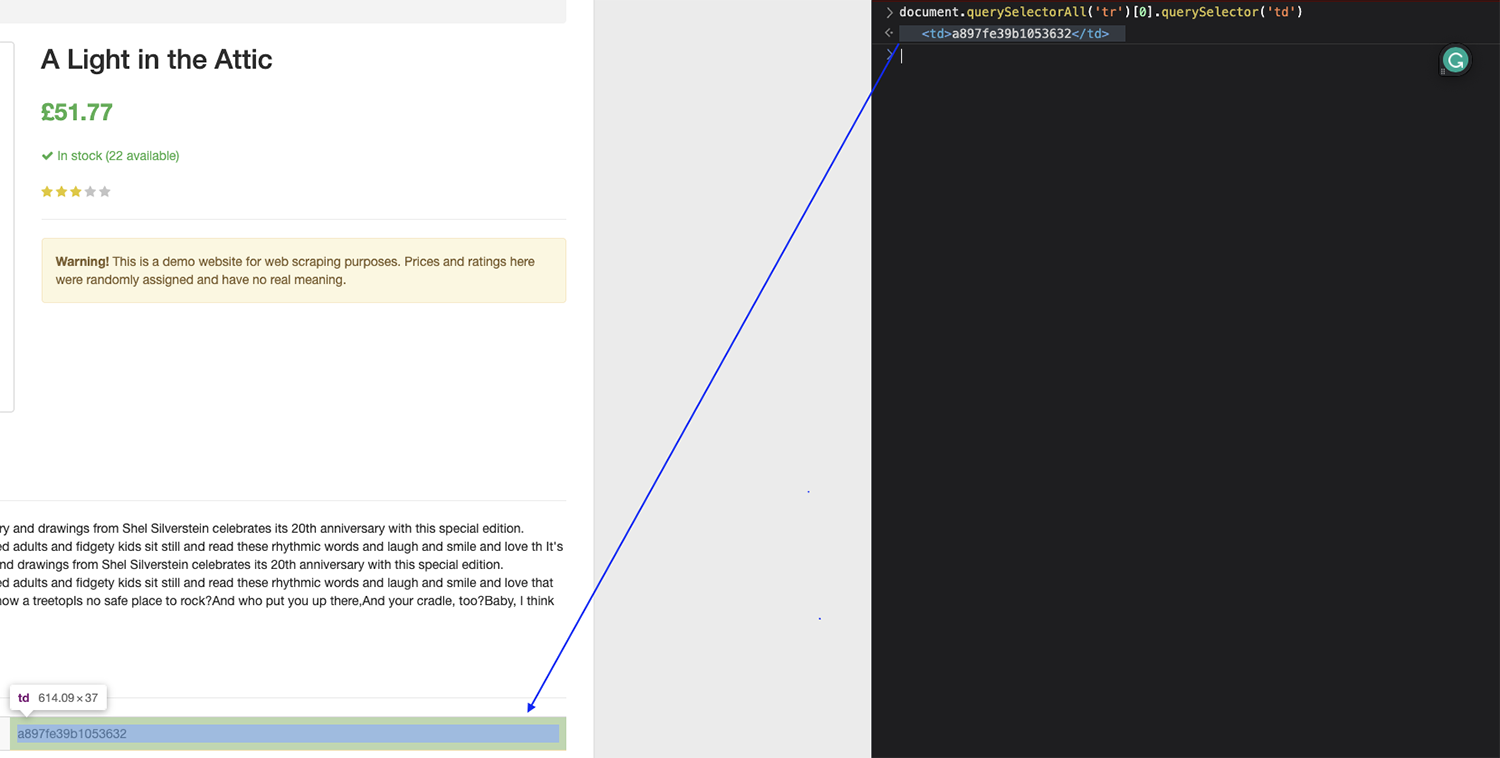
Note: Remember, the index starts counting from zero (0), so if you want to grab the first element, you have to target the element zero.
It worked perfectly!
Now, we can use the same logic inside our code to extract the UPC.
book_data.append({
	'Name': soup.find('h1').text,
	'Price': soup.find('p', class_='price_color').text,
	'UPC': soup.find_all('tr')[0].find('td').text,
})
For the availability, just change the number to 5 to target the sixth row on the table, and now we have completed our parser.
book_data.append({
	'Name': soup.find('h1').text,
	'Price': soup.find('p', class_='price_color').text,
	'UPC': soup.find_all('tr')[0].find('td').text,
	'Availability': soup.find_all('tr')[5].find('td').text,
})
Exporting the Extracted Data to a CSV
This part is super easy because you’ve already done the hard work. By appending the data into book_data, we’ve created a dictionary we can export using Pandas like this:
df = pd.DataFrame(book_data)
df.to_csv('product_data.csv', index=False)
This will use the names we set above (Name, Price, UPC, and Availability) as headers and then add the value.

Wrapping Up
Congratulations, you just built your first price tracker!
Of course, you can scale this script to collect the data from all 1,000 books within books to scrape if you’d like, or build a list of Amazon ASINs and use DataPipeline to collect pricing data from up to 10,000 products per project.
Once you’ve collected the desired data, you can analyze it to draw powerful conclusions that can help you inform your product pricing, understand the overall market, and find interesting pricing opportunities.
Building historical pricing data is the best way to find high-value pricing opportunities (like seasons when competitors are more expensive), find market shifts so you can adapt quickly, see declines in sales based on lower price trends, and much more.
Combine this data with product details and product reviews to get the most value for your efforts.
Here are two resources that can help you get started:
- Scrape Amazon ASIN: How to Do It at Scale
- Scrape Amazon Reviews: How to Scale the Process
- View all our eCommerce scraping guides here
Don’t hesitate to use today’s script to kickstart other projects, or use DataPipeline for more efficient scraping job scheduling.
Until next time, happy scraping!

