Walmart has a data mine, represented by millions of products listed on its platform, that business and data analysts can use to make better decisions and gain a competitive advantage in their market.
However, scraping Walmart product data is challenging due to its anti-scraping mechanisms, such as CAPTCHA challenges, request rate-limiting, and IP address bans – to name a few – making it hard to get consistent access to product data at scale.
ScraperAPI’s Walmart endpoints allow you to turn any Walmart page, including product, search, and category pages, into structured JSON data.
In this tutorial, we’ll build a Walmart web scraper from scratch and show you how to easily bypass its anti-bot detection without harming its server.
TL;DR: Full Walmart Node.js Scraper
For those in a hurry, here’s the full code in Node.js.
	const axios = require('axios');
	const cheerio = require('cheerio');

	const WALMART_PAGE_URL = 'https://walmart.com/search?q=computer+screen';
	const API_URL = 'https://api.scraperapi.com';
	const API_KEY = '' // <--- Enter your API key here

	const parseProductReview = (inputString) => {
	   const ratingRegex = /(\d+\.\d+)/;
	   const reviewCountRegex = /(\d+) reviews/;

	   const ratingMatch = inputString.match(ratingRegex);
	   const reviewCountMatch = inputString.match(reviewCountRegex);

	   const rating = ratingMatch?.length > 0 ? parseFloat(ratingMatch[0]) : null;
	   const reviewCount = reviewCountMatch?.length > 1 ? parseInt(reviewCountMatch[1]) : null;

	   return { rating, reviewCount };
	};

	const webScraper = async () => {
	   const queryParams = new URLSearchParams({
		   api_key: API_KEY,
		   url: WALMART_PAGE_URL,
		   render: true,
	   });

	   try {
		   const response = await axios.get(`${API_URL}?${queryParams.toString()}`);

		   const html = response.data;

		   const $ = cheerio.load(html);
		   const productList = [];

		   $("div[data-testid='list-view']").each((_, el) => {
			   co
	nst link = $(el).prev('a').attr('href');
			   const price = $(el).find('.f2').text();
			   const priceCents = $(el).find('.f2 + span.f6').text();
			   const description = $(el).find("span[data-automation-id='product-title']").text();
			   const reviews = $(el).find('.w_iUH7').last().text();
			   const delivery = $(el).find("div[data-automation-id='fulfillment-badge']").find('span.b').last().text();

			   const { rating, reviewCount } = parseProductReview(reviews);

			   productList.push({
				   description,
				   price: `$${price}.${priceCents}`,
				   averageRating: rating,
				   totalReviews: reviewCount,
				   delivery,
				   link: `https://www.walmart.com${link}`
			   });
		   });

		   console.log(productList);
	   } catch (error) {
		   console.log(error.response.data)
	   }
	};

	void webScraper();
Before running this code, install the dependencies and set your API key, which you can find in the ScraperAPI dashboard – this is critical as ScraperAPI will allow us to bypass Walmart’s anti-bot mechanisms and render its dynamic content.
Note: The free trial includes 5,000 API credits and access to all ScraperAPI tools.
Want to learn the details? Let’s jump into the tutorial!
Scraping Walmart Product Data in Node.js
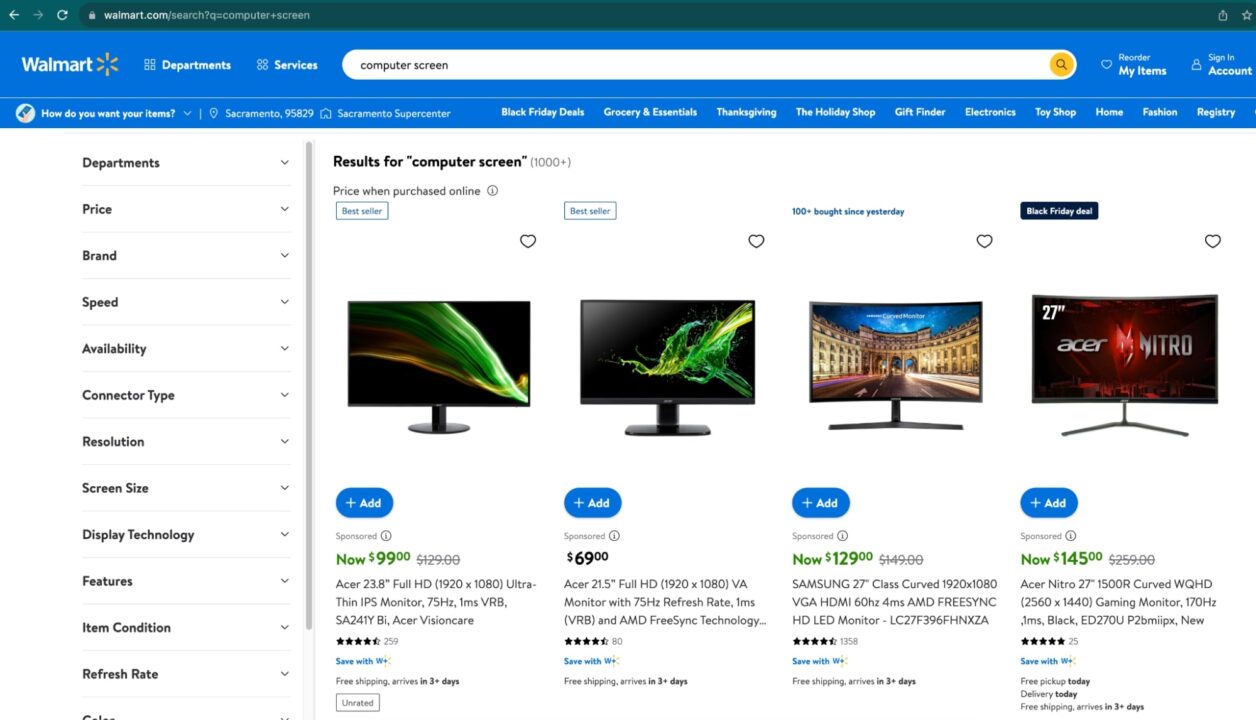
To demonstrate how to scrape Walmart, we’ll write a script that finds computer screens on Walmart.
For each computer screen, we’ll extract the:
- Description
- Price
- Average rating
- Total reviews
- Delivery estimation
- Product link
The script will export the data extracted in JSON format to make it easier to use for other purposes.

Important Update
Turn Walmart search pages into easy-to-navigate JSON data using ScraperAPI’s Walmart Search endpoint.
https://api.scraperapi.com/structured/walmart/searchJust send your requests to the endpoint alongside your API key and query within a
payload. You’ll be able to pick specific data points using predictable and consistent JSON key-value pairs.{ "items": [ { "availability": "In stock", "id": "5Q2MFCGA4YFB", "image": "https://i5.walmartimages.com/asr/0119bcd3-0ea5-45f5-92b8-451c7db9dae9.740de01aff4ffa73cd8579e3335e187a.jpeg?odnHeight=180&odnWidth=180&odnBg=ffffff", "name": "Matchbox Hitch N' Haul: 1:64 Scale Toy Vehicle & Trailer, 4 Accessories (Styles May Vary)", "price": 9.76, "rating": { "average_rating": 4, "number_of_reviews": 31 }, "seller": "Lord of Retail", "url": "https://www.walmart.com/ip/Matchbox-Hitch-N-Haul-1-64-Scale-Toy-Vehicle-Trailer-4-Accessories-Styles-May-Vary/33707529" }, [More Data]See the full Walmart Product endpoint sample response.
Explore Walmart Product SDE
Prerequisites
You must have these tools installed on your computer to follow this tutorial.
- Node.js 18+ and NPM
- Basic knowledge of JavaScript and Node.js API
- A ScraperAPI account; sign up and get 5,000 free API credits to get started
Step 1: Set Up the Project
Let’s create a folder containing the source code of the Walmart scraper.
mkdir walmart-scraper
Enter the folder and initialize a new Node.js project
	cd walmart-scraper

	npm init -y
The second command above will create a package.json file in the folder.
Next, create a file index.js and add a simple JavaScript instruction inside.
	touch index.js

	echo "console.log('Hello world!');" > index.js
Run the file index.js using the Node.js runtime.
node index.js
This execution will print a Hello world! message to the terminal.
Step 2: Install the Dependencies
To build this scraper, we need these two Node.js packages:
- Axios – to build the HTTP request (headers, body, query string parameters, etc…), send it to the ScraperAPI standard API, and download the HTML content
- Cheerio – to extract the information from the HTML downloaded from the Axios request
Run the command below to install these packages:
npm install axios cheerio
Step 3: Identify the DOM Selectors to Target
Navigate to https://www.walmart.com; type “computer screen” in the search bar and press enter.
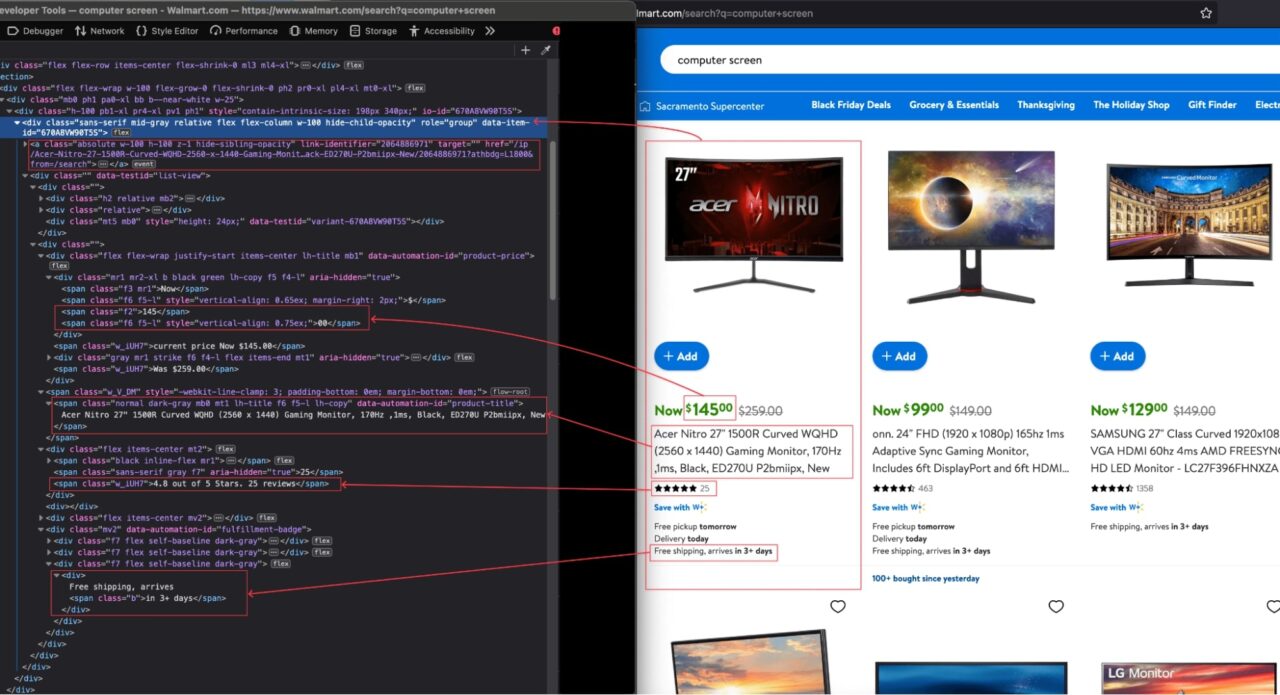
When the search result appears, inspect the page to display the HTML structure and identify the DOM selector associated with the HTML tag wrapping the information we want to extract.

From the above picture, here are all the DOM selectors the Web scraper will target to extract the information.
| Information | DOM selector |
| Product’s Description | span[data-automation-id=’product-title’] |
| Price | div[data-testid=’list-view’] .f2 |
| Price Cents | div[data-testid=’list-view’] .f2 + span.f6 |
| Average rating | div[data-testid=’list-view’] span.w_V_DM + div.flex span.w_iUH7 |
| Total reviews | div[data-testid=’list-view’] span.w_V_DM + div.flex span.f7 |
| Delivery estimation | div[data-testid=’list-view’] div[data-automation-id=’fulfillment-badge’] div.f7:last-child span.b:last-child |
| Walmart’s link | div + a |
Be careful when writing the selector because a misspelling will prevent the script from retrieving the correct value.
Note: A good method to avoid errors when building your selectors is to try them with jQuery first. In the browser console, type your selector like $(“span[data-automation-id=’product-title’]”) if it returns the correct DOM element, then you are good to go.
Important Update
Forget about building and maintaining parsers. With ScraperAPI’s Walmart Products endpoint you can to turn product pages into easy-to-navigate JSON data.
https://api.scraperapi.com/structured/walmart/productJust send your requests to the endpoint alongside your API key and product ID within a
payload. Then, extract specific product details using JSON key-value pairs like"reviews"."reviews": [ { "title": "Walmart pickup order", "text": "Make sure they scan your item right I received my order thru the delivery but when I finished activating my phone it still says SOS mode only so I'll be making a trip to Walmart sucks too have a locked phone after spending the money for it", "author": "TrustedCusto", "date_published": "2/8/2024", "rating": 5 }, { "title": "Very satisfied.", "text": "I'm very satisfied with my purchase and product. Thank you. Definitely will recommend when I get the chance. Keep up the good work. I appreciate you.", "author": "BLVCKSNVCK", "date_published": "10/7/2023", "rating": 5 }, [More Data]See the full Walmart Product endpoint sample response.
Explore Walmart Product SDE
Step 4: Send the Initial Request to Walmart
As mentioned, we’ll use ScraperAPI’s standard API to bypass Walmart’s anti-bot detection.
To build the requests, we’ll use Axios and pass the following parameters to the API:
- The URL to scrape: it is the URL of the Walmart products search page; you can copy it in the address bar of your browser (in our case
https://walmart.com/search?q=computer+screen). - The API Key: to authenticate against the Standard API and perform the scraping. You can find it on your ScraperAPI dashboard.
- Enable JavaScript: Walmart’s website is built with a modern frontend Framework that adds JavaScript for better interactivity. to enable JavaScript while Scraping, we will use a property named
`render`with the value set to`true`.
Note: Enabling JS rendering will allow us to scrape Walmart’s dynamic content. Without it, we would get a blank page.
Edit the index.js to add the code below that builds the HTTP request, sends it, receives the response, and prints it to the terminal.
	const axios = require('axios');

	const WALMART_PAGE_URL = 'https://walmart.com/search?q=computer+screen';
	const API_URL = 'https://api.scraperapi.com';
	const API_KEY = '' // <--- Enter your API key here

	const webScraper = async () => {
	   const queryParams = new URLSearchParams({
		   api_key: API_KEY,
		   url: WALMART_PAGE_URL,
		   render: true,
	   });

	   try {
		   const response = await axios.get(`${API_URL}?${queryParams.toString()}`);

		   const html = response.data;

		   console.log("HTML content", html);
	   } catch (error) {
		   console.log(error.response.data)
	   }
	};

	void webScraper();
Scrape thousands of Walmart products with a custom Enterprise plan. Get more than 3M API credits, +100 concurrent threads, premium support, and an account manager.
Step 5: Extract Information From the HTML
Now that we have the HTML content of the page, we must parse it with Cheerio to be able to navigate it and extract all the information we want.
Cheerio provides functions to load HTML text and then navigate through the structure to extract information using the DOM selectors.
The code below goes through each element, extracts the information, and returns an array containing all the computer’s screens.
	const cheerio = require('cheerio');

	const $ = cheerio.load(html);
	const productList = [];

	const parseProductReview = (inputString) => {
	   const ratingRegex = /(\d+\.\d+)/;
	   const reviewCountRegex = /(\d+) reviews/;

	   const ratingMatch = inputString.match(ratingRegex);
	   const reviewCountMatch = inputString.match(reviewCountRegex);

	   const rating = ratingMatch?.length > 0 ? parseFloat(ratingMatch[0]) : null;
	   const reviewCount = reviewCountMatch?.length > 1 ? parseInt(reviewCountMatch[1]) : null;

	   return { rating, reviewCount };
	};


	$("div[data-testid='list-view']").each((_, el) => {
	   const link = $(el).prev('a').attr('href');
	   const price = $(el).find('.f2').text();
	   const priceCents = $(el).find('.f2 + span.f6').text();
	   const description = $(el).find("span[data-automation-id='product-title']").text();
	   const reviews = $(el).find('.w_iUH7').last().text();
	   const delivery = $(el).find("div[data-automation-id='fulfillment-badge']").find('span.b').last().text();

	   const { rating, reviewCount } = parseProductReview(reviews);

	   productList.push({
		   description,
		   price: `$${price}.${priceCents}`,
		   averageRating: rating,
		   totalReviews: reviewCount,
		   delivery,
		   link: `https://www.walmart.com${link}`
	   });
	});

	console.log(productList);
The function parseProductionReview() extracts the average rating and the total reviews made by the customers on the product.
Here is the complete code of the index.js file:
	const axios = require('axios');
	const cheerio = require('cheerio');

	const WALMART_PAGE_URL = 'https://walmart.com/search?q=computer+screen';
	const API_URL = 'https://api.scraperapi.com';
	const API_KEY = '' // <--- Enter your API key here

	const parseProductReview = (inputString) => {
	   const ratingRegex = /(\d+\.\d+)/;
	   const reviewCountRegex = /(\d+) reviews/;

	   const ratingMatch = inputString.match(ratingRegex);
	   const reviewCountMatch = inputString.match(reviewCountRegex);

	   const rating = ratingMatch?.length > 0 ? parseFloat(ratingMatch[0]) : null;
	   const reviewCount = reviewCountMatch?.length > 1 ? parseInt(reviewCountMatch[1]) : null;

	   return { rating, reviewCount };
	};

	const webScraper = async () => {
	   const queryParams = new URLSearchParams({
		   api_key: API_KEY,
		   url: WALMART_PAGE_URL,
		   render: true,
	   });

	   try {
		   const response = await axios.get(`${API_URL}?${queryParams.toString()}`);

		   const html = response.data;

		   const $ = cheerio.load(html);
		   const productList = [];

		   $("div[data-testid='list-view']").each((_, el) => {
			   co
	nst link = $(el).prev('a').attr('href');
			   const price = $(el).find('.f2').text();
			   const priceCents = $(el).find('.f2 + span.f6').text();
			   const description = $(el).find("span[data-automation-id='product-title']").text();
			   const reviews = $(el).find('.w_iUH7').last().text();
			   const delivery = $(el).find("div[data-automation-id='fulfillment-badge']").find('span.b').last().text();

			   const { rating, reviewCount } = parseProductReview(reviews);

			   productList.push({
				   description,
				   price: `$${price}.${priceCents}`,
				   averageRating: rating,
				   totalReviews: reviewCount,
				   delivery,
				   link: `https://www.walmart.com${link}`
			   });
		   });

		   console.log(productList);
	   } catch (error) {
		   console.log(error.response.data)
	   }
	};

	void webScraper();
Run the code with the command node index.js, and appreciate the result:

Wrapping Up – Scraping Walmart with Node.js
Building a web scraper for Walmart can be done in the following steps:
- Use Axios to send a request to the ScraperAPI with the Walmart page to scrape and download the rendered HTML content
- Parse the HTML with Cheerio to extract the data based on DOM selectors
- Format and transform the data retrieved to suit your needs.
The result is a list of relevant information about the products displayed on the Walmart website.
Here are a few ideas to go further with this Walmart Web scraper:
- Retrieve data about a product, such as technical characteristics, reviews, etc…
- Make the web scraper dynamic by allowing you to type the search keyword directly
- Store the data in a database (RDBMS, JSON files, CSV files, etc…) to build historical data and make business decisions
- Use the Async Scraper service to scrape millions of URLs asynchronously
To learn more, check out ScraperAPI’s documentation for Node.js. For easy access, here’s this project’s GitHub repository.


