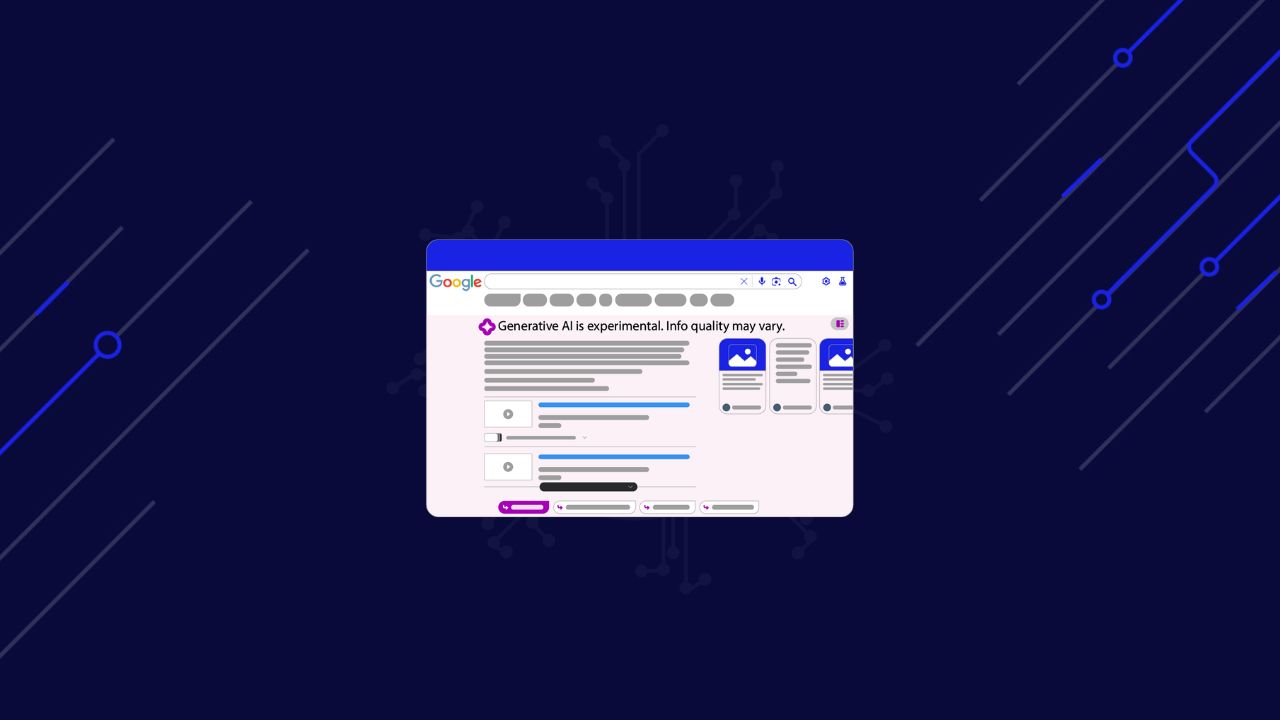
If you’ve ever searched for something on Google and noticed a helpful AI-generated summary at the top of the results, you’ve encountered Google’s AI overviews. These overviews provide a quick and concise answer to your query, making it easier to find relevant information without digging through multiple links. But what if you want to scrape these overviews to build a dataset, analyze trends, or automate data collection?
Scraping Google’s AI overviews can be a bit tricky. Google actively monitors and blocks automated requests, so gathering this data with traditional scraping techniques can be challenging. However, with the right tools and a well-crafted approach, you can bypass these barriers and get the necessary information.
In this guide, I’ll show you:
- How Google AI overviews work
- How to scrape Google AI overviews using Python
- How to bypass Google bot-blockers with ScraperAPI
Whether your goal is research, SEO analysis, or automating data collection, this tutorial will help you collect AI overviews efficiently—step by step.
ScraperAPI’s SERP APIs let you collect data from any Google domain in JSON or CSV format.
Ready to get started? Let’s dive in!
Understanding Google AI Overviews
Google AI overviews are more than quick answers—they’re packed with valuable insights. When Google shows an AI-generated overview at the top of search results, it provides what it thinks is the best answer to a question based on its analysis of millions of web pages.
Let’s look at a real example. When you search for “How to brew coffee,” on google you might see an AI overview that looks something like this:
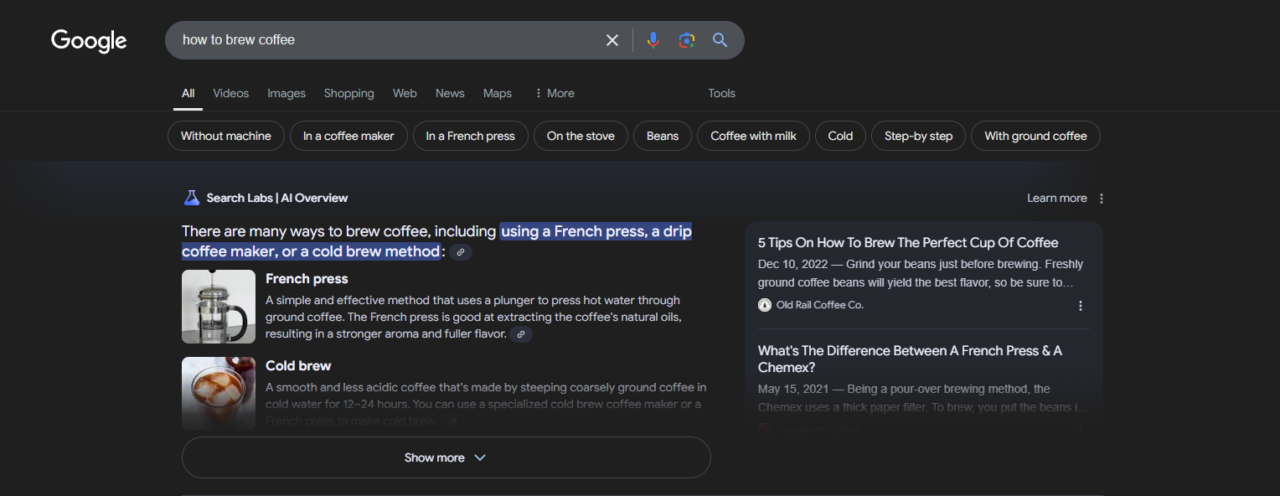
To scrape this data effectively, it’s important to identify the correct selectors for each part of the overview. Here’s how I did it:
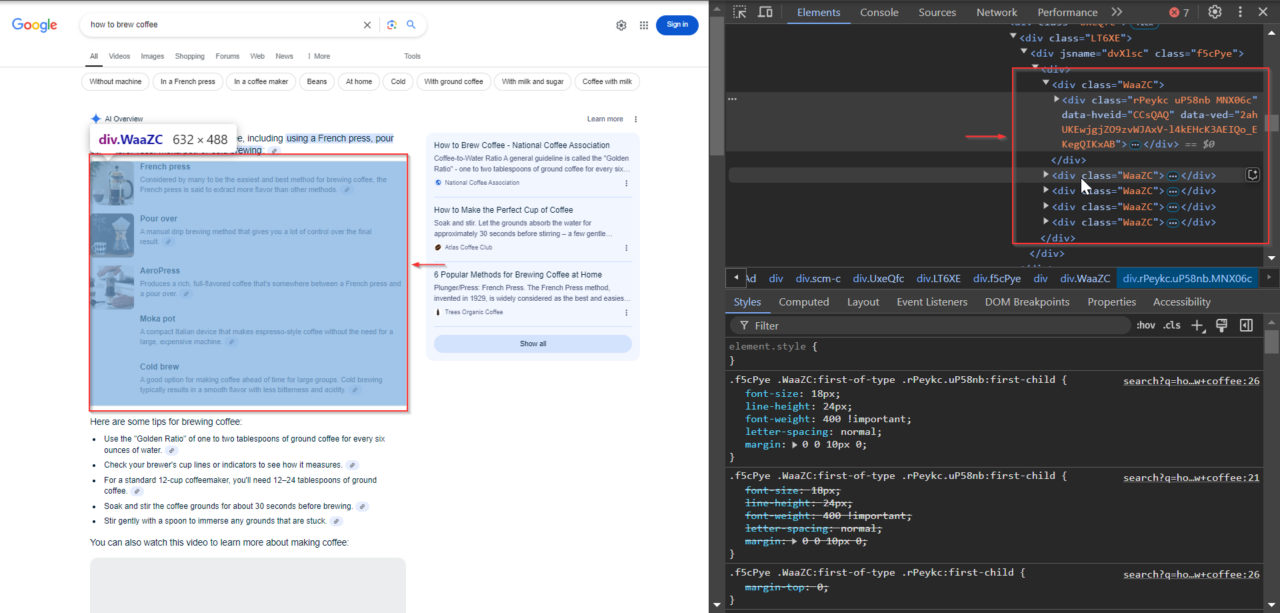
1. Identifying the Content Class
The main AI overview content is located within elements with the WaaZC class. These elements include text descriptions and relevant overviews about the search query. Using your browser’s Inspect tool, you can locate this class and see how Google structures this information.
2. Finding the Related Links
Below the overviews, Google often includes related links to authoritative sources it used to generate the overview. These links are located in elements with the VqeGe class. Inspecting the structure reveals the container holding these links, making it possible to extract them alongside the overview.

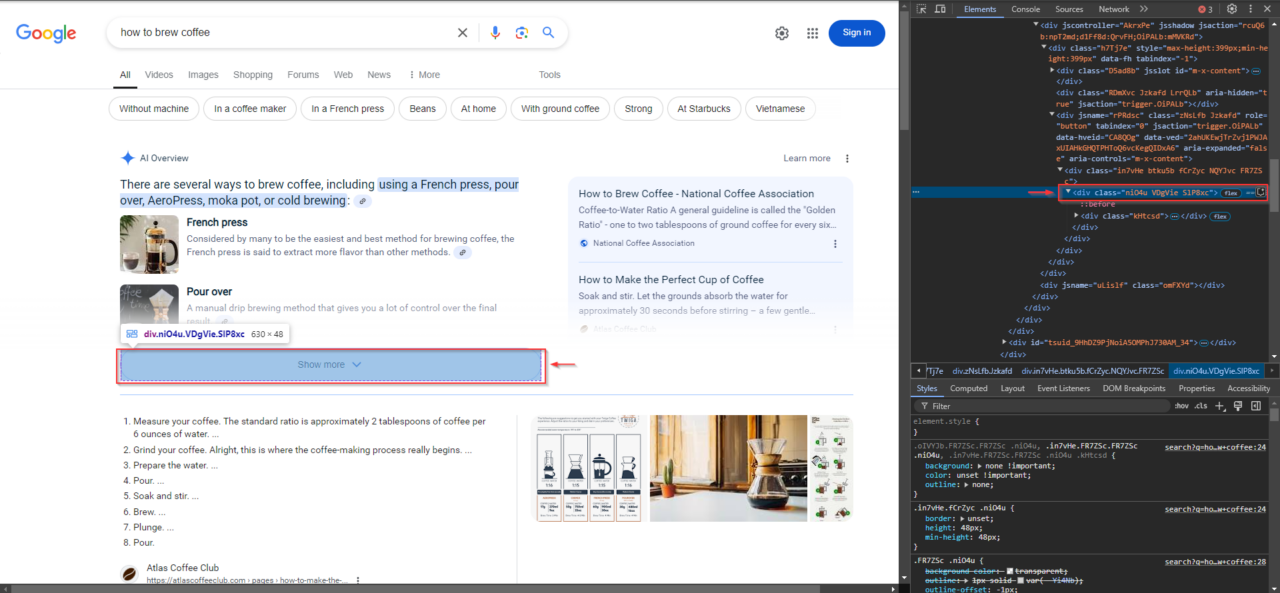
3. Locating the “Show More” Button
For queries with longer AI overview content, a “Show More” button may appear. This button is critical for expanding the content to ensure nothing is missed. To identify it, right-click on the “Show More” button in your browser, select “Inspect”, then right-click the highlighted element in the DevTools pane and choose “Copy XPath”.
These overviews can help you understand:
- What people want to know: By looking at which questions get AI overviews, you can get a feel for what people are searching for and how Google answers their questions. It’s a quick way to see what’s popular and relevant.
- What Google values: Google chooses certain types of answers to highlight, like step-by-step instructions, lists, or short definitions. Watching for these patterns can show you what kinds of content Google’s AI values most.
- How to improve your content: Since these overviews reflect Google’s idea of a good answer, studying their wording and structure can help you understand how to make your content more search-friendly.
AI overviews also often include links to the sources from which Google pulled information. These links add credibility to the overview and show which sites Google deems authoritative on the topic. Scraping these links and the overview can reveal beneficial connections for further research.
Accessing these overviews can be challenging because Google actively tries to block automated access. But don’t worry—this guide will show you exactly how to get around these barriers and extract the needed data!
Project Requirements
Here’s what you’ll need to get started with the project:
1. Selenium Wire
Selenium Wire is a library that extends Selenium’s functionality. It makes it easier to set up proxies, allowing your requests to appear as if they come from different IP addresses. This feature is crucial because Google can block requests from the same IP if they come too frequently.
Using Selenium Wire with ScraperAPI, you can automate Google searches while minimizing the risk of being blocked. ScraperAPI handles things like IP rotation and CAPTCHA-solving, which are necessary for smooth interactions with Google’s search engine results pages (SERP).
Install it using pip:
pip install selenium selenium-wire
You’ll also need ChromeDriver or another compatible WebDriver that matches your browser version. Ensure it’s available in your PATH, or specify the path in your script.
2. ScraperAPI
Sign up at ScraperAPI to get your API key if you haven’t already. After signing up, you will get a unique key, which you’ll need to authenticate your requests.
3. BeautifulSoup
BeautifulSoup helps us parse Google’s search results efficiently after ScraperAPI loads the page.
Install it using pip:
pip install beautifulsoup4
With these tools in place, let’s get to scraping!
How to Scrape Google AI Overviews with ScraperAPI and Python
Now that we understand AI overviews and have our tools ready, let’s get into the actual scraping process.
Step 1: Import Libraries and Set Up Variables
Before diving into the main functions, let’s start by importing the necessary libraries and setting up the variables. Here’s a quick rundown of what each part does:
- Imports:
seleniumwire.webdriver: This is the primary tool we’ll use to control the browser, allowing our script to interact with Google search results as if it were a real user.selenium.webdriver.common.by: We’ll use this to locate elements on the page, like finding the “Show More” button withBy.XPATH.selenium.common.exceptions: We’ll use this to handle errors likeNoSuchElementExceptionandTimeoutException, making our script more resilient.time: We’ll add delays withtimeto give dynamic content a chance to load before we scrape it.csv: We’ll usecsvto save our extracted data into a CSV file for easy analysis.BeautifulSoup: We’ll use BeautifulSoup to parse the page’s HTML to locate and extract the specific data points we need.
- Variables:
url: The Google search query URL (e.g., “how to brew coffee”). Change this to any query you want to scrape.show_more_xpath: The XPath is used to locate the “Show More” button so we can expand hidden content if it’s there.content_classandlink_classes: CSS class names that help us target the page’s AI overview content and related links.output_file: The CSV file name where we’ll save the extracted data.max_retries: Sets the maximum number of retry attempts if an error occurs during scraping.
- ScraperAPI Configuration:
API_KEY: Replace"Your_ScraperAPI_Key"with your unique ScraperAPI key.proxy_options: Configures the ScraperAPI proxy settings for Selenium Wire.
ScraperAPI’s proxy port method is a straightforward way to integrate proxy features like IP rotation, CAPTCHA solving, and JavaScript rendering into your scraper. Instead of configuring multiple complex options, you simply connect through a proxy server that handles everything for you.
Here’s how it’s set up in our code:
proxy_options = {
    'proxy': {
        'https': f'http://scraperapi.render=true:{API_KEY}@proxy-server.scraperapi.com:8001',
        'no_proxy': 'localhost,127.0.0.1'
    }
}
proxy-server.scraperapi.com:8001: This is ScraperAPI’s proxy server that listens on port8001. It handles all requests, including IP rotation, CAPTCHA solving, and rendering JavaScript content.render=true: This parameter enables JavaScript rendering, which is essential for fully loading Google’s dynamic pages.- Authentication: The
API_KEYis embedded directly into the proxy URL, authenticating your requests without requiring additional setup. - Exclusions:
no_proxyensures local requests (likelocalhost) bypass the proxy, avoiding unnecessary overhead.
Using this method simplifies proxy integration, letting you focus on your scraping logic while ScraperAPI handles the heavy lifting in the background.
For detailed information about ScraperAPI’s proxy port method and configuration options, refer to our documentation.
Here’s the complete initial setup code:
from seleniumwire import webdriver
from selenium.webdriver.common.by import By
from selenium.common.exceptions import NoSuchElementException, TimeoutException
import time
import csv
from bs4 import BeautifulSoup

# Variables
url = 'https://www.google.com/search?q=how+to+brew+coffee'
show_more_xpath = "/html/body/div[3]/div/div[13]/div[1]/div[2]/div/div/div[1]/div/div[1]/div/div/div/div[1]/div/div[3]/div/div"
content_class = "WaaZC"
link_classes = "VqeGe"
output_file = "extracted_data.csv"
max_retries = 3

# ScraperAPI configuration
API_KEY = "Your_Scraperapi_Key"
proxy_options = {
    'proxy': {
        'https': f'http://scraperapi.render=true:{API_KEY}@proxy-server.scraperapi.com:8001',
        'no_proxy': 'localhost,127.0.0.1'
    }
}
Step 2: Setting Up the WebDriver
Next, we need to set up the WebDriver, which lets us control the browser and interact with Google. The setup_driver function initializes a Selenium WebDriver instance with ScraperAPI’s proxy configuration.
This function also opens the target URL (in this example, a Google search for “how to brew coffee”) and returns the driver instance.
def setup_driver():
    driver = webdriver.Chrome(seleniumwire_options=proxy_options)
    driver.get(url)
    return driver
By calling this function, we can reuse the driver in multiple steps without reconfiguring the proxy or reopening the browser each time.
Step 3: Clicking the “Show More” Button
Sometimes, Google’s AI overviews contain additional information hidden behind a “Show more” button. For example, in the image from earlier, the overview shows multiple coffee brewing methods, but some of this content may only be accessible after clicking “Show more.”
To ensure we capture all available data in these overviews, we need our script to locate and click this “Show more” button if it’s present. This way, we can expand the overview and scrape any additional content.
The click_show_more function will attempt to locate and click the “Show more” button using its Xpath. If successful, it will return True, letting the rest of our code know it expanded the content. If the button is not found or there’s an error, it will return False.
def click_show_more(driver):
    """Attempt to find and click the 'Show More' button"""
    try:
        element_to_click = driver.find_element(By.XPATH, show_more_xpath)
        element_to_click.click()
        print("Show More button clicked successfully.")
        return True
    except NoSuchElementException:
        print("Show More button not found")
        return False
    except Exception as e:
        print(f"Error clicking Show More button: {e}")
        return False
Step 4: Extracting Content and Links
Once the content is fully visible, we can start extracting it. The extract_content function scrapes text content and related links from the page.
- Text content: We use BeautifulSoup to parse the page’s source HTML and find all elements with the class defined in
content_class. This class targets the sections containing AI overviews. The text from each overview is extracted and stored in acontentlist as dictionaries with the key"Section Text". - Related links: Similarly, we locate related link elements with
link_classes. Each link’shrefattribute (the URL) is stored in a links list as dictionaries with the key"Related Links".
Both content and links lists are combined into combined_data, which holds all extracted information to save in the next step.
def extract_content(driver):
    """Extract text content and links from the specified elements"""
    content = []
    links = []
    try:
        # Extracting text content
        soup = BeautifulSoup(driver.page_source, 'html.parser')
        text_elements = soup.find_all('div', class_=content_class)
        for text_element in text_elements:
            extracted_text = text_element.text
            print(f"Extracted Text: {extracted_text}")
            content.append({"Section Text": extracted_text})
    except Exception as e:
        print(f"Error extracting content: {e}")

    try:
        # Extracting related links
        related_link_divs = soup.find_all('div', class_=link_classes)
        for div in related_link_divs:
            href = div.find('a')['href']
            print(href)
            links.append({"Related Links": href})
    except Exception as e:
        print(f"Error extracting links: {e}")

    # Combine content and links into a single list for CSV
    combined_data = content + links
    return combined_data
Step 5: Saving Data to a CSV File
Now that we’ve collected the data, it’s time to save it for analysis. The save_to_csv function writes the extracted content and links into a CSV file.
Here’s how we’ll do it:
- Check for data: First, we’ll check for any data to save. If not, we print a message and exit the function right away.
- Open CSV file: If data is available, we’ll open (or create) a CSV file with the name specified in
output_file. We set the headers to “Section Text” and “Related Links” to match our data structure. - Write data: Finally, we’ll write each entry from
combined_datainto the CSV file, one row at a time, to be ready for analysis.
def save_to_csv(data, filename):
    """Save extracted data to CSV file"""
    if not data:
        print("No data to save")
        return False

    headers = ['Section Text', 'Related Links']

    try:
        with open(filename, 'w', newline='', encoding='utf-8') as file:
            writer = csv.DictWriter(file, fieldnames=headers)
            writer.writeheader()
            for item in data:
                writer.writerow(item)
        print(f"Data saved to {filename} successfully.")
        return True
    except Exception as e:
        print(f"Error saving to CSV: {e}")
        return False
This will ensure our extracted data is safely stored in an easy-to-use CSV format.
Step 6: Bringing It All Together in the Main Function
Now, let’s bring everything together in our main function to handle the entire scraping process from start to finish. Here’s how we’ll do it:
- Retry logic: We start by setting
retry_countto zero to retry the scraping process up tomax_retriesif any issues pop up. - Initialize WebDriver: We call
setup_driver()to open the browser and load the search page. - Click “Show More” and extract content: We try
click_show_more()next. If it successfully clicks to expand more content, we extract all visible data withextract_content(). - Save data to CSV: We call
save_to_csv()to write it to the CSV file once we have data. If this step is completed successfully, we’re done! - Close browser and retry if needed: After each attempt, we close the WebDriver and wait 2 seconds before trying again if necessary. If retries are exhausted, a message will tell us we’ve reached the limit.
def main():
    retry_count = 0

    while retry_count < max_retries:
        try:
            driver = setup_driver()
            time.sleep(5)
            if click_show_more(driver):
                extracted_data = extract_content(driver)
                if save_to_csv(extracted_data, output_file):
                    break

            retry_count += 1
            print(f"Attempt {retry_count} of {max_retries}")

        except Exception as e:
            print(f"Unexpected error: {e}")
            retry_count += 1
        finally:
            driver.quit()
            time.sleep(2)

    if retry_count == max_retries:
        print("Max retries reached. Exiting...")
Lastly, don’t forget to call your main function to set everything in motion and extract your data:
if __name__ == "__main__":
    main()
Here’s an example of what the CSV file might look like:

This final step pulls everything together, giving us a fully automated script ready to extract Google AI overviews and save them for analysis!
Full Code
Here’s the complete code if you want to go straight to scraping:
from seleniumwire import webdriver
from selenium.webdriver.common.by import By
from selenium.common.exceptions import NoSuchElementException, TimeoutException
import time
import csv
from bs4 import BeautifulSoup

# Variables
url = 'https://www.google.com/search?q=how+to+brew+coffee'
show_more_xpath = "/html/body/div[3]/div/div[13]/div[1]/div[2]/div/div/div[1]/div/div[1]/div/div/div/div[1]/div/div[3]/div/div"
content_class = "WaaZC"
link_classes = "VqeGe"
output_file = "extracted_data.csv"
max_retries = 3

# ScraperAPI configuration
API_KEY = "Your_ScraperAPI_Key"
proxy_options = {
    'proxy': {
        'https': f'http://scraperapi.render=true:{API_KEY}@proxy-server.scraperapi.com:8001',
        'no_proxy': 'localhost,127.0.0.1'
    }
}

def setup_driver():
    driver = webdriver.Chrome(seleniumwire_options=proxy_options)
    driver.get(url)
    return driver

def click_show_more(driver):
    """Attempt to find and click the 'Show More' button"""
    try:
        element_to_click = driver.find_element(By.XPATH, show_more_xpath)
        element_to_click.click()
        print("Show More button clicked successfully.")
        return True
    except NoSuchElementException:
        print("Show More button not found")
        return False
    except Exception as e:
        print(f"Error clicking Show More button: {e}")
        return False

def extract_content(driver):
    """Extract text content and links from the specified elements"""
    content = []
    links = []
    try:
        # Extracting text content
        soup = BeautifulSoup(driver.page_source, 'html.parser')
        text_elements = soup.find_all('div', class_=content_class)
        for text_element in text_elements:
            extracted_text = text_element.text
            print(f"Extracted Text: {extracted_text}")
            content.append({
                "Section Text": extracted_text
            })
    except Exception as e:
        print(f"Error extracting content: {e}")

    try:
        # Extracting related links
        related_link_divs = soup.find_all('div', class_=link_classes)
        for div in related_link_divs:
            href = div.find('a')['href']
            print(href)
            links.append({
                "Related Links": href
            })
    except Exception as e:
        print(f"Error extracting links: {e}")

    # Combine content and links into a single list for CSV
    combined_data = content + links
    return combined_data


def save_to_csv(data, filename):
    """Save extracted data to CSV file"""
    if not data:
        print("No data to save")
        return False

    # Define the CSV headers
    headers = ['Section Text', 'Related Links']

    try:
        with open(filename, 'w', newline='', encoding='utf-8') as file:
            writer = csv.DictWriter(file, fieldnames=headers)
            writer.writeheader()
            for item in data:
                writer.writerow(item)
        print(f"Data saved to {filename} successfully.")
        return True
    except Exception as e:
        print(f"Error saving to CSV: {e}")
        return False

def main():
    retry_count = 0

    while retry_count < max_retries:
        try:
            # Initialize WebDriver and open URL
            driver = setup_driver()
            time.sleep(5)  # Wait for page load

            # Click Show More button
            if click_show_more(driver):
                # Extract content
                extracted_data = extract_content(driver)

                # Save data
                if save_to_csv(extracted_data, output_file):
                    break

            retry_count += 1
            print(f"Attempt {retry_count} of {max_retries}")

        except Exception as e:
            print(f"Unexpected error: {e}")
            retry_count += 1
        finally:
            driver.quit()
            time.sleep(2)

    if retry_count == max_retries:
        print("Max retries reached. Exiting...")

if __name__ == "__main__":
    main()
Extra Tips: Handling Missing AI Overviews
Sometimes, Google’s AI overview doesn’t appear consistently, even with well-crafted queries. Here are a few extra tips to help you handle cases when the AI overview isn’t available immediately:
1. Increase Retry Attempts
Our current code already includes retry logic, but if AI overviews appear inconsistently, consider increasing max_retries. Allowing more attempts gives the script a better chance to capture the overview if it loads on a later try. Start by doubling the retries if overviews are missing after your initial attempts.
2. Add Slight Delays Between Retries
Introducing a small delay between retries, like time.sleep(5), can improve results by giving Google extra time to load the overview. Adding this delay after each retry helps to avoid repeatedly hitting Google too quickly, which could also trigger rate limits.
3. Experiment with Similar Queries
If you’re still not seeing the AI overview, it might help to experiment with slightly different query variations that could trigger the overview more reliably. For example, if your initial query is “How to brew coffee,” try related phrases like “Best way to brew coffee” or “Steps to brew coffee.”
4. Log Each Attempt’s Outcome
Consider adding a logging feature to track whether each attempt successfully captures an overview. This helps you analyze patterns over time—such as specific queries or when overviews appear more frequently—so you can refine your approach if needed.
5. Monitor for Empty Data
If extract_content() returns an empty result after all retries, you may want to log it as an unsuccessful attempt. Keeping track of which queries don’t trigger overviews allows you to adjust your approach and avoid repeatedly scraping those queries.
Wrapping Up
And that’s it! Google’s AI overviews don’t just give quick answers—they reveal what people are interested in, what’s trending, and the content that Google values. By capturing and analyzing these overviews, you’re gathering data and unlocking insights that can help you create more relevant, impactful content.
With the steps we’ve covered, you have everything you need to collect this data. To make things even easier, try ScraperAPI—it handles IP rotation, CAPTCHAs, and rendering, so you can use these insights to improve your content strategy without worrying about the technical hurdles.
Happy scraping!

