
Automating Web Scraping with DataPipeline
DataPipeline is a user-friendly, low-code tool that simplifies and automates your web scraping tasks. With DataPipeline, you can build complex scrapers and run them at scale without maintaining custom scraping scripts, managing proxies, or handling CAPTCHAs – it’s all taken care of for you. Hence, reducing engineering resources and costs.

To get started, simply create a free ScraperAPI account. This gives you access to DataPipeline and 5,000 API credits to start scraping. Plus, if you need any assistance, ScraperAPI’s support team is always happy to help.
Setting Up Our First DataPipeline Project
To show you how DataPipeline works, I’ll walk you through automating an Amazon product data scraping project from scratch.
For this project, I’ll use the Amazon Products scraper, which relies on ASIN numbers (Amazon Standard Identification Numbers) to identify products. No worries; DataPipeline handles proxy requests, retries, and other technical challenges behind the scenes using ScraperAPI’s infrastructure.
Let’s get started!
Step 1: Create a New Amazon Project
First, I’ll log in to my ScraperAPI account and navigate to the dashboard. Then I’ll click the “Create a new DataPipeline project” option.
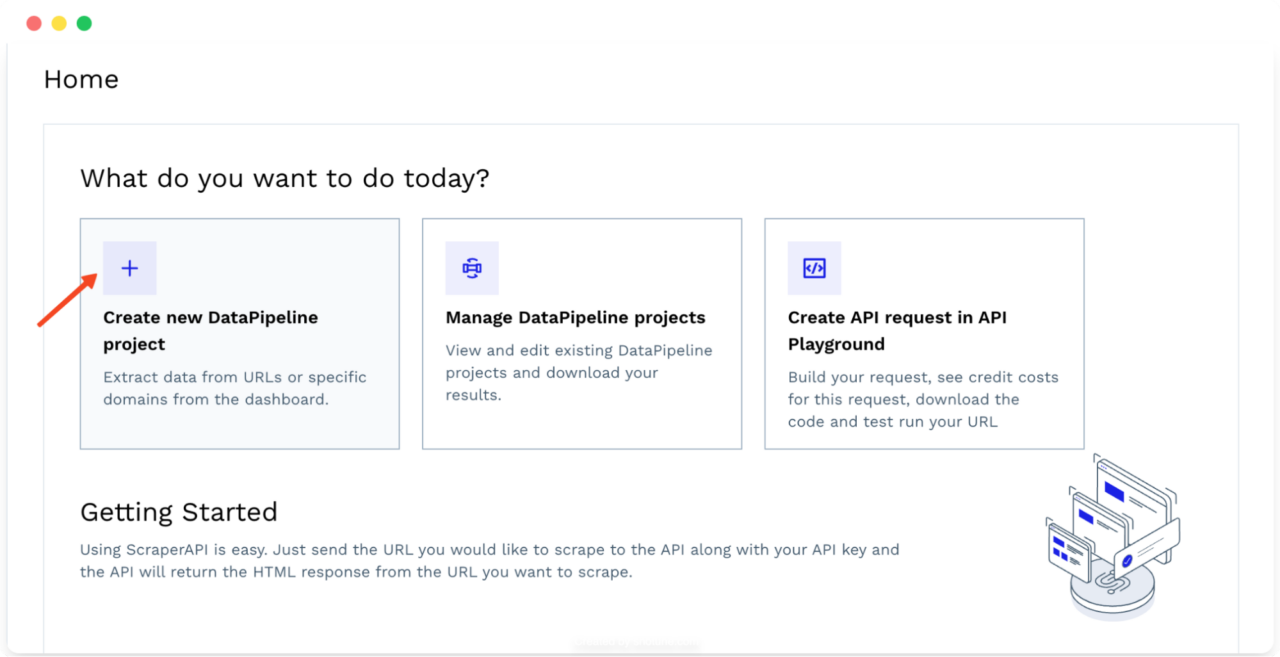
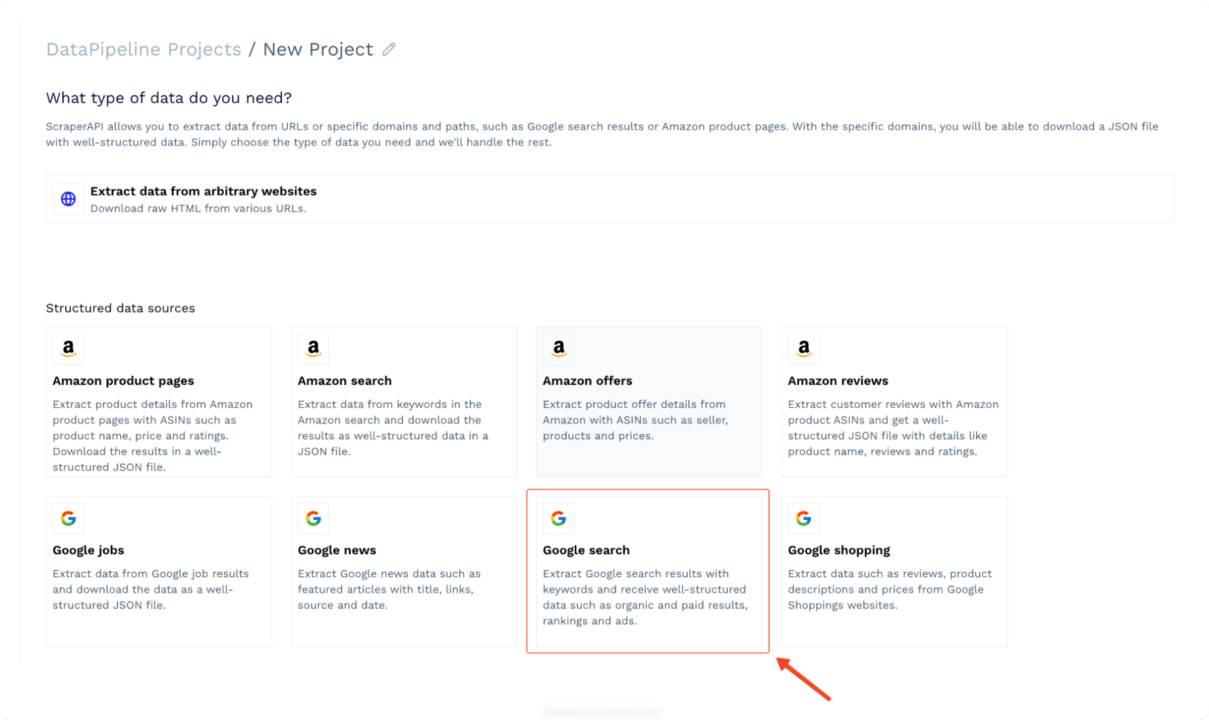
This opens a new window where you can name your project and choose a template. Select the “Amazon Product Pages” template to get started.

Step 2: Provide Input Data
Next, provide a list of ASINs for the products you want to scrape data from. With DataPipeline, you can scrape up to 10,000 items per project.

DataPipeline offers flexible options for providing this input data:
- Manually enter the ASINs directly into the provided text box (one per line) – like I did in the screenshot above
- Upload a CSV file containing the list of ASINs
- Use a Webhook to feed the ASINs to DataPipeline
How to Get ASINs
If you’re not sure how to get ASINs, check out this blog post for a detailed guide on scraping Amazon ASINs at scale.
If you’re already familiar with ScraperAPI’s Structured Data Endpoints, you can use the following code to quickly retrieve a list of ASINs for a given search query:
</p>
  import requests
  import json


  asins = []


  payload = {
     'api_key': 'YOUR_API_KEY',
     'query': 'Airpods',
     'country': 'us',
  }


  response = requests.get('https://api.scraperapi.com/structured/amazon/search', params=payload)
  earphones = response.json()


  all_products = earphones['results']
  for product in all_products:
     if product['asin'] != None:
         asins.append(product['asin'])
     else:
         print('not found')


  with open('asins.json', 'w') as f:
     json.dump(asins, f)

<p>
Make sure you replace 'YOUR_API_KEY' with your actual ScraperAPI API key. This code will fetch search results for “Airpods,” extract the ASINs from the structured data, and save them to an asins.json file.
Note: You can also use DataPipeline to gather ASIN numbers automatically using the Amazon Search template.
Step 3: Customize Parameters
DataPipeline allows for customization to improve the accuracy and relevance of your scraped data. You can select different parameters and additional options depending on the specific data points you need.

For example, you can specify the country from which you want your requests to come (geotargeting) and the TLD (top-level domain) that you want DataPipeline to target.
Step 4: Select Output Format
Next, I’ll decide how I want to receive the scraped data. DataPipeline allows two options:
- Download the extracted data directly to your device
- Deliver the data to a webhook URL, automating your workflow by integrating the data with other applications or services.

You can also choose the format you want to receive the scraped data. DataPipeline supports both JSON and CSV formats for available templates. For arbitrary URLs, it’ll return HTML.
JSON is a great option if you need structured data that’s easy to parse and work within programming languages. On the other hand, CSV is a suitable choice if you need a more spreadsheet-friendly format for analysis or reporting.

Step 5: Schedule Scraping Frequency
Next, I’ll determine how often I want DataPipeline to execute my scraping job. I can opt for a one-time scrape if I only need the data once.

If I need to keep the data up-to-date, I can schedule the scraper to run at regular intervals – daily, weekly, or at a custom frequency that suits my needs. This greatly appealed to me as it relieved me of most of the data mining tasks.

Step 6: Set Notification Preferences
ScraperAPI will email you notifications about the progress and completion status of your scraping jobs. You can configure your notification preferences to receive alerts about successful job completions, any errors encountered, or other relevant updates.

This feature allows me to monitor my scraping projects without constantly checking the dashboard – which always saves a couple of minutes of work per day.
Step 7: Run Your Amazon Scraper
Once you’re ready, click “Review & Start Scraping.”

Review your project configuration before clicking on the “START SCRAPING” button. You will see an estimate of the credits that will be used for each run, giving you a transparent view of the cost.

You will then be redirected to the project dashboard.

From this dashboard, you can monitor the progress of your scraper, cancel running jobs if needed, review your configurations, and download the scraped data once the jobs are complete.
Note: Check DataPipelines documentation to learn the full features of the tool.
Automate Data Delivery Through Webhooks
One of the things I love about DataPipeline is the ability to deliver data directly to my applications using Webhooks. This webhook will act as the endpoint where the DataPipeline will send the scraped data, eliminating the need to download and transfer data manually.
Setting Up a Webhook
Before using the webhook functionality in DataPipeline, you must have a webhook URL set up. To make things easier, I’ll show you two options:
- A no-code option – great for testing or for serious projects in its paid version
- Advanced Webhook set up with Flask and Ngrok
No-Code Webhook Setup
A simple solution for quickly getting started with webhooks is to use Webhook.site. When you visit the site, it automatically generates a unique webhook URL. Copy this URL as your webhook endpoint to receive the scraping results.

This is a quick and easy way to test and see the incoming data.

However, without a paid plan, Webhook.site only retains the data for 7 days, after which it is discarded.
Setting Up a Webhook Using Flask and Ngrok
While inspecting the content of a webhook payload can be useful (for example, by forwarding the webhook to tools like webhook.site), developers also require the capability to receive incoming webhooks directly in their application.
Here’s how you can do that using Flask</a >, a lightweight web framework for Python, and Ngrok, a tool that exposes local servers to the public internet:
- Install Flask and Ngrok
You can install Flask using pip:
pip install Flask
To install Ngrok
- On Windows (using Chocolatey):
choco install ngrok
- On macOS (using Homebrew):
brew install ngrok
You can download Ngrok directly from the official website for other operating systems.
- Configure your auth token (one-time setup)
To use Ngrok, you need to connect it to your account using an auth token. Get your Authtoken from your Ngrok dashboard</a >.

Open your terminal or command prompt and run the following command, replacing $YOUR_AUTHTOKEN with your actual auth token:
ngrok config add-authtoken $YOUR_AUTHTOKEN
- Create a Flask Webhook server
Let’s create a simple Flask application to handle incoming webhook requests. Save the following code in a file named webhook.py
  from flask import Flask, request, jsonify
  import csv
  import io
  import zipfile
  from werkzeug.utils import secure_filename

  app = Flask(__name__)

  @app.route('/webhook', methods=['POST'])
  def webhook():
      content_type = request.headers.get('Content-Type')

      if content_type == 'application/json':
          data = request.json
          print("Received JSON data:", data)
      elif content_type == 'text/csv':
          data = request.data.decode('utf-8')
          csv_reader = csv.reader(io.StringIO(data))
          csv_data = [row for row in csv_reader]
          print("Received CSV data:", csv_data)
      elif content_type.startswith('multipart/form-data'):
          files = request.files
          for filename, file in files.items():
              print(f"Received file: {filename}")
              file.save(secure_filename(file.filename))
              if filename.endswith('.zip'):
                  with zipfile.ZipFile(file, 'r') as zip_ref:
                      zip_ref.extractall('extracted_files')
                      print(f"Extracted files: {zip_ref.namelist()}")
      elif content_type == 'application/zip':
          file = request.data
          with open('received.zip', 'wb') as f:
              f.write(file)
          with zipfile.ZipFile(io.BytesIO(file), 'r') as zip_ref:
              zip_ref.extractall('extracted_files')
              print(f"Extracted files: {zip_ref.namelist()}")
      else:
          data = request.data.decode('utf-8')
          print("Received raw data:", data)
      # process the data as needed - eg add to a database/ perform analysis
      return jsonify({'status': 'success', 'data': 'Processed data'}), 200

  if __name__ == '__main__':
      app.run(port=5000)
This code creates a simple Flask application that listens for incoming POST requests on the “/webhook” endpoint. It can handle different content types, such as JSON, CSV, raw data, and ZIP files. It also extracts and saves the received data in the current working directory. The data can be further processed as needed, such as saving it to a database or performing analysis.
- Run the Flask application
You can now run your Flask application:
python webhook.py
- Start Ngrok
Open a new terminal window and start Ngrok to expose your local Flask server:
ngrok http 5000
Ngrok will generate a public URL that forwards requests to your local Flask application. Copy the “Forwarding” URL that Ngrok provides; you’ll use this URL as your webhook endpoint in DataPipeline.

- Add the Webhook to DataPipeline
In your DataPipeline project settings, find the output settings:

Select “Webhook” as your preferred method, paste the webhook URL provided by Ngrok, and attach the “/webhook” endpoint to it.

DataPipeline will automatically send the scraped data to your webhook URL.
  Received file: result
  127.0.0.1 - - [25/Jun/2024 15:32:36] "POST /webhook HTTP/1.1" 200 -
  Extracted files: ['job-11814822-result.jsonl']
You can configure your webhook service or server to handle the data as needed, whether saving it to a database, sending notifications, or triggering other automated actions.
  [
  {
      "input": "B0CHJ5LJZG",
      "result": {
          "name": "Wireless Earbuds, 2024 Wireless Headphones HiFi Stereo Earphones with 4 ENC Noise Canceling Mic, 42Hs Playtime In Ear Earbud, Bluetooth 5.3 Sport Earphones with LED Power Display for Android iOS White",
          "product_information": {
              "model_name": "A60PW-USM",
              "connectivity_technology": "Wireless",
              "wireless_communication_technology": "Bluetooth",
              "special_feature": "Lightweight, Noise Isolation, Volume-Control, Microphone Feature, Sports & Exercise",
              "included_components": "Charging case *1, Type-C Charging Cable*1, User Manual*1, 3 Pairs of Ear Tips(S M L ), Wireless Earbuds*2",
              "age_range_description": "Adult",
              "material": "Plastic",
              "specific_uses_for_product": "Sports & Exercise, Running",
              "charging_time": "1.5 Hours",
              "compatible_devices": "Compatible devices with Bluetooth 5.3 or earlier, … [TRUNCATED]",
              "control_type": "Media Control",
              "cable_feature": "Without Cable",
              "item_weight": "0.634 ounces",
              "control_method": "Touch, Voice",
              "number_of_items": "1",
              "audio_driver_type": "Dynamic Driver",
              "bluetooth_range": "15 Meters",
              "bluetooth_version": "5.3",
              "carrying_case_battery_charging_time": "1.5 Hours",
              "audio_driver_size": "13 Millimeters",
              "earpiece_shape": "Rounded Tip",
              "manufacturer": "Aoslen",
              "package_dimensions": "4.17 x 3.27 x 1.46 inches",
              "asin": "B0CHJ5LJZG",
              "item_model_number": "A60Pro",
              "batteries": "1 Lithium Ion batteries required. (included)",
              "customer_reviews": {
                  "ratings_count": 3154,
                  "stars": 4.5
              },
              "best_sellers_rank": [
                  "#267 in Electronics (See Top 100 in Electronics)",
                  "#48 in Earbud & In-Ear Headphones"
              ],
              "date_first_available": "September 7, 2023"
          },
          "brand": "Brand: Aoslen",
          "brand_url": "https://www.amazon.com/Aoslen/b/ref=bl_dp_s_web_38765055011?ie=UTF8&node=38765055011&field-lbr_brands_browse-bin=Aoslen",
          "full_description": "From the brand Aoslen Wireless Earbuds                                      If you have any questions, … [TRUNCATED]",
          "pricing": "$19.99",
          "list_price": "$49.99",
          "shipping_price": "FREE",
          "availability_status": "In Stock",
          "is_coupon_exists": false,
          "images": [
              "https://m.media-amazon.com/images/I/41nBiguTHfL.jpg", [TRUNCATED]
          ],
          "product_category": "Electronics \u203a Headphones, Earbuds & Accessories \u203a Headphones & Earbuds \u203a Earbud Headphones",
          "average_rating": 4.5,
          "feature_bullets": [
              "2024 New Bluetooth 5.3 Technology: Bluetooth in ear headphones equipped with new version of bluetooth 5.3 chip, using better chip and technology. Transmit high quality lossless audio coding, ensure more stable connection, lower latency and lower power consumption during data transmission. With a stable connection distance of up to 15 meters, you can easily control your music and phone at home, in the office and on the go", [TRUNCATED]
          ],
          "total_reviews": 3154,
          "model": "A60Pro",
          "customization_options": {
              "color": [
                  {
                      "is_selected": false,
                      "url": "https://www.amazon.com/dp/B0BVQG2LVW/ref=twister_B0D14MT3VB?_encoding=UTF8&psc=1",
                      "value": "Black",
                      "price_string": "$19.99",
                      "price": 19.99,
                      "image": "https://m.media-amazon.com/images/I/41cGPiRmLHL.jpg"
                  }, [TRUNCATED]
              ]
          },
          "ships_from": "Amazon",
          "sold_by": "Aoslen US",
          "aplus_present": true
      }
  },
]
Scrape a Dynamic List of Web Pages
DataPipeline’s ability to accept webhooks as input opens up a whole new level of automation for your web scraping projects. Now, you can scrape dynamic lists of URLs, ASINs, product IDs, or even search queries without having to manually update your DataPipeline projects.
Imagine you want to track Google search results for a list of perfume queries that change regularly. Instead of manually updating your project in DataPipeline every time your list changes, you can automate the entire process.
Create a Webhook to Provide Search Queries
Let’s create a webhook endpoint using Flask to provide the DataPipeline with a list of search queries. I’ll store my search queries in a CSV file, but you could easily adapt this to fetch queries from a database or any other dynamic source.
- Create a perfume_queries.csv file
Create a CSV file named perfume_queries.csv and add your list of search queries, one per line (without a header row). For example:
  Perfume
  Blue de Chanel
  Dior Sauvage
  Gucci Guilty
  Versace Eros
  Calvin Klein Euphoria
  Marc Jacobs Daisy
  Yves Saint Laurent Black Opium
  Tom Ford Black Orchid
  Initio Oud For Greatness
  Paco Rabanne 1 Million
- Create the Flask Webhook:
Create a Python file (e.g., queries_webhook.py) and add the following Flask code:
  from flask import Flask, jsonify
  import csv

  app = Flask(__name__)

  def read_queries_from_csv(filepath):
      with open(filepath, newline='', encoding='utf-8') as csvfile:
          reader = csv.reader(csvfile)
          next(reader)  # Skip the header row
          queries = [row[0] for row in reader if row]  # One query per row
      return queries

  @app.route('/queries', methods=['GET'])
  def provide_queries():
      queries = read_queries_from_csv('perfume_queries.csv')
      return jsonify(queries)

  if __name__ == '__main__':
      app.run(debug=True, port=5000)
Here, we define a Flask app with a “route /queries” that reads the search queries from your CSV file and returns them in JSON format.
- Run the Flask App:
Start your Flask application:
python queries_webhook.py
- Expose with Ngrok:
Use Ngrok (as explained in the previous section) to create a publicly accessible URL for your local Flask webhook:
ngrok http 5000
Copy the forwarding URL provided by Ngrok.
Create a Google Search Project in DataPipeline
Go to your DataPipeline dashboard and create a new project using the “Google Search</strong >” template.
Instead of manually entering search terms, paste the Ngrok forwarding URL (that points to your /queries webhook) into the input field in DataPipeline.

DataPipeline will automatically call your webhook, fetch the latest list of search queries, and use them as input for scraping Google Search results. Now, you have a fully automated pipeline where any updates to your perfume_queries.csv file will be reflected in your scraped data without any manual intervention!
Also Read: How to Scrape Google Shopping with Python</a >
Wrapping Up: Automated web scraping
In this guide, I’ve shown you how to automate web scraping using ScraperAPI’s DataPipeline
- You learned how to automate scraping projects with DataPipeline,
- Configure input data dynamically using Webhooks,
- Automate data delivery through Webhooks
DataPipelines takes the hassle out of web scraping, making it easier to gather the data you need at scale. Ready to give it a try? Sign up for a free ScraperAPI account and try DataPipeline today.
Until next time, happy scraping!