ScrapingBee is a web scraping API provider that allows users to extract data from websites at scale. It provides a simple and efficient way to gather data from the web without the need for complex coding or infrastructure.
However, Depending on the complexity of tasks and the volume of data being extracted, users may find ScrapingBee’s speed and efficiency lacking, especially on larger-scale scraping projects.
In this article, we’ll take a closer look at this platform and compare it with our top picks of alternatives for automatic data collection at scale.
Learn how ScraperAPI can help you save time and money when scaling your data pipelines.
TLDR: Comparative Analysis
Here’s how ScrapingBee compares against other web scraping APIs in terms of features and pricing:
| Feature | ScraperAPI | ScrapingBee | Octoparse | WebScraper.io | ParseHub |
| Ease of Use | High (API-based) | Moderate | High | High | High |
| Pricing | $49/mo | $49/mo | $99/mo | $50/mo | $189/mo |
| JS Rendering | Yes (Customizable) | Yes | Yes | Limited | Yes |
| No-Code Solution | Partial (DataPipeline GUI) | Partial (With Make) | Yes | Yes | Yes |
| Custom Scripts | Yes | Yes | No | No | No |
| Asynchronous Processing | Yes | Limited | No | No | No |
ScraperAPI offers the best value for high-volume scraping, offering higher scalability and asynchronous processing capabilities, making it suitable for large-scale projects – while ScrapingBee provides integration with Make for no-code solutions but has limited asynchronous processing.
Octoparse, WebScraper.io, and ParseHub are more suitable for smaller-scale projects or users preferring no-code solutions, with pricing based on page volumes rather than API credits.
Understanding ScrapingBee’s Automation Features (An Overview)
ScrapingBee offers many features to automate web scraping. The three major ones are:
- Data Extraction
- JavaScript Rendering Instructions
- Integration with Make
Let’s take a closer look at these features.
Data Extraction
ScrapingBee offers a versatile data extraction API as one of its primary services, enabling users to extract data from a wide range of web pages. This API simplifies data extraction using CSS or XPath selectors, allowing you to extract data from webpages without parsing the HTML on your side, as users can pass the extraction rules directly with their API calls.
To evaluate this feature, we’ll scrape a test ecommerce site:
# pip install scrapingbee
from scrapingbee import ScrapingBeeClient

client = ScrapingBeeClient(api_key='YOUR_API_KEY')
response = client.get(
    'https://scrapeme.live/shop/',
    params={
        "extract_rules": {
            "products": {
                "selector": "ul.products > li",
                "type": "list",  # to extract multiple items
                "output": {
                    "title": ".woocommerce-loop-product__title",
                    "image_url": {
                        "selector": "img.attachment-woocommerce_thumbnail",
                        "output": "@src"
                    },
                    "product_url": {
                        "selector": "a.woocommerce-LoopProduct-link",
                        "output": "@href"
                    },
                    "price": ".price .woocommerce-Price-amount",
                    "currency_symbol": ".woocommerce-Price-currencySymbol"
                }
            }
        }
    },
)


print('Response HTTP Status Code: ', response.status_code)
print('Response HTTP Response Body: ', response.json())
In this specific request, we’re making a GET request to the target URL 'https://scrapeme.live/shop/', specifying our extraction rules in the params argument. The extract_rulesdefine what data we want to extract and how to extract it using CSS selectors. For example, we extract product titles using the selector .woocommerce-loop-product__title. The type parameter which is set to "list" indicates that we’re extracting multiple items.
After running this code, you can expect to see results similar to the example below printed to your terminal:
[
  {
    "products": [
      {
        "title": "Bulbasaur",
        "image_url": "https://scrapeme.live/wp-content/uploads/2018/08/001-350x350.png",
        "product_url": "https://scrapeme.live/shop/Bulbasaur/",
        "price": "£ 63.00",
        "currency_symbol": "£"
      },
      {
        "title": "Ivysaur",
        "image_url": "https://scrapeme.live/wp-content/uploads/2018/08/002-350x350.png",
        "product_url": "https://scrapeme.live/shop/Ivysaur/",
        "price": "£ 87.00",
        "currency_symbol": "£"
      },
      {
        "title": "Venusaur",
        "image_url": "https://scrapeme.live/wp-content/uploads/2018/08/003-350x350.png",
        "product_url": "https://scrapeme.live/shop/Venusaur/",
        "price": "£ 105.00",
        "currency_symbol": "£"
      },
...
]
JavaScript Rendering Instructions
ScrapingBee offers JavaScript rendering capabilities, which are useful for scraping dynamic websites. If you want to interact with pages before scraping the returned HTML, you can add a JavaScript scenario to your API call.
Let’s look at the same example of scraping the next page of the ecommerce site but now with javascript rendering enabled.
from scrapingbee import ScrapingBeeClient

client = ScrapingBeeClient(api_key='YOUR_API_KEY')
response = client.get(
    'https://scrapeme.live/shop/',
    params={
        'js_scenario': {"instructions": [
            {"scroll_y": 1000},
            {"wait": 1000},
            {"scroll_y": 1000},
            { "click": "a.next.page-numbers" },
            {"wait": 5000},
            ]},
        "extract_rules": {
            "products": {
                "selector": "ul.products > li",
                "type": "list",
                "output": {
                    "title": ".woocommerce-loop-product__title",
                    "image_url": {
                        "selector": "img.attachment-woocommerce_thumbnail",
                        "output": "@src"
                    },
                    "product_url": {
                        "selector": "a.woocommerce-LoopProduct-link",
                        "output": "@href"
                    },
                    "price": ".price .woocommerce-Price-amount",
                    "currency_symbol": ".woocommerce-Price-currencySymbol"
                }
            }
        }
    },
)

# Displaying the output
print('Response HTTP Status Code: ', response.status_code)
print('Response HTTP Response Body: ', response.json())
This feature is particularly useful when dealing with single-page applications (SPAs) or websites that load content dynamically, ensuring that the data you extract is fully rendered before the scraping process begins.
Integration with Make [No-Code]
Scrapingbee has limited no-code scraping options. However, it supports integration with a no-code platform like Make (formerly Integromat), letting you set up automated scraping workflows without coding.
Make allows you to connect different modules and create scenarios that define how data is transferred and transformed between apps and services.
However, the process is quite opinionated and takes away control over your project, making it really hard to use for large-scale projects.
ScrapingBee Pricing
ScrapingBee offers a range of pricing plans designed for different user categories, including freelancers, startups, businesses, and corporate clients.
For instance, the freelancer plan targets freelancers and small-scale web scraping projects. This plan starts at $49 per month and offers 150,000 API credits, with each request costing around 10 – 25 API credits, depending on the features used, such as geotargeting or JavaScript rendering.
Here’s a breakdown of ScrapingBee’s pricing plans:
| Plan | Price | API Credits | Pages Scraped |
| Freelance | $49 | 150,000 | 15,000 |
| Startup | $99 | 1,000,000 | 100,000 |
| Business | $249 | 3,000,000 | 300,000 |
| Business + | $599 | 8,000,000 | 800,000 |
Note: The estimated pages scraped are calculated based on an average consumption of 10 API credits per request, which is typical when using features like JavaScript rendering and premium proxies required for scraping complex websites.
ScrapingBee charges additional API credits for advanced features:
- Premium Proxies: 10 API credits per request.
- JavaScript Rendering: 5 API credits per request.
- Stealth Mode: Up to 75 API credits per request.
This means that scraping sites with sophisticated anti-bot measures, such as ecommerce platforms, can heavily increase your API credit consumption, leading to higher costs.
However, when considering cost-effectiveness, ScrapingBee may not be the most economical option for large-scale projects. Even with the Business+ plan at $599, you can scrape approximately 800,000 ecommerce pages.
In contrast, ScraperAPI’s Business plan at $299 allows you to scrape up to 600,000 ecommerce pages, offering a more cost-effective solution for high-volume scraping needs.
Discover how ScraperAPI can offer you more advanced features and larger datasets without increasing your budget.
Why Consider Alternatives to ScrapingBee?
While ScrapingBee offers useful features, some limitations make the process of using its automation features less appealing:
- Advanced features like JavaScript rendering and premium proxies consume more API credits, increasing costs.
- Handling millions of requests can become cumbersome and expensive. Some users face limitations in scraping specific sites, pointing to potential restrictions in the tool’s scraping capabilities.
- Credits are often charged for blocked requests.
What’s more important, though, is that in terms of automation, ScrapingBee’s reliance on a 3rd party tool means you need to handle another subscription, plus the pain of not being able to integrate the process with your workflow seemingly.
With this in mind, let’s explore the top ScrapingBee alternatives that might suit specific use cases relating to automatic data collection.
1. ScraperAPI [Best Web Scraping Automation Tool for Dev Teams]
ScraperAPI addresses many of the limitations found in ScrapingBee, offering more advanced features better suited for developers and large-scale projects.
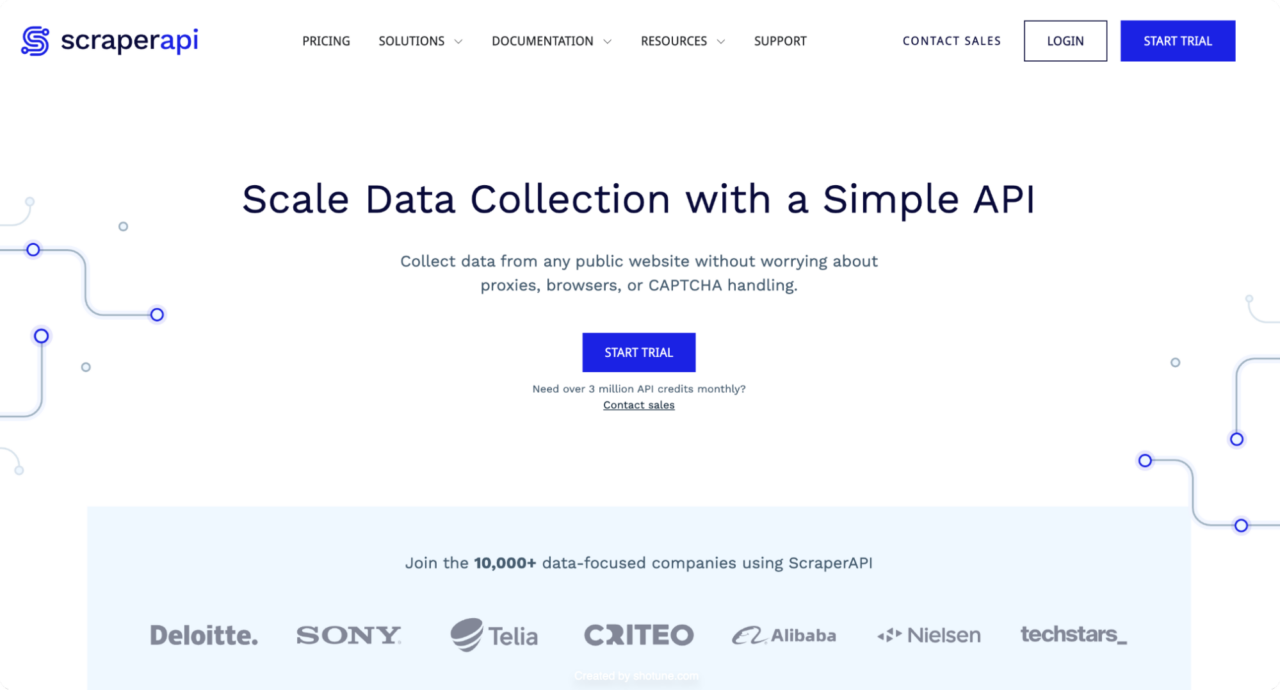
ScraperAPI focuses on delivering a high-performance automated scraping experience with minimal overhead. Its API is engineered to efficiently handle large-scale data extraction tasks, providing users with fast and reliable access to web data.
ScraperAPI’s advanced anti-bot detection also handles advanced bot blockers like DataDome and PerimeterX, javascript rendering, and automatic CAPTCHA solving to ensure near 100% success rates.
Let’s take a closer look at some of ScraperAPI’s best automation features:
DataPipeline [Hosted Scraping Scheduler]
DataPipeline is a user-friendly web scraping scheduler that simplifies and automates your web scraping tasks. With DataPipeline, you can simultaneously run up to 10,000 URLs, keywords, Amazon ASINs, or Walmart IDs and build complex scrapers without maintaining custom scraping scripts, managing proxies, or handling CAPTCHAs.
Users can schedule pre-configured jobs for custom URLs and structured data endpoints, get their results in JSON or CSV, or have them delivered to a webhook. This makes it easier to integrate with your existing architecture.

Note: To get started, simply create a free ScraperAPI account. This gives you access to DataPipeline and 5,000 API credits to start scraping.
ScraperAPI recently introduced a new feature to give users more control over their DataPipeline projects. The DataPipeline endpoints allow users to automate their interactions with the DataPipeline through a list of APIs, providing greater efficiency and flexibility for users who manage multiple projects simultaneously.
With this new feature, users can set up, edit, and manage their projects via an API instead of the dashboard, providing better integration with your workflow and even more options to automate entire scraping scenarios.
Let’s walk through an example of creating a DataPipeline project using the API endpoint:
curl -X POST \
  -H 'Content-Type: application/json' \
  --data '{ "name": "Google search project", "projectInput": {"type": "list", "list": ["iPhone", "Android"] }, "projectType": "google_search", "notificationConfig": {"notifyOnSuccess": "weekly", "notifyOnFailure": "weekly"}}' \
  'https://datapipeline.scraperapi.com/api/projects/?api_key=YOUR_API_KEY'
If you want to test the provided code yourself, follow these steps:
- Create a ScraperAPI account.
- Replace the
YOUR_API_KEYtext in the code with your own ScraperAPI API key.
This request creates a new Google Search DataPipeline project with the search terms “iPhone” and “Android“.
Note: Refer to the documentation for a complete list of endpoints and parameters.
Here’s what the API response would look like:
{
  "id": 125704,
  "name": "Google search project",
  "schedulingEnabled": true,
  "scrapingInterval": "weekly",
  "createdAt": "2024-09-27T08:02:19.912Z",
  "scheduledAt": "2024-09-27T08:02:19.901Z",
  "projectType": "google_search",
  "projectInput": { "type": "list", "list": ["iPhone", "Android"] },
  "notificationConfig": {
    "notifyOnSuccess": "weekly",
    "notifyOnFailure": "weekly"
  }
}
When you navigate to your dashboard, you’ll see that this project has been created.
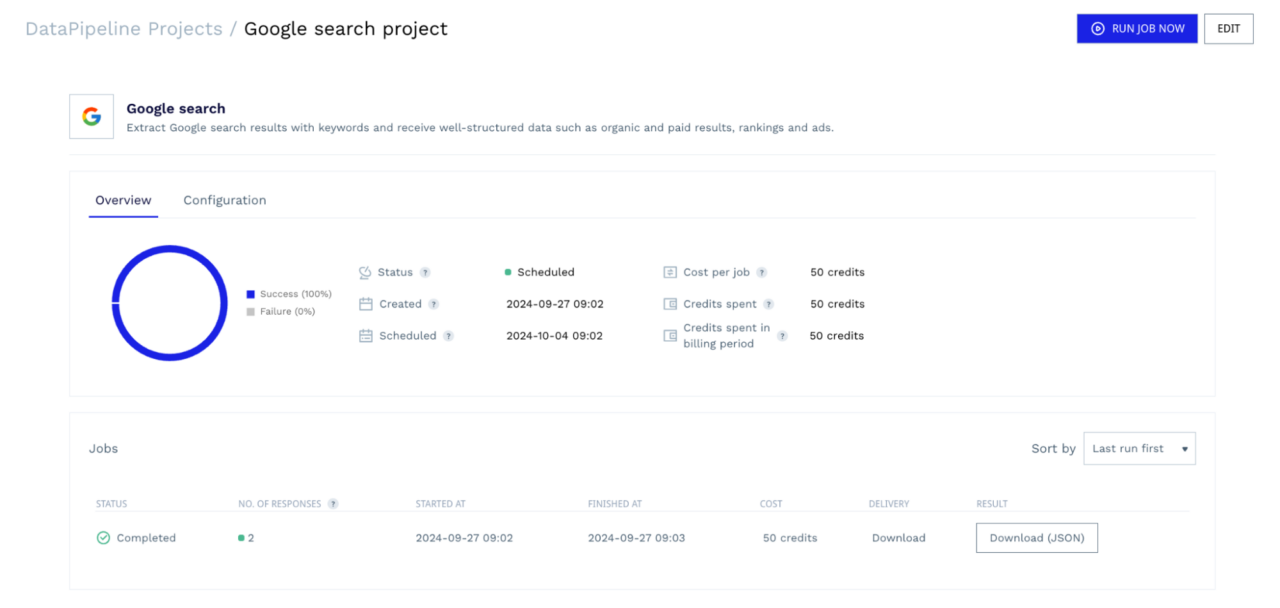
From this dashboard, you can monitor the progress of your scraper, cancel running jobs if needed, review your configurations, and download the scraped data once the jobs are complete. You can also monitor all of this information using the corresponding endpoints. No need for 3rd-party tools or to get out of your development environment.
This seamless integration makes ScraperAPI’s DataPipeline a better option than ScrapingBee’s integration with Make.
Render Instruction Sets
Handling websites with dynamic content requires rendering JavaScript accurately. ScraperAPI’s Render Instruction Set allows you to send instructions to a headless browser via an API call, guiding it on what actions to perform during page rendering. These instructions are sent as a JSON object in the API request headers.
Now, let’s go over an example of using the render instruction set on the same test ecommerce site:
import requests
from bs4 import BeautifulSoup
import json

api_key = 'YOUR_SCRAPER_API_KEY'
url = 'https://api.scraperapi.com/'
target_url = 'https://scrapeme.live/shop/'

config = [{
    "type": "loop",
    "for": 1,
    "instructions": [
        {
            "type": "scroll",
            "direction": "y",
            "value": "bottom"
        },
        {
            "type": "wait",
            "value": 2
        },
        {
            "type": "click",
            "selector": {
                "type": "css",
                "value": "a.next.page-numbers"
            }
        },
        {
            "type": "wait",
            "value": 5
        }
    ]
}]

# Convert the configuration to a JSON string
config_json = json.dumps(config)

# Construct the instruction set for Scraper API
headers = {
    'x-sapi-api_key': api_key,
    'x-sapi-render': 'true',
    'x-sapi-instruction_set': config_json
}

payload = {'url': target_url, }
response = requests.get(url, params=payload, headers=headers)

soup = BeautifulSoup(response.text, "lxml")

products = soup.select('ul.products > li')

    # Loop through each product and extract relevant information
for product in products:
        title = product.select_one('.woocommerce-loop-product__title').get_text(strip=True)
        image_url = product.select_one('img.attachment-woocommerce_thumbnail')['src']
        product_url = product.select_one('a.woocommerce-LoopProduct-link')['href']
        price = product.select_one('.price .woocommerce-Price-amount').get_text(strip=True)
        currency_symbol = product.select_one('.woocommerce-Price-currencySymbol').get_text(strip=True)

print({
            'title': title,
            'image_url': image_url,
            'product_url': product_url,
            'price': price,
            'currency_symbol': currency_symbol,
        })

print('Response HTTP Status Code: ', response.status_code)
To follow along with this, set up your API credentials (with your ScraperAPI API key). Next, define a configuration config that contains the render instruction set.
This instruction set tells the browser to:
- Scroll to the bottom of the page (“
scroll” action). - Wait for 2 seconds (“
wait” action). - Click on the “Next” button using the CSS selector “
a.next.page-numbers” (“click” action). - Wait for 5 seconds to allow the next page to load (“
wait” action).
We then construct the headers for the API request, including our API key, enabling rendering and adding the instruction set.
Note: Refer to the Render instruction set documentation to see a full list of supported instructions and learn how to customize your scraping tasks further.
These instructions give you the same control over the page rendering as ScrapingBee’s but without the opinionated process. ScraperAPI is designed to work the way you do, so there is no need to limit yourself to rigid “data extraction” rules.
Structured Data Endpoints (SDEs)
Apart from offering a general API for scraping custom URLs, ScraperAPI also offers pre-configured endpoints designed for specific popular websites such as Amazon, Walmart, and Google Search. This feature allows you to scrape any e-commerce product page without writing complex parsing logic or constantly adapting to website updates, regardless of the scale of your project.

ScraperAPI’s SDEs can be used with both the standard API and the Async API. The Async API is particularly beneficial for large-scale projects, allowing you to achieve higher scraping speed while handling millions of requests asynchronously and receiving structured data (JSON or CSV) via a webhook.
Let’s look at an example of using ScraperAPI’s SDE to scrape Google Search results:
import requests
import json

APIKEY= "YOUR_SCRAPERAPI_KEY"
QUERY = "EA FC25 game"

payload = {'api_key': APIKEY, 'query': QUERY, 'country_code': 'us'}

r = requests.get('https://api.scraperapi.com/structured/google/search', params=payload)

data = r.json()

# Write the JSON object to a file
with open('results.json', 'w') as f:
    json.dump(data, f, indent=4)

print("Results have been stored at results.json")
Note: To learn more, check out our comprehensive tutorial on how to scrape data from Google Search results.
In this case, we send a request to the Google Search endpoint. We’ll pass the “EA FC25 game” search query parameter and specify “us” as the country_code to get results from US-based IPs. Remember to replace “YOUR_SCRAPERAPI_KEY”.
Here’s how a standard organic result will look like in JSON:
{
            "position": 1,
            "title": "EA SPORTS FC 25",
            "snippet": "EA SPORTS FC\u2122 25 gives you more ways to win for the club. Team up with friends in your favorite modes with the new 5v5 Rush, and manage your club to victory as\u00a0...",
            "highlighs": [
                "EA"
            ],
            "link": "https://www.xbox.com/en-US/games/ea-sports-fc-25",
            "displayed_link": "https://www.xbox.com \u203a en-US \u203a games \u203a ea-sports-fc-25"
        },
        {
            "position": 2,
            "title": "EA SPORTS FC\u2122 25: what's new, release date, and more",
            "snippet": "4 days ago \u2014 The official release date for EAS FC 25 is September 27, 2024. The early access release date for EAS FC 25 is September 20, 2024 for the\u00a0...",
            "highlighs": [
                "EAS FC 25",
                "EAS FC 25"
            ],
            "link": "https://help.ea.com/en-us/help/ea-sports-fc/ea-sports-fc-release-date/",
            "displayed_link": "https://help.ea.com \u203a en-us \u203a help \u203a ea-sports-fc-release-..."
        },
        {
            "position": 3,
            "title": "EA SPORTS FC\u2122 25",
            "snippet": "EA SPORTS FC\u2122 25 gives you more ways to win for the club. Team up with friends in your favourite modes with the new 5v5 Rush, and manage your club to\u00a0...",
            "highlighs": [
                "EA"
            ],
            "link": "https://store.steampowered.com/app/2669320/EA_SPORTS_FC_25/",
            "displayed_link": "https://store.steampowered.com \u203a app \u203a EA_SPORTS_FC..."
        },
Note: We’re only showing a portion of the response due to space constraints.
In terms of automation, you can use these endpoints with DataPipeline – as shown in the previous example. This makes it easier to get extra data automatically without building or maintaining complex parsers or having to spend hours cleaning your datasets.
Note: To learn more about Structured Data Endpoints, their usage, and parameters, refer to the SDE documentation.
ScrapingAPI Pricing
ScraperAPI offers a special free trial of 5,000 API requests (limited to 7 days), transitioning to their standard free plan of 1,000 API credits afterward. This generous trial allows you to thoroughly test the service before committing to a paid plan.
| Plan | Pricing | API Credits |
| Free | – | 5000 |
| Hobby | $49 | 100,000 |
| Startup | $149 | 1,000,000 |
| Business | $299 | 3,000,000 |
| Enterprise | Custom | 3,000,000 + |
ScraperAPI charges a predefined amount of credits per request. The amount of credits consumed varies according to the parameters you use in the request. This system is more straightforward than Scrapingbee’s and the ScraperAPI website can help you accurately estimate your API credit consumption even before making the requests.
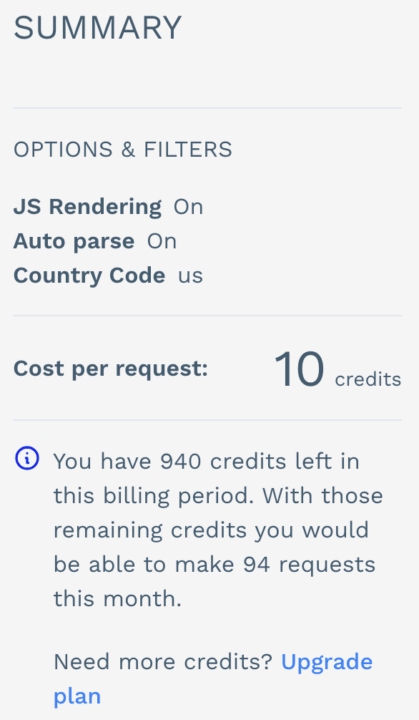
ScrapingBee’s geotargeting functionality is only available when using premium proxies. To put it into perspective, with ScrapingBee’s Business plan at $299, you can scrape approximately 300,000 static pages and 120,000 JavaScript-rendered pages.
On the other hand, ScraperAPI’s Business plan at $299 provides 3,000,000 API credits, allowing you to scrape up to 3,000,000 static pages or 600,000 JavaScript-rendered pages (since JS rendering consumes more credits per request). This means you can scrape up to 2,700,000 more static pages for the same price, making ScraperAPI a more cost-effective solution.
Why ScraperAPI is Better for Automatic Data Collection
When it comes to performance, both services deliver on what they promise and offer reliable scraping solutions. However, here are a few reasons why ScraperAPI gets the nod:
- Easy-to-Use API: ScraperAPI offers a straightforward API that allows you to start scraping within minutes using a simple GET request. There’s no need for additional software or complex setups, making it accessible even for those new to web scraping.
- Efficient Proxy Usage: By utilizing machine learning, ScraperAPI intelligently rotates IPs and headers to minimize the chances of being blocked. This reduces the need for expensive residential proxies, saving you costs while maintaining high success rates.
- Specialized Ecommerce Endpoints: ScraperAPI provides ready-made endpoints specifically designed for major ecommerce platforms like Amazon, Walmart, and Google Shopping. These endpoints enable more efficient data extraction without writing complex parsing logic.
- Better Cost Efficiency: ScraperAPI’s plans offer more successful requests at a lower price point. Its straightforward pricing model and effective proxy management deliver better cost efficiency. You get more value for your investment, making it a more economical choice for small and large projects.
- Seamless Workflow Integration: Its DataPipeline endpoint lets you build and automate entire scraping projects directly in your development environment. This also means you can automate other aspects of your project by feeding DataPipeline dynamic lists of inputs.
Other Notable Alternatives
While ScraperAPI stands out, other tools might suit specific needs:
2. Octoparse [Best Point-and-Click Scraper]
Octoparse is one of the best screen scraping tools for people who want to scrape websites without learning to code. It features a point-and-click interface and a built-in browser view, which helps it imitate human behavior.
It is capable of scraping data from tough, aggressive, or dynamic web resources with drop-down menus, infinite scrolling, log-in authentication, AJAX, and more.

Octoparse also offers templates that enable users to browse hundreds of preset templates for the most popular websites and get data instantly with little to no setup. It recently released (2024) a beta version for macOS and is also compatible with the latest versions of Windows operating systems. This software’s ease of use is a major reason it resonates with many users.
The Octoparse Interface
Once you launch the program, you are immediately asked to register using your Google, Microsoft, or email account to log in to your profile automatically. A quick overview introduces you to the program’s capabilities, followed by an optional step-by-step tutorial to help you get started.
- Creating a New Task
All work with Octoparse begins with creating a task consisting of instructions for the program to execute. On the sidebar, clicking the “New” icon provides two options:
- Custom Task
- Task Template

Let’s review a basic example of using the custom task to scrape eBay listings. Selecting “Custom Task” allows you to determine the source of the URL. Options include entering it manually, importing it from a file, or using an existing task.
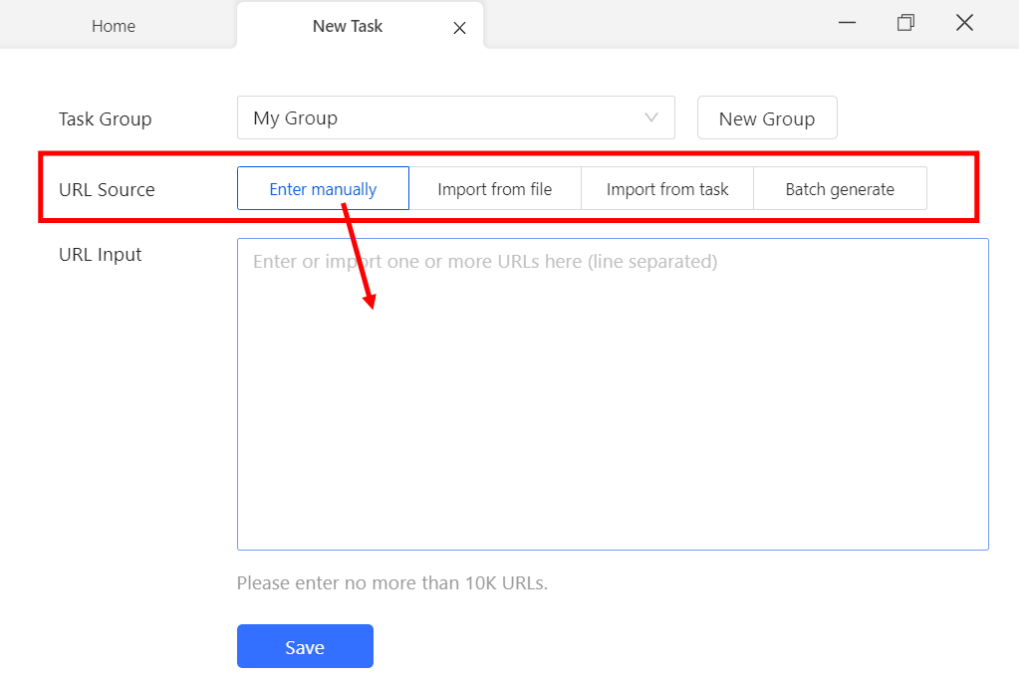
- Templates
The “Templates” tab in Octoparse features a collection of web scraping templates. These are pre-formatted tasks ready to use without establishing scraping rules or writing any code.
Now, let’s extract some data from the templates. For this exercise, we’ll use an Amazon scraper template.
How to Use:
Step 1: Click the Templates tab
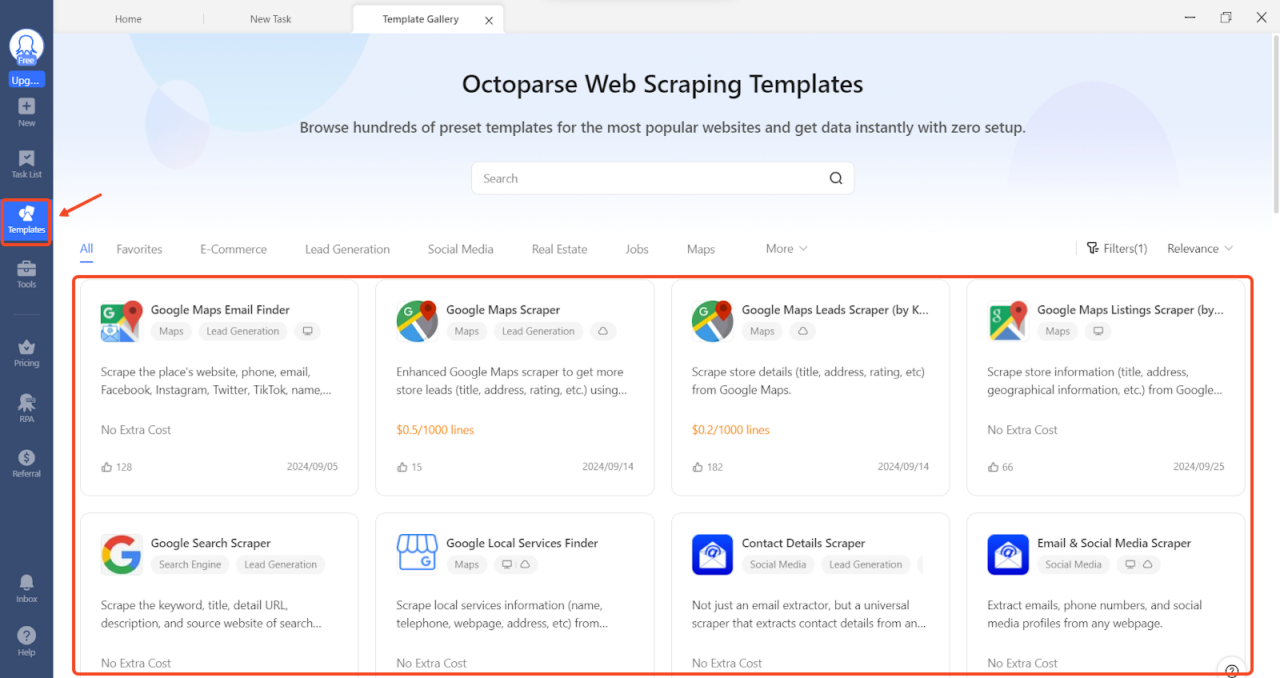
Step 2: Select an Amazon template and confirm. Then proceed to enter a list of keywords (up to 5)

Step 3: Click Start to choose your preferred run mode.

Octoparse Pricing
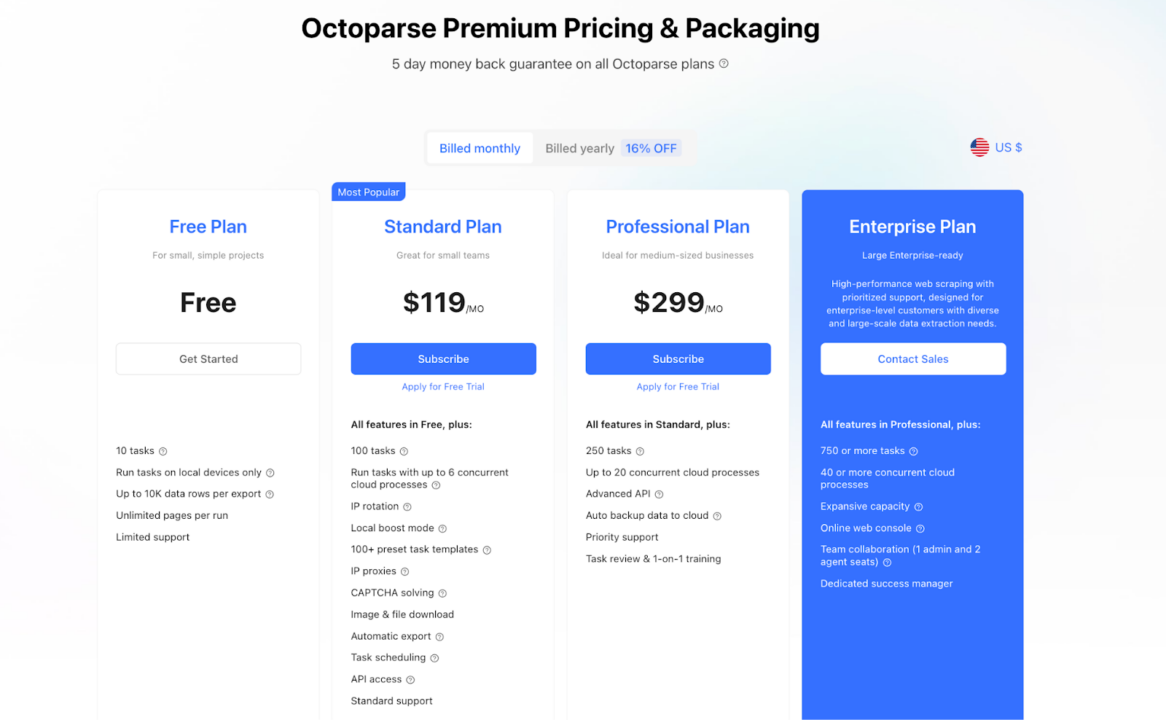
Octoparse is free to download and use but has limited features. To unlock its full potential, you’ll need a paid subscription. Octoparse also offers a five-day money-back guarantee for users who want to try its premium services.
Because Octoparse is all about point-and-click automation, they offer task-based pricing. This means the number of pages or successful requests does not limit you. Instead, the only limit is the number of “steps” your automation can perform.
Limitations of Octoparse
Despite its user-friendly interface and robust features, Octoparse has some limitations:
- Pricing: Compared to other alternatives like ScraperAPI, Octoparse’s paid plans are pricier, especially considering the features included at each price point.
- Customer Support: The level of customer support varies by subscription plan. Free plan users receive minimal support, referred to as “lazy support.” Higher-tier plans offer email support, but there is no live chat option, which can be inconvenient if immediate assistance is needed.

Why ScraperAPI is Better
Compared to Octoparse, ScraperAPI provides a more cost-effective and scalable solution for web scraping. ScraperAPI’s Hobby plan starts at $49/month, offering 100,000 API credits (capable of scraping 100,000 results) with features like automatic IP rotation, geotargeting, and JavaScript rendering included. This is significantly more affordable than Octoparse’s Standard plan, which is $119/month, especially considering the scalability and features provided.
3. WebScraper.io [Best Browser Extension]
WebScraper offers two major web scraping solutions: Web Scraper Cloud and Web Scraper Browser Extension.
The browser extension is a point-and-click tool integrated into Chrome and Firefox developer tools, allowing users to set up and run scrapers directly within their browsers.

It’s designed for ease of use, requiring only a basic understanding of HTML and CSS selectors, making it suitable for beginners and small-scale web scraping projects.
WebScraper.io Key Features
- Point-and-click interface integrated with browser developer tools
- Community sitemaps for popular websites
- Cloud-based execution (paid plans only)
WebScraper.io also provides a collection of community-contributed sitemaps that simplify scraping data from popular websites like Amazon. Here’s how to use a premade sitemap to extract data from Amazon:
- To use this feature, you must sign up for a Webscraper.io account and select one of their paid plans. The browser extension doesn’t support this feature.
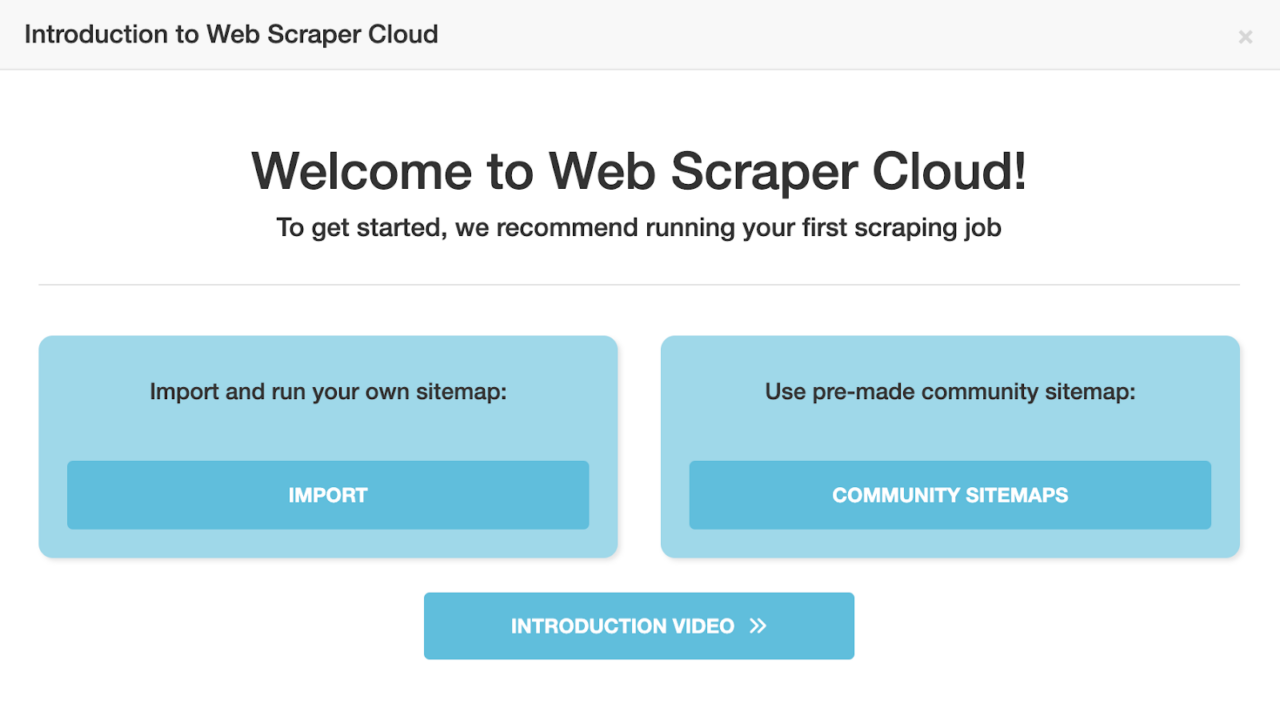
- On the Community Sitemaps page, search for an Amazon sitemap scraper that fits your needs and click Import & Run.

- Now adjust the necessary scraping parameters and click on the Scrape button.

- Once the scraping job has commenced, there’s a nice little dashboard to update you on the scraping progress. Once the scraper is finished, click the preview button to see and export your scraping results.

- Export the data in your preferred format (CSV, XLSX, or JSON).

Webscraper Pricing
Webscraper.io is designed for regular and scheduled use to extract large amounts of data and easily integrate with other systems. Paid plans offer features like cloud extraction, scheduled scraping, IP rotation, and API access, allowing for more frequent and extensive data collection.

Note: The Browser Extension is free to use, but cloud features and advanced functionalities require a paid plan.
Difference Between Scraping on Web Scraper Cloud and Web Scraper Browser Extension
| Web Scraper Cloud | Web Scraper Browser Extension |
| Consistent site accessibility while scraping. | Limited access. Only sites that you can access via your browser can be scraped. |
| Scraped data is stored in cloud storage for all scraping jobs within the data retention period. | Only data from the latest scraping job is stored in the browser’s local storage. |
| Images are not loaded while scraping | Images are loaded while scraping |
Limitations of WebScraper.io
While WebScraper.io is user-friendly and great for beginners, it has some limitations:
- Proxy Support: The browser extension lacks built-in support for proxy integration, which can be problematic when scraping websites with strict anti-scraping measures.
- Scalability: The browser extension scraper is limited by your local machine’s resources, making it less suitable for large-scale scraping projects. However, this doesn’t apply to the cloud scraper.
- Data Validation and Cleaning: There are no built-in data validation or cleaning features, so post-processing must be done manually.
- Customer Support: Support is mainly provided through a community forum, which may not offer timely assistance compared to dedicated customer service.
Why ScraperAPI Is Better
ScraperAPI is designed to handle millions of requests efficiently. Hence, it’s ideal for large-scale projects that require high throughput and reliability. ScraperAPI also offers several advantages over WebScraper, including:
- Comprehensive Proxy Management: ScraperAPI automatically handles IP rotation and offers access to a vast pool of proxies, including residential and datacenter IPs, helping you avoid IP bans and access geo-restricted content.
- Professional Support: ScraperAPI offers dedicated customer support across all plans, including priority assistance and a dedicated account manager for higher-tier plans.
4. ParseHub [Browser-like Scraping Tool]
ParseHub is a web scraping tool compatible with Windows, Mac, and Linux operating systems. It is designed to help users extract data from websites without any coding knowledge.
While it doesn’t offer ecommerce-specific templates or auto-detection, experienced users can create customized crawlers to extract data from various websites, including those with dynamic content and interactive elements.
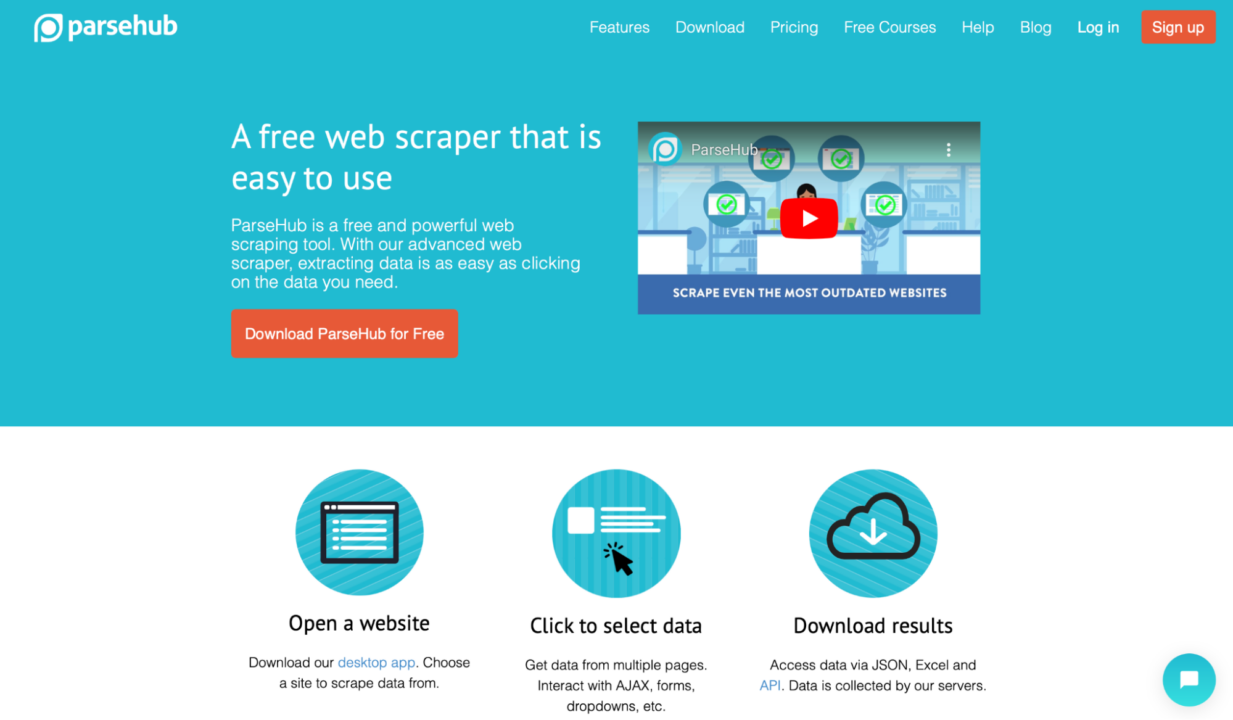
To use ParseHub, open a website of your choice and click on the data you want to extract. There’s no coding required, making this tool super easy to use.
Paid plans include features like image and file saving to DropBox or Amazon S3, IP rotation, and scheduling. Free plan users get 200 pages per run, with a 14-day data retention period.
ParseHub Key features
- Point-and-click interface
- Cloud-based data collection and storage
- Scheduled data collection
Using ParseHub
To get started with ParseHub:
- Download the ParseHub application from the official website and install it on your computer. Then, sign in to your ParseHub account. The main dashboard is clean and intuitive. It looks as follows:

The main dashboard shows access and shortcuts to your “Recent Projects” and “Recent Runs” and tutorials to help you get started with Parsehub.
- Click “New Project” in the main dashboard to create a new project.
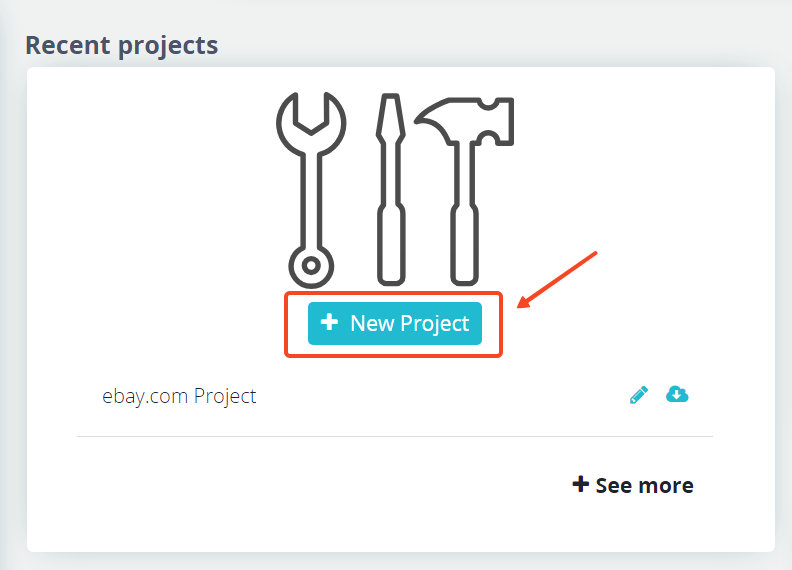
- Enter the URL of the website you want to scrape. For example, to scrape Apple Watch listings on eBay:
https://www.ebay.com/sch/i.html?_nkw=apple+watch.
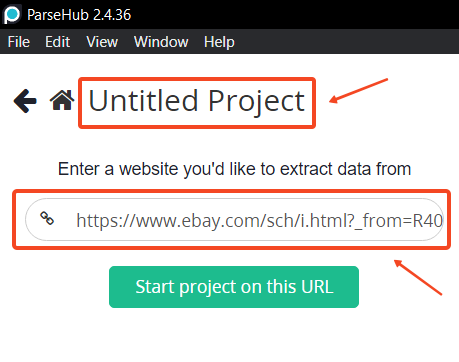
Once you enter the URL, the web interface will display the webpage on the right side and the controls on the left side.
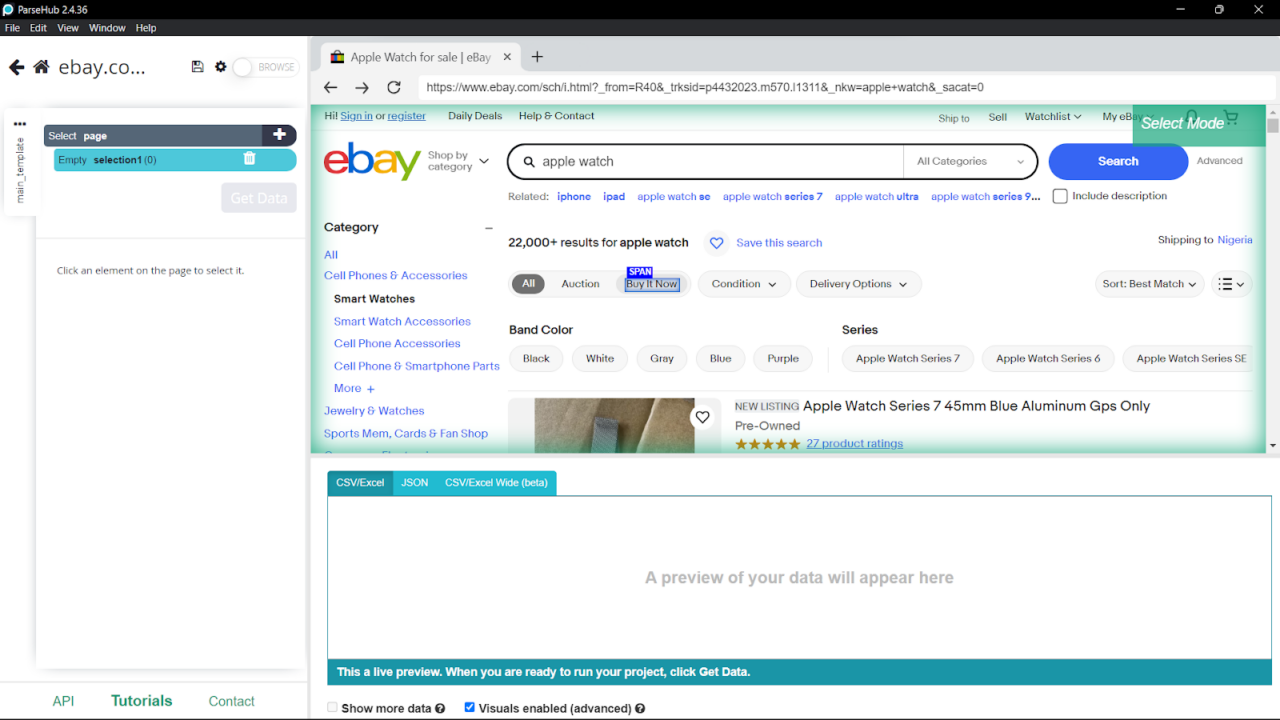
- Use the selection tools to click on the data you want to extract:

- Customize your selection by choosing options like Select, Relative Select, Click, Extract, etc. Specify the data to extract, such as text, images, URLs, or attributes:

- Click on “Get Data” and choose “Run,” or choose “Schedule” for later. After extraction, export your data in CSV, Excel, or JSON formats. Alternatively, connect to other platforms using ParseHub’s API or webhooks.
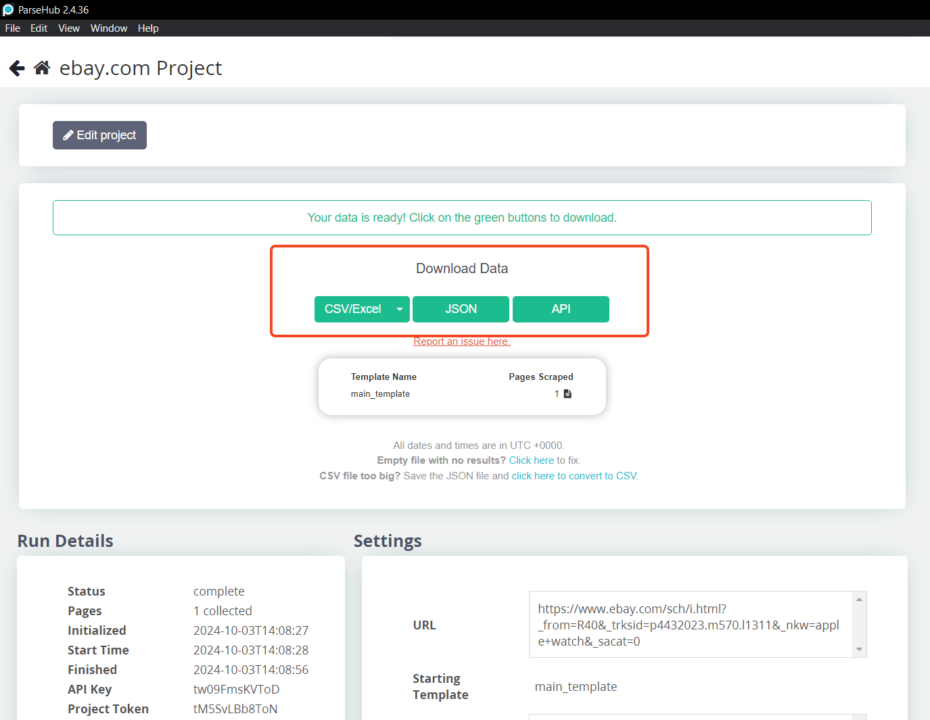
With Parsehub, you can perform a simple web scrape without much training. But you’ll need to follow a learning curve to get the most out of this web scraping tool.
ParseHub Pricing
Though ParseHub is known as the free web-scraping solution, that’s only half true. There is a free version with limited features, but there are three other paid plans as well: Standard ($189 per month), Professional ($599 per month), and Enterprise (custom pricing, pricing upon request only).
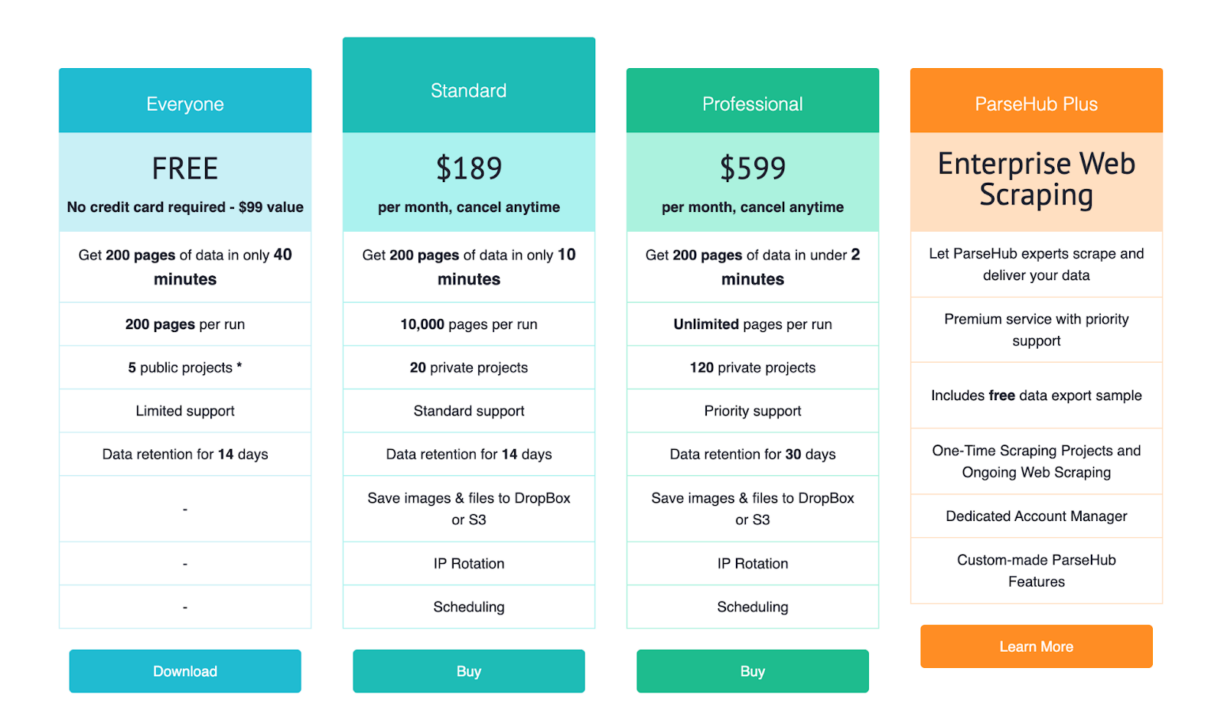
Note: Prices may vary if billed annually.
While the Free plan allows you to test the waters with limited features, upgrading to the Standard or Professional plans unlocks additional capabilities like increased page limits, concurrent runs, scheduling, IP rotation, and API access. However, these plans are on the pricier side compared to other alternatives.
Limitations
Despite its user-friendly interface and powerful features, ParseHub has some limitations:
- High Cost: ParseHub’s paid plans are relatively expensive, especially for large-scale projects.
- No Ecommerce Templates: Lacks specific templates for popular ecommerce platforms, requiring users to build custom scrapers from scratch.
- Learning Curve: Although coding is not required, setting up complex scraping tasks can be time-consuming and may require a deeper understanding of the tool.
- Customer Support: Free users have limited support, although advanced support options are available in higher-tier plans.
Why ScraperAPI Is Better
ScraperAPI offers several advantages over ParseHub, making it a more suitable choice for large-scale and simple scraping projects:
- Cost-Effective Pricing: ScraperAPI provides generous API credits at lower price points. For example, the $49/month Hobby plan offers 100,000 API credits, which is way more affordable than ParseHub’s Standard plan, which costs $189/month.
- Easy Integration: Developers can integrate ScraperAPI into their existing workflows with a simple API without installing additional software.
- Specialized Ecommerce Endpoints: ScraperAPI provides ready-made endpoints for major e-commerce platforms like Amazon and Walmart, eliminating the need to build custom scrapers.
All this, while providing advanced automation options via DataPipeline and DataPipeline endpoints and Async Scraper to handle large request volumes.
Factors to Consider When Selecting an Automatic Scraping Tool
When choosing a web scraping tool, consider the following key factors:
- Automation Features: Look for automation capabilities like scheduling tasks, automated CAPTCHA solving, and automatic management of cookies and sessions.
- Ease of Use: Assess the learning curve, user interface, and available documentation to ensure it’s accessible for those who will use it.
- Scalability: Evaluate how well the tool handles large-scale data extraction and its ability to adapt to increasing data volumes or requests.
- Data Extraction Capabilities: The tool should support various data formats and extract content from different web structures, including static HTML and dynamic JavaScript sites.
- IP Rotation and Proxy Support: Ensure the tool provides robust IP rotation and proxy management to prevent being blocked by more sophisticated websites.
By carefully considering these factors, you can select an automatic scraping tool that best meets your technical needs and project requirements.
Related: How to choose the right web scraping tool.
Conclusion
This article has explored ScrapingBee’s features and limitations in automating web scraping tasks from a technical perspective. We also looked at several alternatives, including ScraperAPI, Octoparse, WebScraper.io, and ParseHub.
Web scraping tools are available for everyone, from those who prefer no-code solutions to seasoned developers seeking advanced features. Choosing the best ScrapingBee alternative often comes down to price, ease of use, and the specific features that meet your project’s needs.
Working on a large data automation project? Contact our sales team to get started with a custom plan that includes all premium features, dedicated support Slack channels, and a dedicated account manager.
Related Resources:

